- Security
- Privacy
- Performance
Has your mouse disappeared? Don’t panic; it hasn’t run off to start a new life with another monitor. It’s a common glitch, and we’ve tested the best fixes for you. From keyboard tricks to driver updates, discover these 11 proven ways to coax back your cursor. Then, keep your computer running smoothly by regularly updating your drivers with a handy tool.

This Article Contains
This Article Contains
Before diving into complicated fixes, it’s best to start with the basics. You’d be surprised how often a cursor not showing up on your laptop or PC is caused by something simple, like a loose connection or an unresponsive mouse.
You can jump straight to your preferred fix here:
Check for connectivity issues
Whether you’re using a HP laptop or diving into a project on a Dell PC, no machine is immune to vanishing cursor syndrome. Checking for connectivity issues is a simple and logical place to start.
For a wired mouse:
-
Unplug the mouse cable from your laptop or desktop and wait a few seconds before plugging it in again. Sometimes, a quick reconnection is enough of a nudge to remind your mouse and device to “speak” nicely to each other again.
-
If that doesn’t work, try plugging your mouse into a different USB port. Ports can fail or temporarily glitch, and your mouse might just need a new “home.”
-
Inspect the mouse cable for kinks or signs of wear, like fraying, which means it’s probably time for a new mouse.
For a wireless mouse:
-
Remove the USB receiver (the small attachment that plugs into your laptop or PC) and reinsert it. Sometimes the connection can fail to register correctly.
-
If that doesn’t solve the problem, replace the batteries in your mouse. Weak or dying batteries are a common culprit behind disappearing cursors.
-
Double-check that the wireless sensor underneath isn’t dirty and that it’s on a suitable surface, like a mouse pad.
These quick checks will eliminate the most common connectivity problems. If your mouse is still AWOL, don’t panic! There are plenty of other methods to try.
Make sure your mouse and pointer are enabled
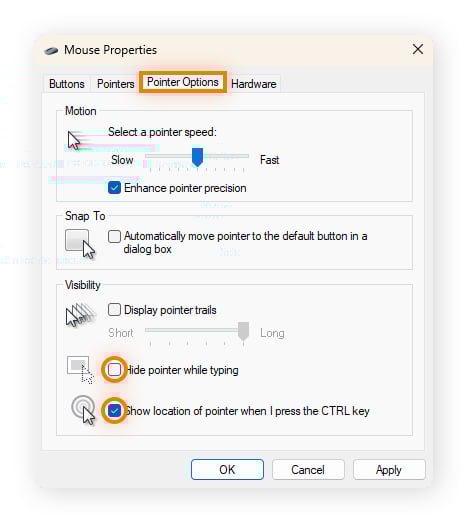
Windows lets you quickly find your cursor by highlighting it when you hit the CTRL key — you just need to enable the feature. It also offers a “Hide pointer while typing” option, which is meant to reduce distractions, but it can mislead you into thinking there’s a problem. You can turn this on and off easily too, in the same menu.
Here’s how on Windows 10 and 11.
-
Press the Windows key + I to open Settings (that’s an “i” – not an “l”).
-
On Windows 11: Press tab, then use the down arrow to move to Bluetooth & devices, and hit Enter. On Windows 10: Use the arrow keys to move to Devices, and hit Enter.
-
Use the tab and arrow keys to move to the right and down to Mouse, and press Enter.
-
Press tab until you reach Additional mouse settings (Windows 11) or Additional mouse options (Windows 10), then hit Enter.
-
Press tab, then right arrow across until you reach the Pointer Options tab.
-
Tab down to Hide pointer while typing, then press Spacebar to deselect it. Then tab to Show location of pointer when I press the CTRL key and press Spacebar to select it. Hit Enter to confirm your choices.
Check touchpad settings
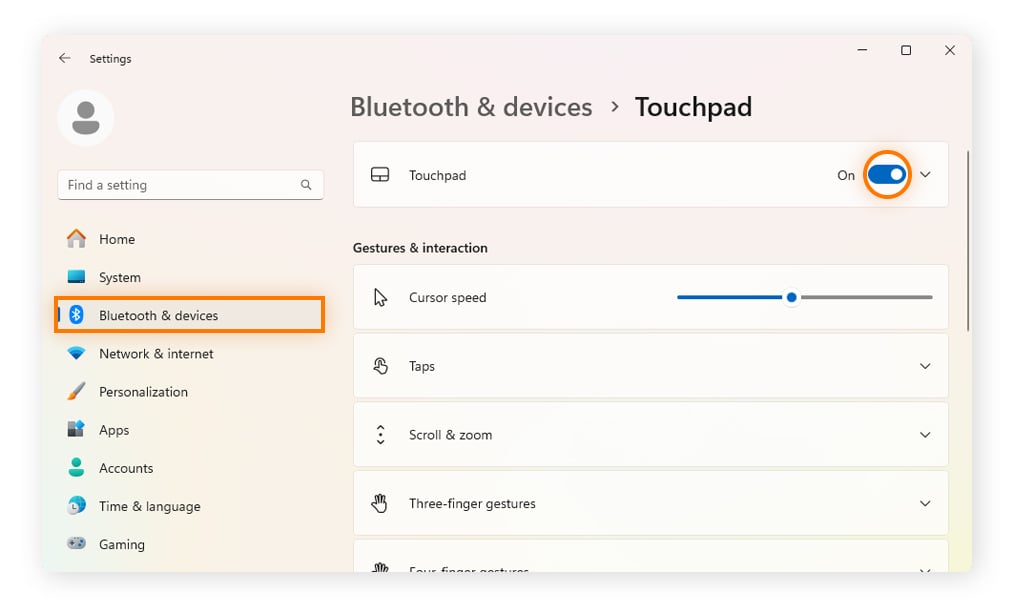
If you’re still missing your cursor, then your laptop’s touchpad might be to blame. It can be disabled accidentally via a keyboard shortcut or system setting — making it look like the touchpad cursor has disappeared.
Here’s how to check and re-enable your touchpad without using your missing mouse on Windows 10 or 11:
-
Press Windows key + I to open Settings.
-
Use the tab and down arrow to reach Bluetooth & devices (Windows 11) or Devices (Windows 10). Hit Enter.
-
Use the tab and down arrow until you reach Touchpad settings. Toggle on by pressing the spacebar.
Once enabled, your cursor should reappear, and you’ll be back in control.
Restart your PC
If you’re still yelling, “Where did my cursor go?”, it might be time for the age-old trick of switching your PC off and then on again. Thankfully, you can use keyboard shortcuts to access the shutdown options without your mouse.
-
Press the Ctrl + Alt + Delete keys simultaneously.
-
Use the tab or arrow keys to navigate to the power icon (or similar) on the bottom right with options to sleep (or lock), shut down, or restart.
-
Choose the Restart option and press Enter.
Use built-in Windows troubleshooting
If you’re still wondering how to get your mouse pointer back, try accessing the troubleshooters in Windows. These tools can automatically detect and fix common issues with hardware, Bluetooth, and input devices.
Note: The built-in Microsoft Diagnostic Support and Troubleshooters are being retired. The steps for this only work if you’re running Windows 11 version 22H2 or older, Windows 10, or any other earlier OS version.
Here’s how to launch and run diagnostic tools (without needing your mouse):
-
Press Windows key + R to open the Run dialog box.
-
Type in msdt.exe -id DeviceDiagnostic and press enter.
-
The Hardware and Devices Troubleshooter window will open.
-
Use the tab key to move to Next. Press Enter.
-
Windows will now scan for problems with your mouse, touchpad, and other hardware. If issues are found, follow the prompts to apply the recommended fixes (and navigate using tab and enter).
If you’re using a wireless Bluetooth mouse, refer to the Bluetooth troubleshooter.
Update or reinstall drivers
If your cursor is still playing a game of “Lost on a laptop,” it could be time to learn how to fix common driver problems in Windows. It’s also essential to regularly update Windows drivers because corrupted or outdated drivers are a common cause of the cursor disappearing in Windows 10 or 11. Updating your drivers can improve performance in other areas too.
Tools like Avast Driver Updater make light work of this. It’s designed to automatically scan for driver updates to help improve graphics, sound, and gaming. This can also help reduce freezing, crashing, and other common issues, like a missing mouse cursor. Try it for free today, with no card details needed.
Using a reputable PC driver updater tool is by far the simplest and safest way to install new driver updates. But there are also several manual options.
Update drivers using Device Manager
-
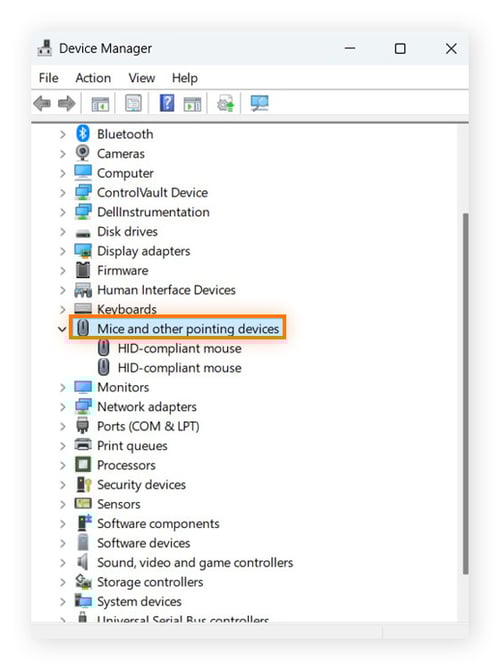
Press Windows + X, then use the down arrow to select Device Manager, and hit Enter.
-
Tab, then use the down arrow to highlight Mice and other pointing devices. (If you can’t see it, check Human Interface Devices or Bluetooth for wireless mice).
-
Press the right arrow to expand the category.
-
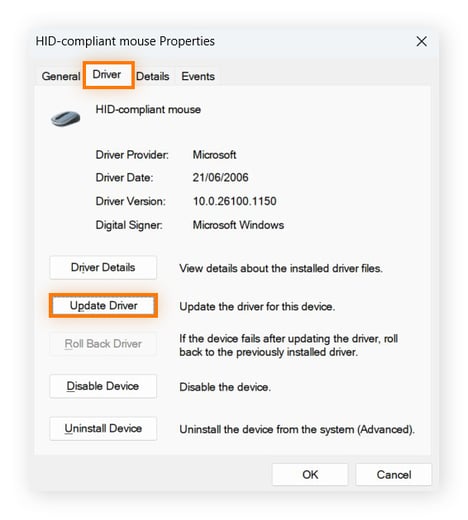
Use the down arrow to select your device, then press Enter.
-
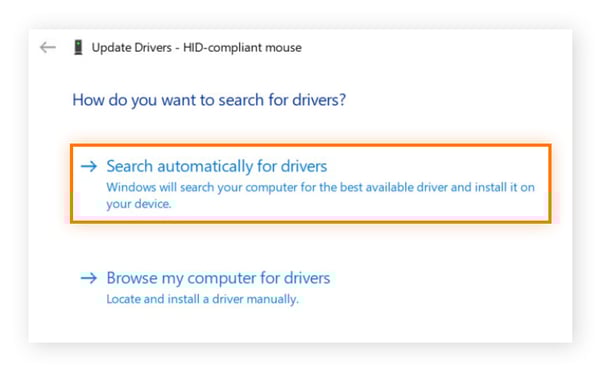
Use the right arrow to highlight the Driver tab. Then tab down to Update Driver and hit Enter.
-
Search automatically for drivers should be highlighted. Hit Enter. Windows will search and install drivers for your mouse if it finds any.
-
Follow any on-screen instructions, and Restart if prompted.
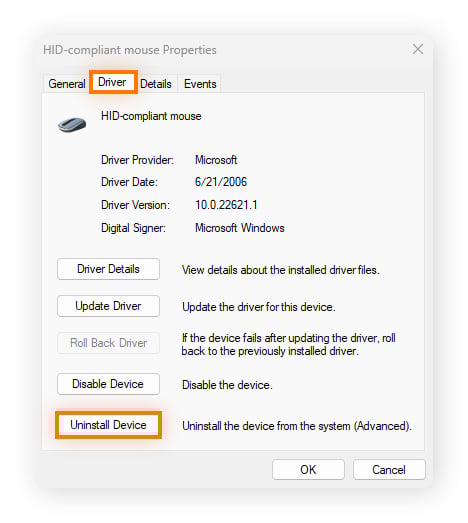
Reinstall drivers using Device Manager
-
Follow steps 1-5 as above, but tab down to Uninstall device in step 5, instead of Update Driver.
-
Confirm the uninstallation (and whether to delete the driver software) if prompted.
-
Restart your computer to complete the driver removal.
-
Windows will automatically look for and reinstall the latest driver upon restarting.
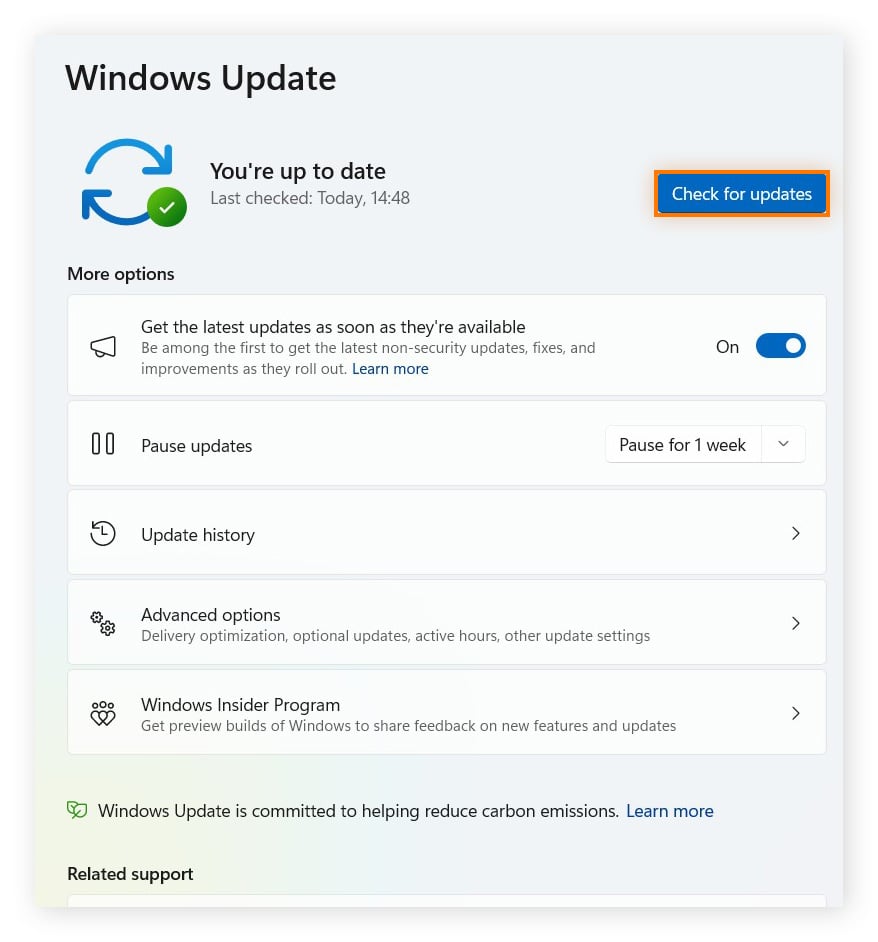
Update your OS
Microsoft regularly pushes out operating system (OS) updates. Don’t ignore them! They’re vital to help fix security loopholes, USB/Bluetooth glitches, and touchpad bugs — precisely the sort of issues that could be behind the cursor not showing up on your laptop or PC.
Here’s how to perform a quick update check using the keyboard only:
-
Press Windows + R and then type ms-settings:windowsupdate, and hit Enter.
-
Tab across until you reach Check for updates, and hit Enter.
-
After the scan, tab to Download & install (or Install now), then press Enter.
-
When prompted, tab to Restart now (or Schedule the restart), then press Enter.
Some vendors also ship fixes via their apps (e.g., Lenovo Vantage, Dell Command, and HP Support Assistant). It’s worth running those after your Windows Update finishes.
Find out more about how to update Windows 10 and how to update Windows 11, including the system requirements for Windows 11.
Clear the cache
If you’re still pondering where your pointer has gone, try clearing your cache. This can help if cached data is corrupted, because it forces Windows to rebuild fresh system and driver data, which can restore the missing cursor.
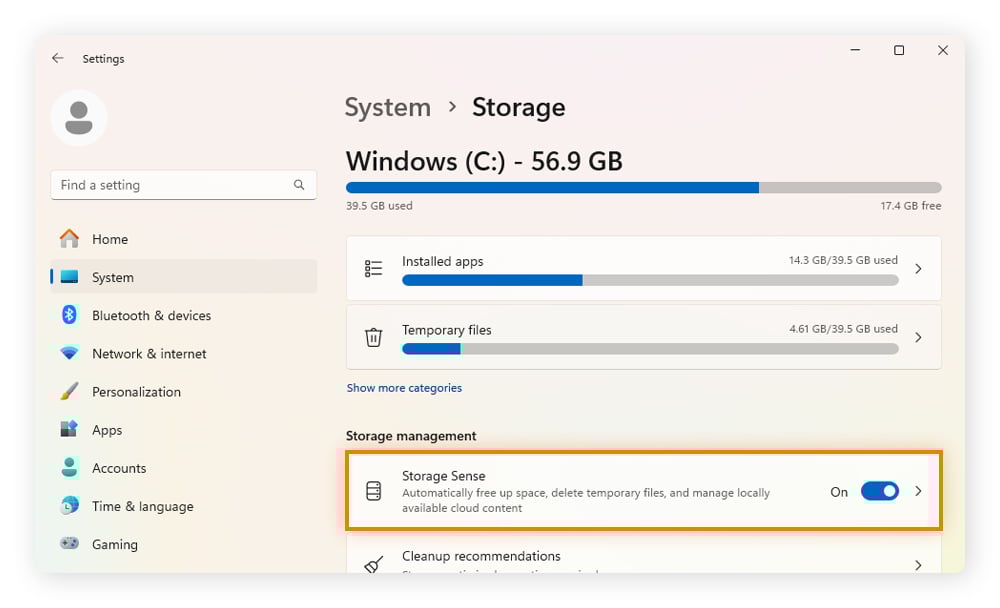
Windows comes with a Disk Cleanup function that scans your hard drive for unnecessary files (such as temporary files, system files, and files in the recycle bin) and then helps you safely delete them. This can help free up space, cut clutter, and boost system performance.
Using Windows Settings
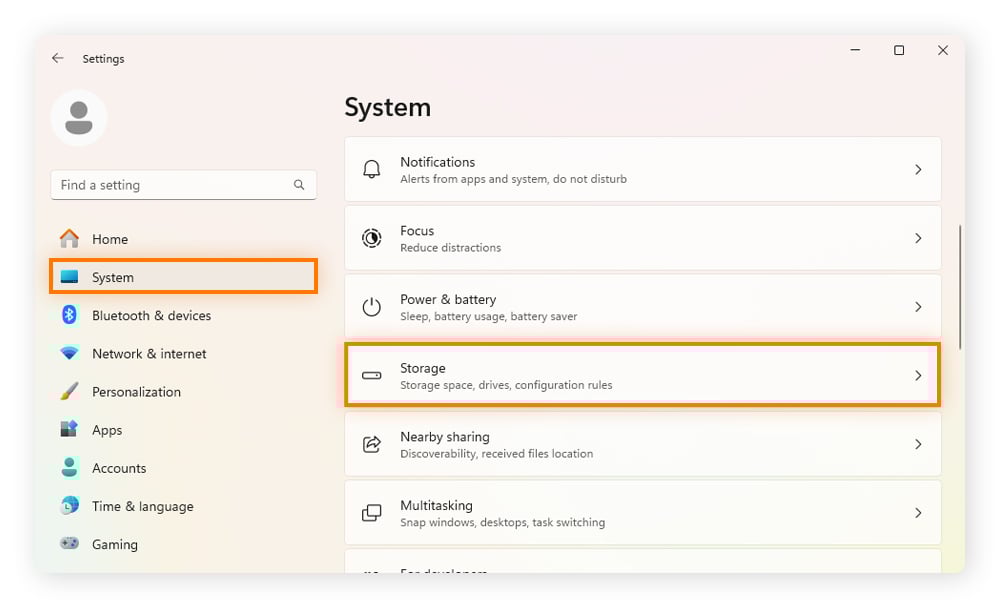
In Windows 11:
-
Press Windows + I to open the Settings window.
-
Press tab, then arrow down to System and hit Enter. Tab across and then arrow down to Storage and press Enter.
-
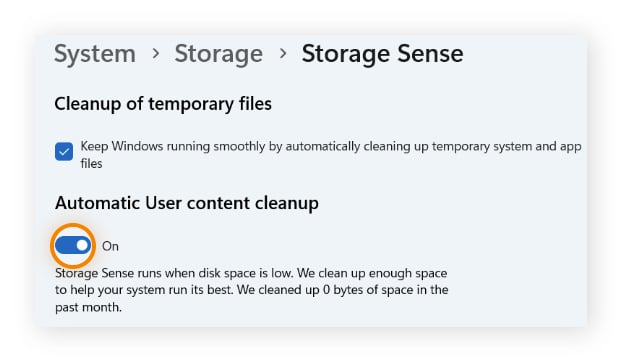
Within the Storage settings, tab and arrow down to Storage Sense, and hit Enter.
-
Tab to Automatic User content cleanup and toggle the switch to on by pressing the spacebar.
-
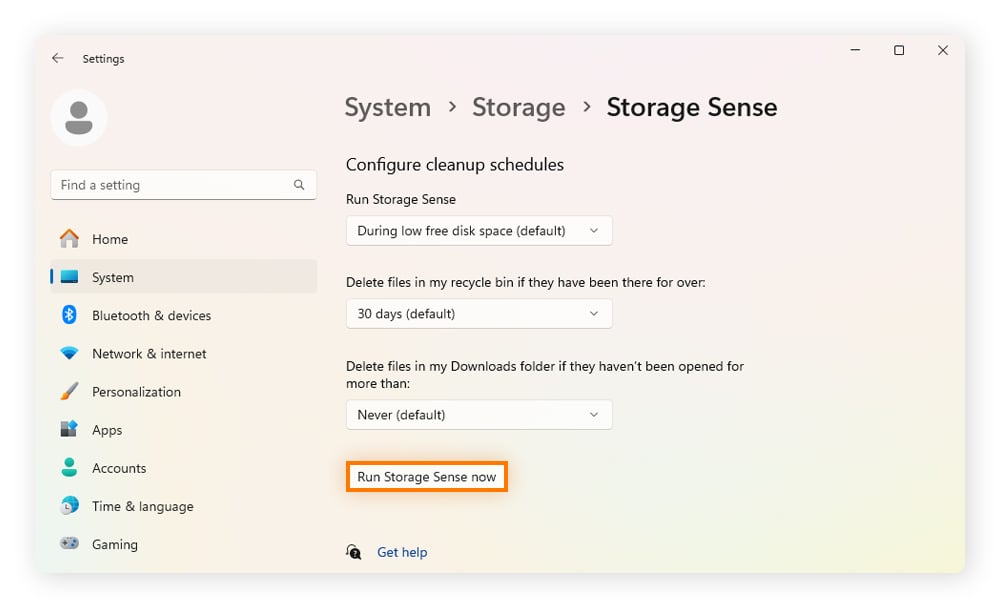
Tab to the Run Storage Sense now button, and hit Enter.
In Windows 10:
-
Press Windows + I > go to System > Storage > Configure Storage Sense or run it now. Tick Delete temporary files that my apps aren't using and Clean now.
Using Disk Cleanup
-
Press the Windows key, type Disk Cleanup, and press Enter.
-
Tab into the section Files to delete, then arrow down to Temporary files, and press the spacebar to check the box, and click OK.
-
When prompted, choose Delete files.
Switch hardware acceleration on and off
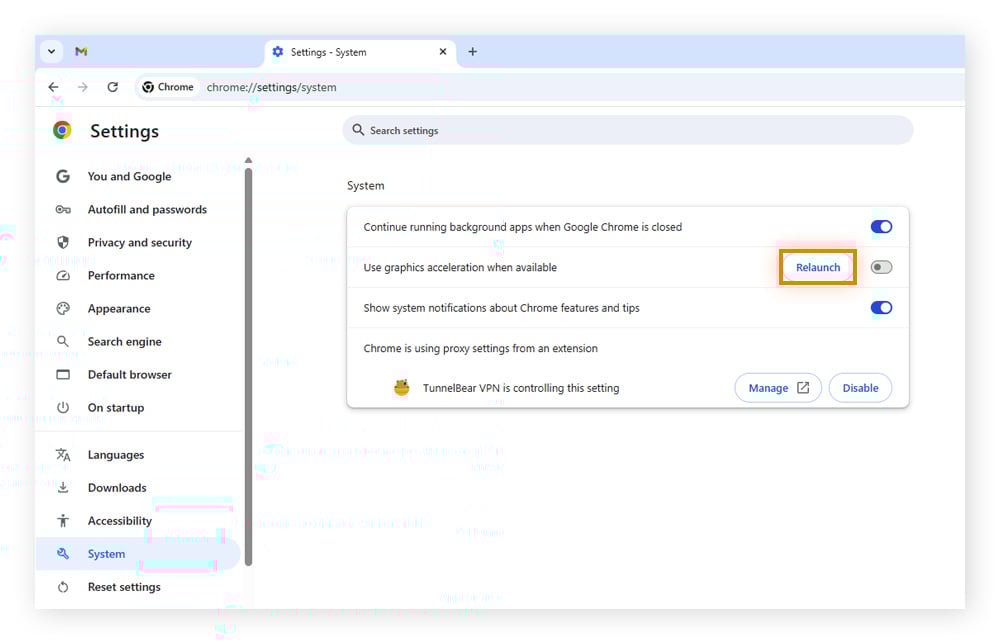
Hardware acceleration lets Chrome hand over graphics functions (like page rendering and video animations) to the graphics processing unit (GPU) instead of your central processing unit or CPU.
If the GPU isn’t working optimally, your cursor can flicker or vanish when you’re using Chrome. Follow these keyboard-only steps (in Windows 10 and 11) to determine if this is the issue and change the setting.
-
Press Windows + R, type chrome, and press Enter.
-
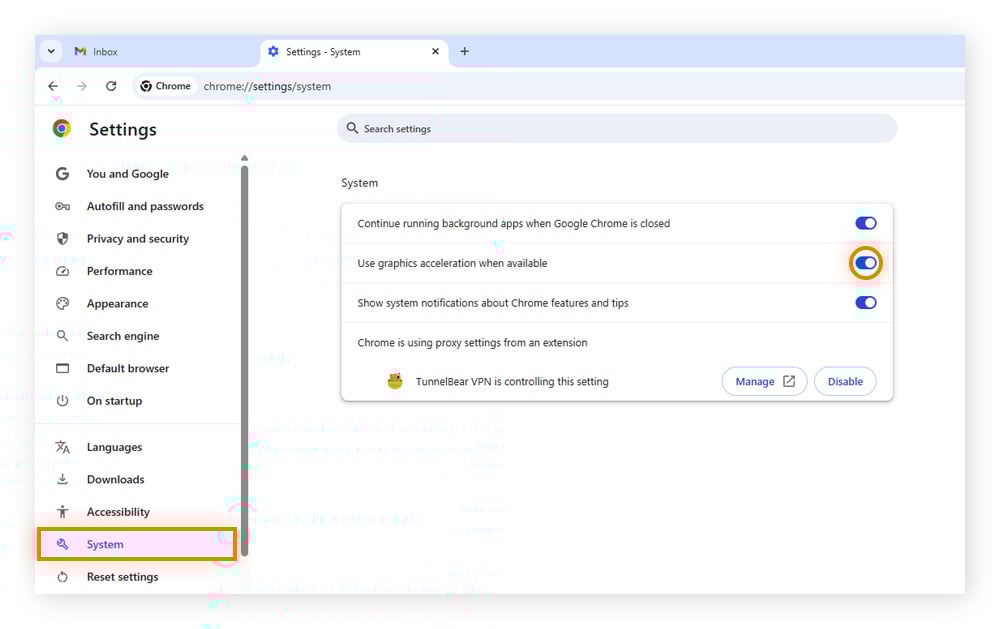
Press Ctrl + L and type chrome://settings/system. Press enter.
-
Tab across to Use graphics acceleration when available.
-
Press the spacebar to switch to the opposite setting. So, if it was switched on, turn it off.
-
A Relaunch button appears. Press tab to highlight it, and then Enter to restart Chrome.
-
Test the cursor on a web page.
This trick also applies to Microsoft Edge (use edge://settings/system) and other apps.
If turning it off fixes your cursor problem, but you notice slower video playback, update your graphics driver and then try turning it back on. If turning it on makes Chrome/Edge snappier and your cursor behaves, you’re safe to leave it that way.
Run a malware scan
If your device has been exhibiting strange behavior — such as unusual slowdowns, strange pop-ups, or programs running without your permission — malware could be the culprit. Viruses and other malicious programs can corrupt system files, disable drivers, steal data, hijack resources, and leave your mouse unresponsive.
They often sneak in through malicious third-party apps, fake updates, or accidental downloads from phishing links and attachments.
A malware removal and prevention tool scans your system for harmful files, quarantines or deletes them, and helps block future threats. Running a full scan is a quick way to rule out infections, and stamping out malware might bring your errant cursor back.
If you’re keen to strengthen your digital defenses, use a reputable program like Avast Free Antivirus. It provides real-time protection against malware like viruses, spyware, and ransomware, plus includes features to help block malicious websites, scams, and unsafe downloads.
Repair system files
If malware isn’t to blame, your absent mouse might be the victim of corrupted or missing system files. These files are essential for Windows to run properly, so repairing them can address underlying problems that might be interfering with your mouse.
One example is svchost.exe (Service Host), a critical process that runs many background services. If it becomes corrupted, your system (and mouse) might behave unpredictably.
Windows includes a built-in tool called System File Checker (SFC) to repair or replace damaged files with clean versions, restoring stability to systems and drivers. Follow these steps to run the SFC, but note you must be signed in as an administrator to wield these powers:
-
Press Win+X and use the arrow keys to select Command Prompt (Admin) or Windows PowerShell (Admin).
-
In the User Account Control pop-up, use the arrow keys to select Yes, then hit Enter.
-
Type sfc /scannow and press Enter.
-
SFC will now check the integrity of your Windows files and repair any broken ones. Once SFC is done, reboot your computer.
Keep your computer operating smoothly with Avast Driver Updater
Updating computer drivers is an essential, but often overlooked, part of routine PC maintenance. Drivers allow your computer to communicate with devices like your mouse. Avast Driver Updater is your one-click update aide to help your machine perform at its best. It also helps keep you safer from security vulnerabilities in corrupted drivers. Try it today, and enjoy better performance and security.
What customers say
More Performance Articles
Facebook Session Expired: Causes, Solutions, and Prevention

How to Get Your Mouse Cursor Back: 11 Tried and Tested Methods
How to Split Screens on Your PC or Laptop (Windows 10 & 11)

Your Phone Is Not Registered On a Network: What It Means and How to Fix It

Why Won't My iPhone Turn On? 6 Easy Fixes to Try

Why Your iPhone Gets So Hot and How to Fix It

Why Is My Ping So High and How to Reduce It

Why Your Keyboard Isn’t Working and How to Fix It in 6 Easy Steps

How to Right-Click on Mac With or Without a Mouse

How to Test for Packet Loss and Check Your Internet Quality

How to Fix Common Printer Problems

Why Does My Phone Keep Restarting and How Can I Fix It?
Performance Tips
Performance
Nicola Massier-Dhillon
16-10-2025