- Security
- Privacy
- Performance
Is your Mac running slower than it used to? Chances are, it's cluttered with junk files, outdated caches, and other digital debris that's taking up valuable storage and dragging down performance. Keep reading to discover how to clean up disk space on your Mac manually, or use a tool like Cleanup to help get your machine running like new again.




This Article Contains
This Article Contains
Key actions for cleaning up your Mac
To help get your Mac running smoothly again, start with these key wins to reclaim space, reduce clutter, and free up system resources:
-
Remove what you don’t use. Uninstall unused apps, delete large files, and clear out Downloads and Desktop clutter — this gives the biggest immediate space boost.
-
Clear hidden junk files. Clean up cache, temporary files, logs, and “Other Storage” to free up space that isn’t obvious but slows your system.
-
Use a cleanup tool (or system storage view). Quickly identify what’s taking up space and remove duplicates, junk, and leftover files in bulk.
-
Reduce background load. Remove unnecessary login items and old backups to improve startup speed and overall performance.
-
Offload and maintain regularly. Move files to iCloud or an external drive, empty the Trash, and build simple habits to keep clutter from creeping back.
13 tips to clear up space on a Mac
Running low on storage slows everything down on your Mac — from app performance to basic file saves. The good news: there are multiple proven ways to reclaim space, whether that's deleting unused apps, clearing hidden files, or managing your data more efficiently.
Here are 13 tried-and-tested tips to free up space on a Mac:
1. Use a Mac cleanup tool
Automatic cleanup tools scan your Mac for junk files, duplicates, and unused apps, then remove them to save the effort and risk of manually clearing storage on your Mac. A dedicated tool like Cleanup can help identify and remove files and unused apps both quickly and safely.
Identify what's taking up space
Instead of manually digging through folders for oversized files or forgotten downloads, Cleanup breaks your storage down into clear categories — large files, system junk, apps, duplicates, and browser data. It highlights safe-to-remove items and lets you delete them in bulk.
To identify space-hoggers, download Cleanup, open it via the Avast One app, navigate to the Status section, and click Scan.
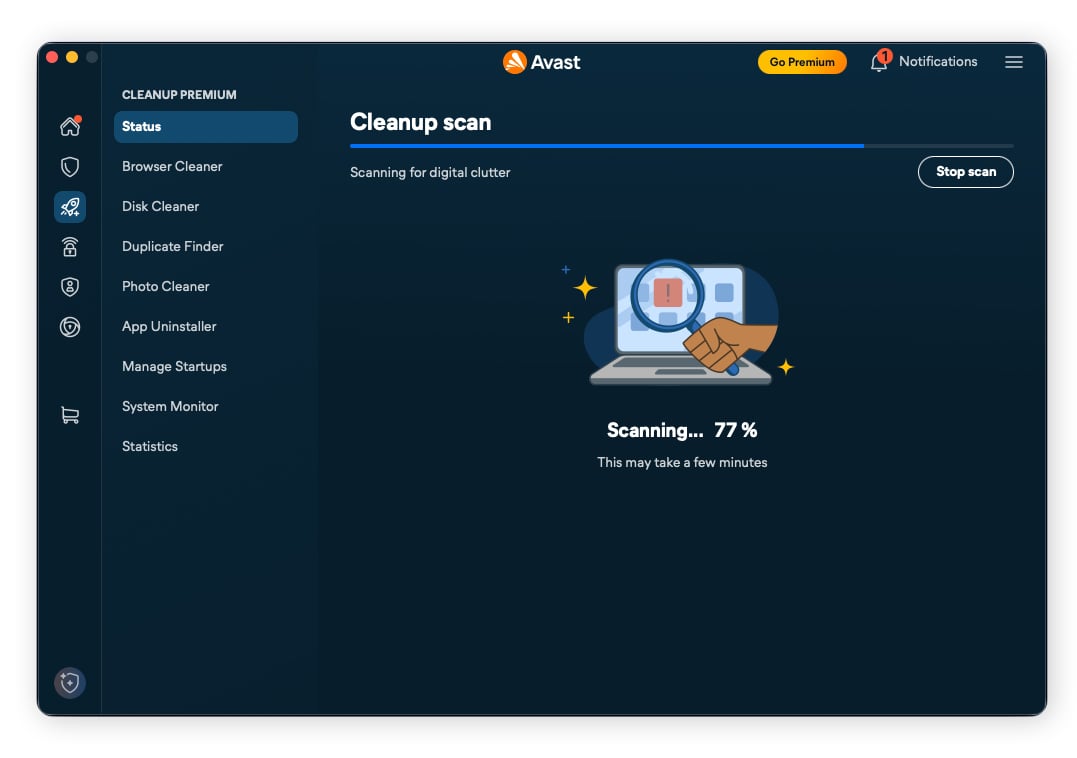
Automatically clean your disk space
Once you’ve installed Cleanup and run a scan to find out which files and data are taking up disk space, simply select the items you’d like to remove, and then click Clean to automatically reclaim precious disk space.
Bulk delete duplicated photos & files
Here’s how to remove duplicate files using Cleanup:
-
Install and open Cleanup, select Duplicate Finder from the Cleanup menu, and then click Find duplicates.
-
Select your user folder (entire hard disk, or external hard disks), click Scan for duplicates, review duplicates, select the items you no longer need, and click Delete.
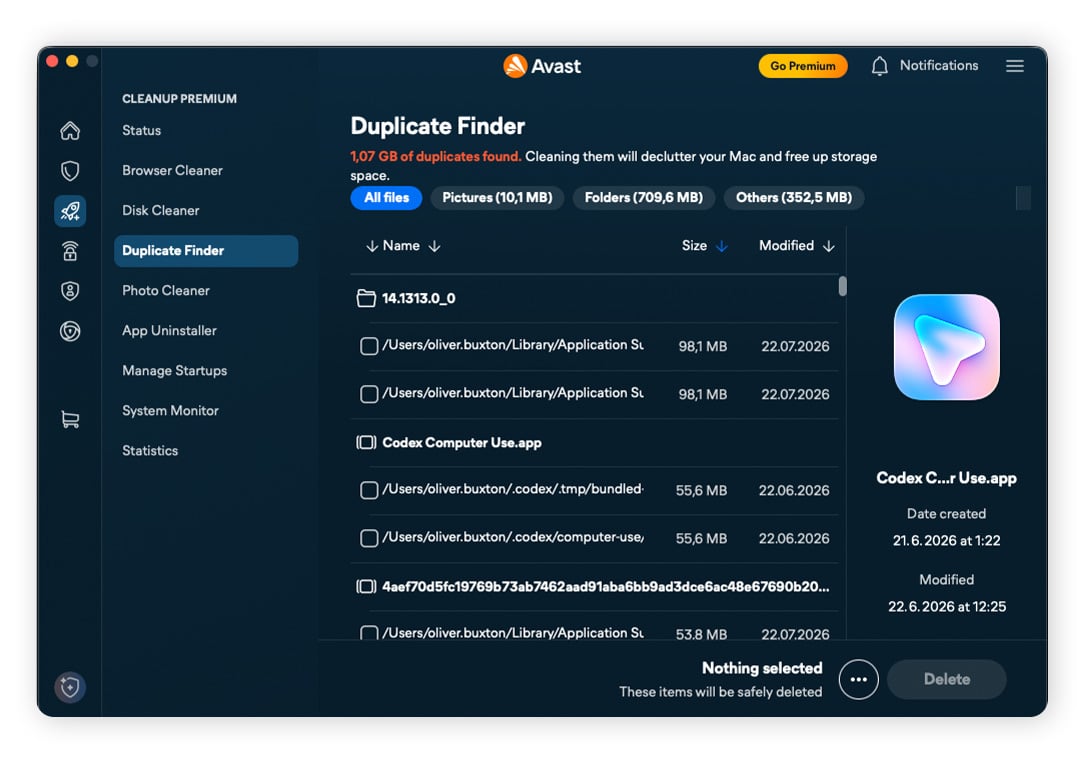
Cleanup can also declutter your photo library using its Photo Cleaner tool:
-
Open Cleanup, select Photo Cleaner from the Cleanup menu, click Look for photos, and choose all the locations on your Mac where your photos are stored.
-
Click Scan for photos, review the results, select photos you don’t want or need, and click Delete.
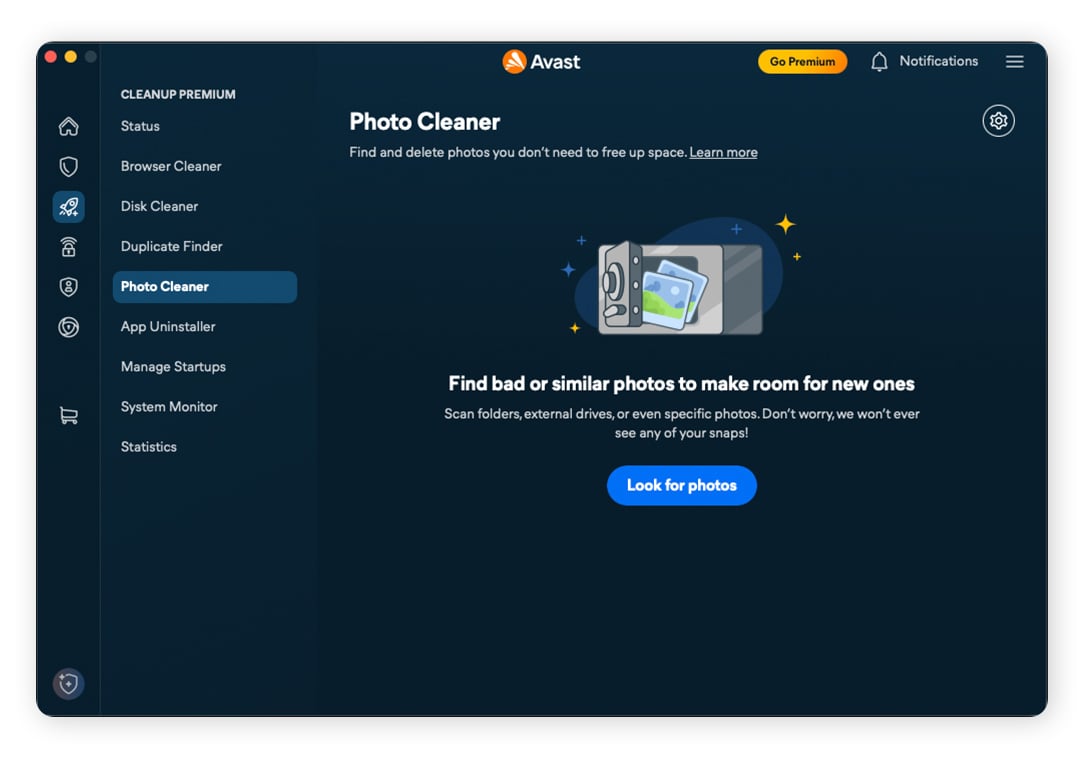
Automate browser clean-ups
Browsers tend to accumulate large amounts of temporary data over time. Fortunately, you can use Cleanup to clean your web cache and other browser files.
Simply install and open Cleanup, navigate to the Browser Cleaner section, click Start scan, select the browser items you want to clear, and then click Clean.
Remove unwanted apps automatically
You can also automate app removal using a dedicated cleanup tool. Cleanup for Mac makes it easy to identify outdated apps and uninstall multiple obsolete ones at once.
-
Install and open Cleanup for Mac, and click App Uninstaller followed by Scan for apps.
-
Select the apps you don’t need, and click Uninstall.
-
Then, navigate to Big to find storage-heavy apps, select apps you don't need, and click Uninstall.
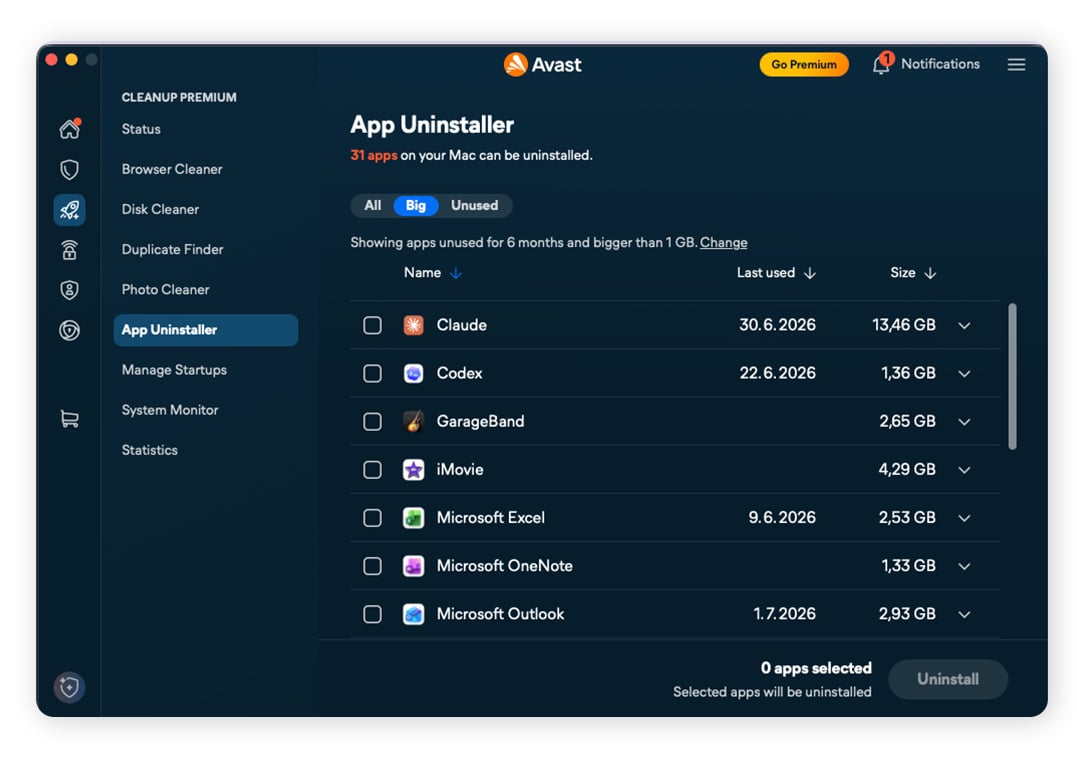
Keep your Mac running smoothly with Cleanup. From cluttered downloads to duplicate photos and bulky apps, it helps you reclaim space fast — minus the manual effort.
2. Update your software
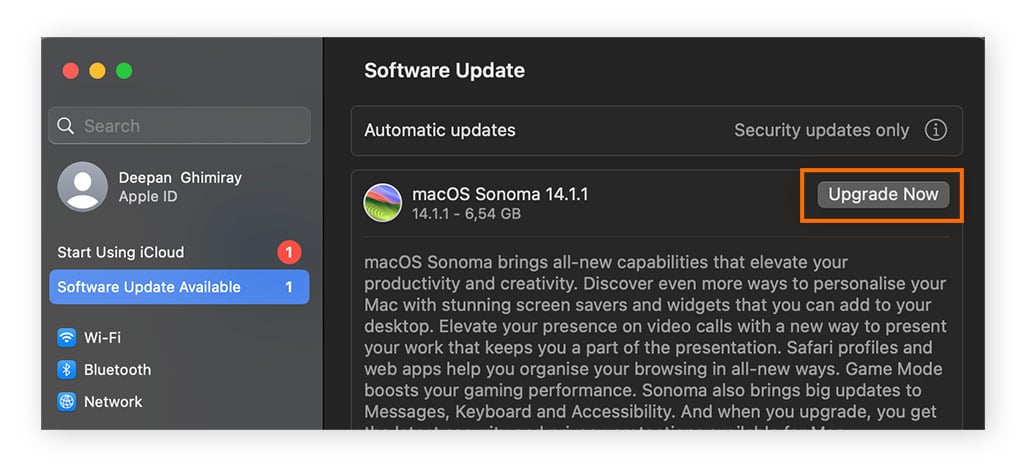
Keeping macOS and system software up to date can optimize how files are stored and managed, and updates sometimes reduce software file size without affecting functionality.
To update your macOS software, click the Apple logo (top-left of the screen) > System Settings > Software Update Available > Upgrade Now.
3. Get rid of apps
Even apps you no longer use can leave behind background data, login items, and leftover files that consume storage and slow down your Mac. Removing unnecessary apps can free up disk space, reduce clutter, and help your Mac run more efficiently.
Here’s how to uninstall Mac apps you no longer need:
-
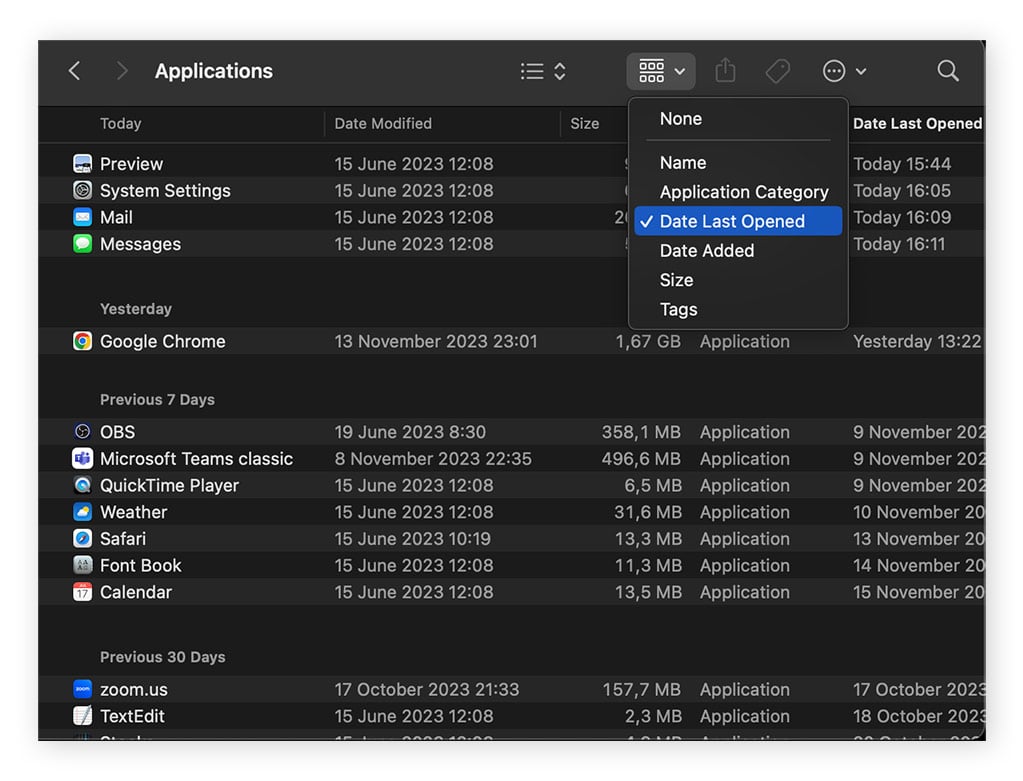
Click the Finder icon (in your dock) and then click Applications (in the left sidebar).
-
Using the filter drop-down, select Date Last Opened to filter your apps according to the last time you opened them.
-
Right-click any app you want to remove and select Move to Bin.
4. Clean up Other Storage
Other Storage on Mac is a category that includes system files, caches, logs, and leftover data that macOS doesn’t clearly label as documents, apps, or photos. It can build up quietly in the background and take up a large amount of space without you realising it.
Clearing Other Storage can help free up this hidden space and may improve performance by giving your Mac more room to run efficiently without unnecessary clutter slowing it down.
Delete temporary files
Temporary files are short-term files created while your Mac or apps are working (like during installs, updates, or file processing). They’re supposed to be deleted automatically once the task is done — but sometimes they get left behind and become unnecessary junk if not cleared.
Here is how to remove temporary system files on macOS:
-
Open Finder, press Command + Shift + G, type “/private/var/folders”, and press Enter.
-
Open the folders, right-click unnecessary temporary files, and select Move to Bin.
-
Click the Apple icon > Restart your Mac to finish the cleanup.
Avoid deleting folders you don’t recognise as they may be important.
Clear your cache
Cache files are data saved by apps and websites to help things load faster next time (like images, login data, or page elements). Although helpful, these files can accumulate over time and take up excessive storage space.
Here’s how to clear your Mac cache files:
-
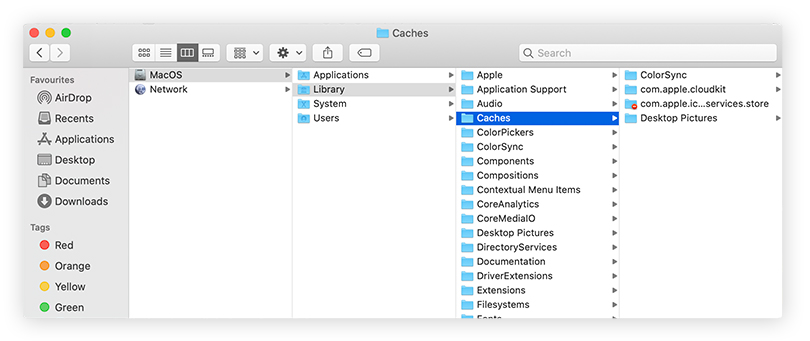
Open Finder, press Shift + Command + G, type “~/Library/Caches”, and click Go.
-
Open the cache folders individually, right-click on files you want to purge, and select Move to Trash.
Remove junk files
System junk files are leftover data from macOS and apps — like outdated preferences and files from uninstalled apps — that build up over time and take up space.
To remove system junk files on Mac, open Finder, press Command + Shift + G to access each location below:
-
Delete leftover app files: Type “~/Library/Application Support”, hit Enter, and look for folders from apps you’ve already uninstalled. Delete only ones you’re sure you no longer need.
-
Remove old preferences: Type “~/Library/Preferences”, hit Enter, and delete “.plist” files linked to removed apps.
-
Clear old macOS update files: Type “~//Library/Updates”, hit Enter, and delete old update files if present.
Only delete files linked to apps you recognise, and avoid removing unknown system files.
Clear system data
System Data includes logs, caches, and other files that macOS creates to record activity, errors, and crashes. While these files help with troubleshooting, many aren't needed for everyday use and can accumulate over time, taking up valuable storage space.
Here’s how to delete old system logs on a Mac:
Open Finder, press Command + Shift + G, type “~/Library/Logs”, press Enter, right-click old or large log files, and select Move to Trash.
5. Practice good file hygiene
Practising good file hygiene helps keep your Mac organized and prevents storage from filling up with unnecessary clutter. Simple habits like organizing files into folders, compressing large files, clearing Downloads, and tidying your photo and video library make it easier to manage space and keep your Mac running smoothly.
Organize files by using folders
Keep folder organization simple — use a few main folders instead of lots of small ones to stay organised.
-
Open Finder and navigate to where your files are stored (e.g. Desktop or Downloads).
-
Right-click New Folder, name the folder clearly (e.g. Work, Photos, Receipts), and drag and drop related files into the folder.
-
Repeat to group different types of files.
Compress large files
Compression is best for large documents, folders, and images — it won’t save much space on already-compressed files like videos or photos.
To compress a file, open Finder, locate and right-click the large file or folder, and select Compress [file/folder name]. A .zip file will be created in the same location.
Once you've confirmed the compressed (.zip) file works, you can delete the original to free up space. You can access the files again at any time by simply double-clicking the .zip file in Finder to uncompress it.
Delete large files
Removing large files is one of the most direct ways to create storage space on your Mac, but you’ll need to identify them first. Here’s how to find and remove large files:
-
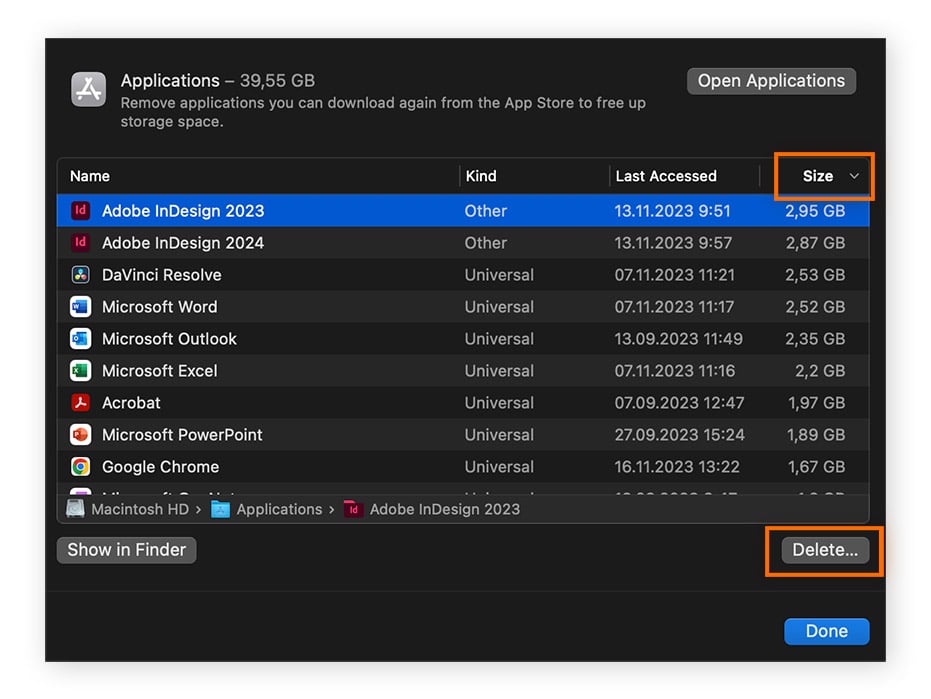
Click the Apple logo (top-left of the screen) > System Settings > General (left sidebar) > Storage.
-
Click the info (i) button for each of the file categories, filter the list by size, select the large files you don’t need, and click Delete… > Done.
Clear your downloads folder
Your Downloads folder stores everything you've downloaded from the web, including documents, installers, images, and disk images. Because many of these files are only needed temporarily, the folder can quickly become cluttered and consume valuable storage space.
Here is how to delete download files you don’t need:
Open Finder, click Downloads (in the left sidebar), select the Size column, review the list, right-click files you don’t need, and select Move to Bin.
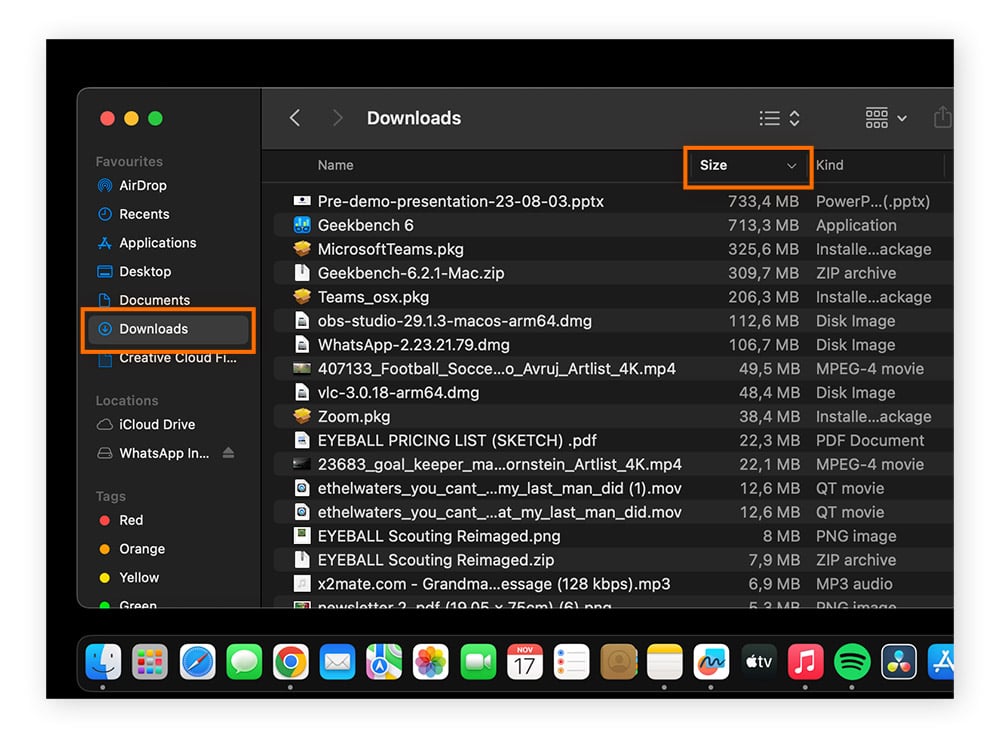
Since this folder accumulates files whenever you download anything, make a habit of clearing the Downloads folder regularly, and then empty your trash.
Tidy up your photo & video library
Photos and videos can be some of the biggest drains of storage space on a Mac. Regularly removing duplicates, blurry shots, outdated screenshots, and unwanted videos can free up space and make your library easier to browse.
Here is how to clean up your Photos app on a Mac:
-
Open Finder > Applications > Photos > Library and scroll through recent imports and albums looking out for:
-
Burst photos (multiple near-identical shots).
-
Blurry or poor quality photos.
-
Repeated images from downloads or messaging apps.
-
-
Right-click the image you want to delete, and select Delete Photo.
You can also delete unwanted videos by clicking on Photos > Videos (left sidebar) > Review your videos > Right-click a video > Delete Video.
6. Remove unnecessary login items
Removing unnecessary login items (apps and services that automatically launch when you log into your account) reduces startup time and prevents apps from consuming resources in the background.
Here is how to remove unneeded login items to help make space on your Mac:
-
Click the Apple logo (top-left of the screen) > System Settings > General (in the left sidebar) > Login Items & Extensions.
-
Review your login items displayed in the window, click the remove button (–) next to the items you want to remove, and then Restart your device to apply the changes.
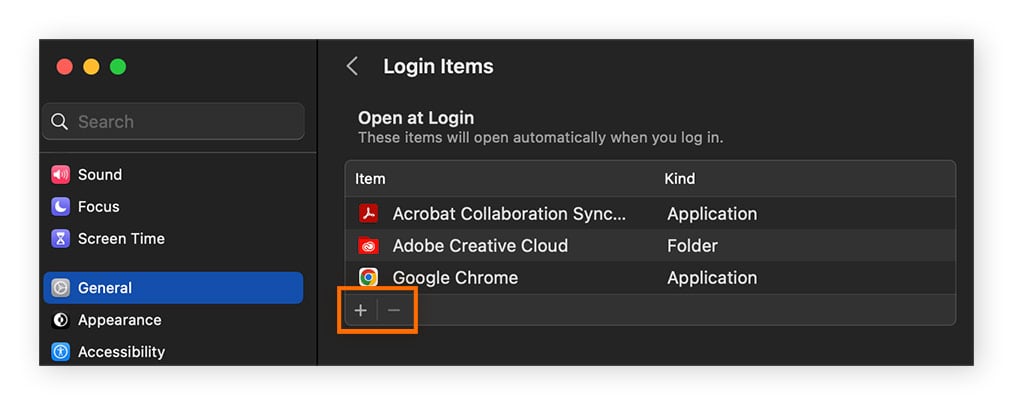
It’s also a good idea to remove non-essential login items such as media apps, messaging apps, cloud storage sync tools, and background updaters. These apps launching automatically when your Mac starts can slow down the startup process and consume system resources during your session, even if you don't need them.
7. Offload your Mac data
Offloading your Mac data to iCloud or an external drive helps clean up your Mac because it moves large or rarely used files off your internal storage, freeing up space for essential system programs and apps to run more efficiently.
iCloud
When files are stored in iCloud Drive, they stay accessible on demand but don’t permanently take up local disk space, while an external drive lets you fully remove them from your Mac without losing them. iCloud enables you to store certain types of files in the cloud, including photos, videos, documents, and backups.
To check iCloud settings, click the Apple logo (top-left of the screen) > System Settings > Apple ID or Apple Account > iCloud > See All, and then Toggle on apps and folders you want to save to iCloud drive, and click Done.
External drive
An external drive is a separate storage device you plug into your Mac to store files that you can use to move large or unused files off your Mac’s internal storage.
-
Plug your external drive into your Mac, and wait for the connection confirmation message.
-
Open Finder, locate the files or folders you want to move (e.g., Downloads, Documents, Photos), and Drag and drop the items onto the external drive.
-
Right-click the external drive, and then select Eject to remove the drive safely when finished.
8. Remove backups
Backups are essential for recovering your files and media if something goes wrong with your Mac. However, older backups can accumulate over time and take up significant storage space. On macOS, backups are typically managed through Time Machine, which automatically creates and stores backup snapshots.
Here’s how to remove old backups:
-
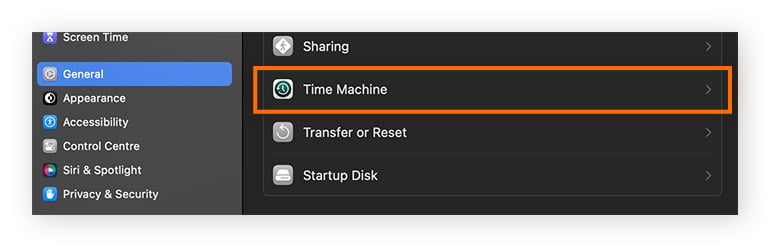
Click the Apple logo (top-left of the screen) > System Settings> General (left sidebar) > Time Machine.
-
Review your backups, click the Remove button (–) to delete a backup, and select Forget Destination when prompted.
9. Remove old messages
Email messages and text conversations can quietly consume storage over time, especially if they include large attachments. Unless they're stored in iCloud, apps like Apple Mail and Messages save data locally on your Mac, where it can gradually take up valuable disk space.
After deleting old emails or messages, don't forget to empty the trash. Until you do, they remain on your Mac and continue to use storage space.
From Apple Mail
Open Finder > Applications > Apple Mail > Left sidebar > Mailbox or linked account (from where you want to delete old messages). Click on the Date column, review old emails, right-click an email you want to delete, and select Move to Trash.
From Messages app
Open Finder > Applications > Messages > Left sidebar, and select a conversation. Review old messages, right-click the message you want to delete, select Move to Trash, and repeat the process for other conversations.
From third-party messaging apps
If you want to remove messages from third-party messaging apps, like Facebook Messenger, WhatsApp, or Telegram, you need to remove them inside each app — there’s no single “delete all messages” setting in macOS that clears them across apps.
Here is the general process for deleting messages in a third-party app:
Open Finder > Applications and select the messenger app (e.g., WhatsApp, Telegram, etc). Then, right-click a conversation and click Delete chat.
10. Reorganize your desktop
Your Mac’s desktop can quickly get cluttered with unnecessary files, folders, and apps. Plus, to be ready to go at a click’s notice, desktop items require some storage resources, so reorganizing them can have a noticeable impact on your storage situation.
Here’s how to reorganize your desktop:
-
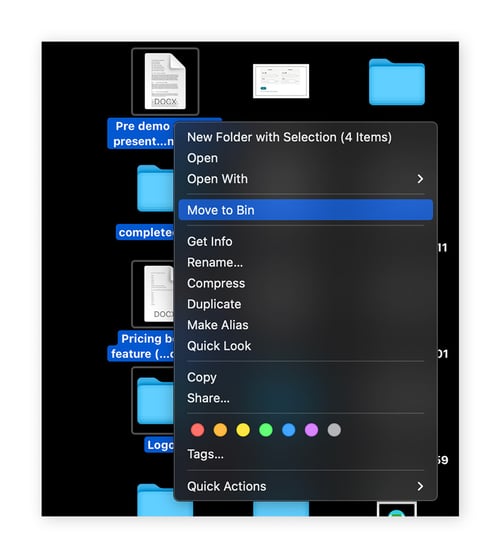
Right-click anywhere on your desktop, click Sort By (in the menu), and select Size.
-
Right-click on the items you wish to remove, and select Move to Bin.
11. Empty your trash
Moving files to Trash doesn't immediately free up storage — they remain on your Mac until the Trash is emptied. After deleting files, apps, or folders, remember to empty your Trash folder to permanently remove them and reclaim the disk space.
Here’s how to delete items in your Trash:
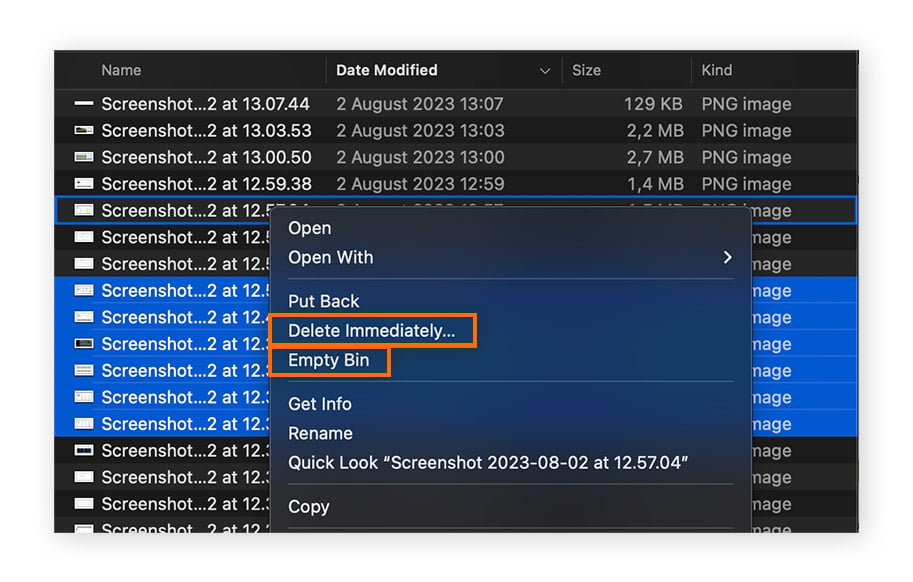
Go to your dock and click the Trash can icon. Then right-click any individual items you want to delete, and select Delete Immediately.
Alternatively, delete everything in the Bin at once by clicking Empty Bin.
12. Run a DNS flush via Terminal
When you visit a website, your Mac uses DNS (Domain Name System)to translate a web address (like google.com) into an IP address. To speed things up, your Mac saves these lookups in a temporary cache.
Flushing DNS deletes the saved cache so your Mac fetches fresh, up-to-date information the next time you browse, fixing any annoying internet glitches.
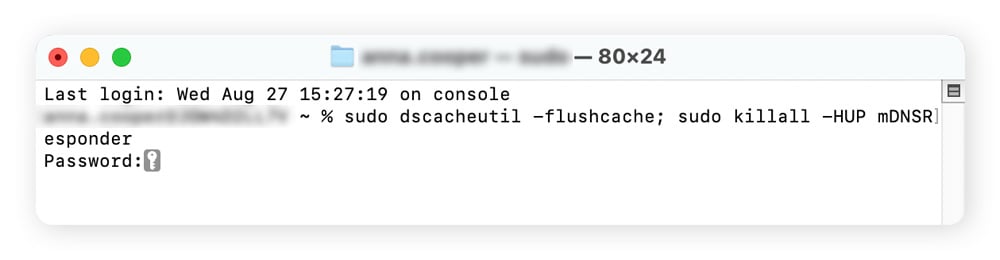
Here are the steps to flush DNS on a Mac using Terminal:
-
Click Finder > Applications > Utilities > Terminal, type “sudo dscacheutil -flushcache; sudo killall -HUP mDNSResponder”, and hit Enter.
-
Enter your Mac password when prompted (it won’t show as you type) and hit Enter.
13. Clean up your browser data
Cleaning up your browser data on a Mac helps remove cached files, cookies, and browsing history that build up over time. This can free up a small amount of storage, improve web browser speed, fix loading issues on websites, and reduce clutter caused by stored site data.
Google Chrome
-
Open Google Chrome > three dots (top-right corner) > Settings > Privacy and security > Delete browsing data, and choose a time range (e.g., “All time”).
-
Tick Cookies and other site data and Cached images and files, then click Delete data.
Safari
Open Safari > Safari (in the top menu bar) > Settings (or Preferences) > Privacy > Manage Website Data > Remove All > Remove Now.
Alternatively, you can clear just your search history in Safari via Safari > Clear History by choosing the time range and clicking Clear History.
How to physically clean your Mac
Cleaning your Mac won't free up storage, but it can help maintain performance by improving airflow and preventing dust from interfering with ports, vents, or the keyboard. Before cleaning, shut down your Mac and avoid using harsh chemicals or excessive moisture.
-
Clean the screen: Use a microfiber cloth lightly dampened with water to wipe your computer screen. Never spray liquid directly onto the display.
-
Clean the keyboard: Shake out loose debris, use short bursts of compressed air between the keys, and wipe the surface with a microfiber cloth.
-
Wipe the exterior: Clean the case, trackpad, and palm rest with a soft microfiber cloth.
-
Clear vents and ports: Use compressed air to remove dust from cooling vents and ports.
-
Clean accessories: Wipe your mouse, trackpad, and other accessories to remove dirt and grease.
Signs your Mac needs a clean-up
If your Mac is running slowly, showing a “startup disk full” warning, frequently displaying the spinning beach ball, or behaving unusually with pop-ups or lag, it’s a clear sign that a cleanup is needed. Ignoring these issues can lead to worse performance, app failures, and potential system instability, so regular maintenance is key to keeping your Mac running smoothly and reliably.
Here’s what to look out for:
-
Slow app performance: Apps take longer to open or respond.
-
Slow startup or shutdown: Your Mac takes noticeably longer to boot up or power down.
-
Freezing or crashes: Frequent lag, freezes, or persistent computer crashes can indicate storage or memory issues.
-
"Startup Disk Almost Full" alerts: A clear sign your Mac is running out of available storage.
-
Apps not working properly: Some apps may fail to open or behave unpredictably when macOS doesn't have enough free space for virtual memory.
-
Very low storage: If your available storage drops below around 20%, overall performance can suffer.
-
Frequent spinning beach ball: Regular appearances of the spinning cursor suggest your Mac is struggling to access memory or storage.
-
Overheating or loud fans: Excess background activity or storage pressure can make your Mac work harder and run hotter.
-
Storage filled with "System Data" or unknown files: Hidden caches, logs, and leftover app files may be consuming significant space.
-
Slow web browsing: Large browser caches, excessive cookies, or too many extensions can slow page loading.
-
Unexpected pop-ups or unfamiliar apps: These may indicate malware or potentially unwanted software that should be removed.
Easy, automatic cleanup for your Mac
A cleaner Mac is often a faster, smoother Mac. But the work of keeping it in tip-top shape is never complete. Cleanup for Mac automates the process by removing junk files, duplicates, unwanted apps, and unnecessary photos — so you can reclaim space without the hassle. Set it up once, let it do the work, and enjoy a Mac that stays organized, efficient, and ready for whatever comes next.
What customers say

More Performance Articles

How to Clear the Instagram Cache on Your Device

The Applications Folder on Mac: How to Find and Access Your Apps

How to Clear System Data or “Other” Storage from Your iPhone

How to Fix Corrupted Files on Windows Using SFC And DISM

How to Lower CPU Usage on Windows

How to Fix the Blue Screen of Death (BSOD) on Windows 10 and 11

How to Clean Your Computer Screen Without Damaging It

How to Clear Cache in Chrome and Other Browsers

How to Screen Record on Your Mac or Macbook (With or Without Audio)

How to Delete Cache and Cookies on Your iPhone

How to Clear the Cache on Your Mac

Android Safe Mode: How to Turn On & Disable Safe Mode on Your Phone
Cleaning
Performance
Sandro Villinger
9-01-2020