- Security
- Privacy
- Performance
Screen recording on Mac is a handy tool for gamers, educators, tech professionals, and anyone else who needs to capture and share their on-screen activity. Learn how to screen record on a Mac using various methods. Then install a Mac cleanup tool that runs on an automatic cleaning schedule, helping you make room for the recordings you really need.

This Article Contains
This Article Contains
Can you screen record on a Mac?
You can screen record on a Mac using your Mac’s built-in Screenshot toolbar (without audio) and QuickTime Player (with audio). Plus, there are multiple third-party app options available that include features like multi-input recording and visual overlays.
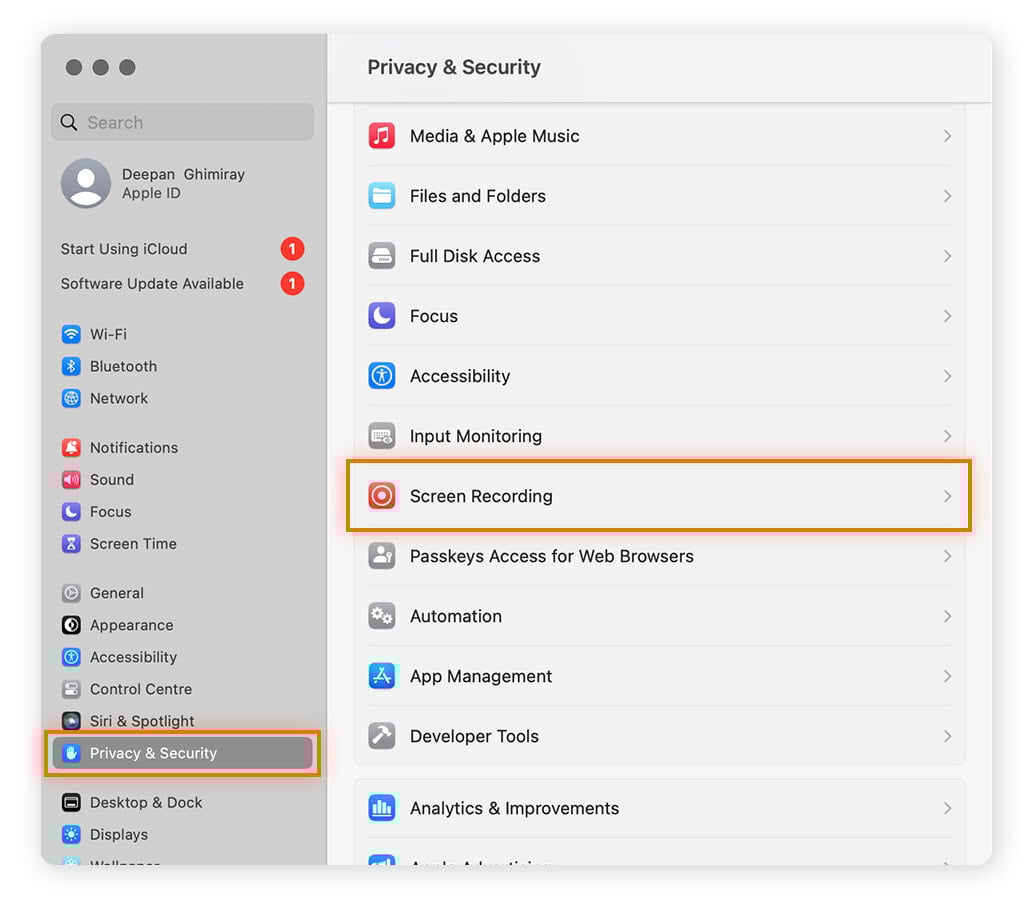
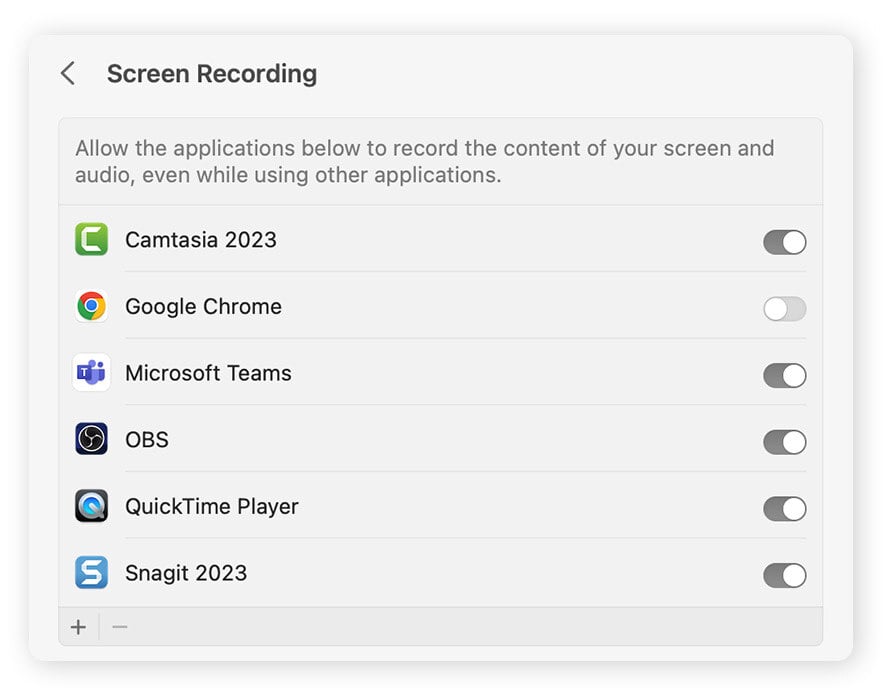
But first, you may need to enable screen recording on your Mac. Here’s how:
-
Click the Apple menu and select System Settings.
-
Click Privacy & Security and Screen Recording.
-
Toggle on (or off) screen recording for each app on the list.
While you can use a screen recorder to record most activities on a Mac, there are exceptions. For example, you won’t be able to screen record while booting up your Mac or during the initial setup. This is because the operating system (OS) and necessary frameworks for screen recorders haven’t started running yet.
Screen record on Mac using the Screenshot toolbar
If your Mac or Macbook is running macOS Mojave or later, you can use the pre-installed Screenshot toolbar to screen record with or without audio. Here’s how:
-
With the application or window you want to record open, press and hold Shift + Command + 5 to open the Screenshot toolbar.
-
Select the screen recording icon on the left to record the entire screen or the one on the right to record a selected portion of the screen.
-
If you’re recording a portion of the screen, drag your cursor to specify what part you want to record. Then, click Record.
-
To end the recording, click the Stop button on the menu bar. Or press Command + Control + Escape. By default, these recordings will be saved to your desktop.
This method is simple, but it does have limitations. Let’s take a look at the pros and cons of using the Screenshot toolbar to screen record on a Mac or Macbook:
![]() Screenshot toolbar pros:
Screenshot toolbar pros:
-
Keyboard shortcut to open the tool
-
Pre-installed on your Mac, so you don’t have to download additional software
-
Customizable settings, such as frame size, audio input, and mouse clicks
-
Recording delay options
![]() Screenshot toolbar cons:
Screenshot toolbar cons:
-
Basic editing features
-
No audio/visual effects or annotations
-
Exports saved only as .mov files—only converting can change the format
-
No scheduling—you can only manually start and stop the recording
You can also use the Screenshot toolbar to take screenshots on a Mac or MacBook. Whether you’re screen recording or taking screenshots, test your Mac’s performance to ensure your system is running smoothly and prevent glitches or crashes. If you need to make storage space, learn how to clean your Mac.
How do I record my Mac screen with a keyboard?
Unfortunately, you can't fully navigate the Screenshot toolbar using only a keyboard. But, if your last action in the Screenshot toolbar was either "Record Entire Screen" or "Record Selected Portion," you can rely on that previously-selected action to start a new screen recording on your Mac. Here's how:
-
Press Shift + Command + 5 to open the Screenshot toolbar.
-
Press Enter to use your last screen recording option.
-
To stop recording, press Command + Control + Escape.
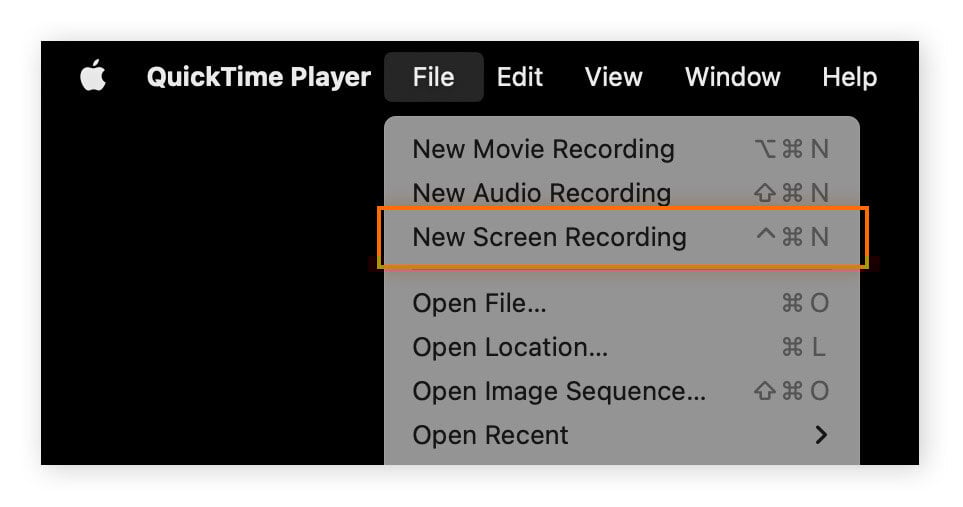
Screen record on Mac using QuickTime Player
Like the Screenshot toolbar, QuickTime Player is pre-installed on Macs and is convenient to use. Here’s how to screen record on Mac with audio using QuickTime Player:
-
Open the QuickTime Player application.
-
Click File in the Menu bar and select New Screen Recording.
-
In the toolbar, click Options and select your preferred audio input from the Microphone section of the drop-down menu.
-
Choose to record the entire screen or a portion of your screen using the buttons to the right of the Options button. Then click the Record button to start the screen recording.
-
To stop recording, click the Stop button in the menu bar, or press and hold Command + Control + Escape.
QuickTime Media Player is a great tool for people who don’t need professional screen recordings. It comes pre-installed on your Mac and can get the job done if you need simple screen recordings once in a while. Here are a few more pros and cons:
![]() QuickTime pros:
QuickTime pros:
-
No purchase necessary—aside from the Mac that it comes pre-installed on
-
Basic editing features
-
Simple interface, uncluttered by extra bells and whistles
-
Can record audio along with the video
-
Compatible with older macOS versions
![]() QuickTime cons:
QuickTime cons:
-
No live streaming option
-
More resource-draining than other Mac screen recording tools
Third-party Mac screen recorders
Third-party screen recorders may offer more features than your Mac’s built-in options—but there are some potential risks, like Mac viruses. To stay safe, stick to apps from the App Store and check the reviews before downloading. Be sure to follow our Mac security guide to stay informed, and learn how to remove a virus from Mac, if needed.
Here’s a quick rundown of some of the most popular third-party screen recorder apps:
OBS Studio
OBS Studio is a great screen recording option for people who need professional clips. It’s also a widely-used tool for gamers, as it’s particularly good for live streaming. Here’s how to use it to record your Mac screen:
-
Download OBS Studio and launch the app.
-
Once the app is open, select the Scenes panel and click the + button to create a new Mac recording.
-
In the Sources panel, click the + button. Then choose macOS Screen Capture and click OK. Next, choose what to record from the dropdown list next to Method.
-
If you want to record audio, go back to the Sources panel and click the + button. Select Audio Input Capture and click OK. Then select your audio input source and click OK.
-
Click Start Recording and Stop Recording when you’re finished. All recordings you capture with OBS Studio will be saved in your Mac’s Movies folder by default.
![]() OBS Studio pros:
OBS Studio pros:
-
Advanced video and audio features
-
Free and open-source
-
Multiple input recording capabilities for both audio and video
-
Multiple outputs for a variety of platforms
![]() OBS Studio cons:
OBS Studio cons:
-
Can be tricky to use
-
No video editing features
-
Many system requirements
-
Can be resource-intensive
Snagit
Snagit is a great tool for technical support specialists, YouTubers, or anyone else making basic instructional videos. Snagit’s developer TechSmith also offers a premium screen and video recording software called Camtasia, which focuses on advanced screen capturing and video editing. But for this section, we’ll focus on Snagit’s basic screen recording functionality. Here’s how to screen record on Mac using Snagit:
-
Download Snagit and launch the app.
-
Click the Capture button and select Video for screen recording.
-
Under Selection, choose Fullscreen or Region, then click Capture.
-
Select Audio Recording, then click the red Record button. When you’re finished, click the blue Stop button.
![]() Snagit pros:
Snagit pros:
-
User-friendly interface
-
Includes templates for easy recordings
-
Includes overlay options for recordings
-
Multi-platform compatibility
![]() Snagit cons:
Snagit cons:
-
No live streaming functionality
-
The trial version has restrictions
Loom
Loom is a popular cloud-based recorder that’s easy to use. The tool can be installed as a browser extension or as a standalone app. Here’s how to use Loom to screen record on Mac with sound:
-
Download Loom and launch the app.
-
Select your recording options: Screen + Cam, Screen Only, or Cam Only (for webcam recording).
-
Choose whether to record the entire screen, a window, or a specific tab.
-
Click the Start Recording button to begin capturing your screen with audio. When you’re finished, click the Stop Recording button on-screen.
![]() Loom pros:
Loom pros:
-
Simple and intuitive interface
-
Cloud-based storage saves Mac storage space
-
Advanced editing features to customize recordings
-
Supported on multiple operating systems
![]() Loom cons:
Loom cons:
-
Can crash during system audio recording
-
Online use only, as it’s cloud-based
-
Trial version has restrictions
Apowersoft Screen Recorder
Apowersoft’s online screen recorder offers quality recordings and good editing options. It’s a cloud-based tool and can record both your Mac’s screen and webcam, including sound. Here’s how to use it to record your Mac screen:
-
Go to the Apowersoft Screen Recorder page and click Start Recording, or launch the app.
-
Click the options you want to record: Screen, Webcam, System Sound, and/or Microphone.
-
If you’re recording your Mac screen, you’ll be asked to choose what to record. Select Entire Screen, Window, or Chrome Tab.
-
Click Start Recording to begin capturing your screen.
-
Click Stop to finish the recording. The completed screen recording will be saved in your Downloads folder by default.
![]() Apowersoft pros:
Apowersoft pros:
-
Option for high-resolution recordings
-
Multi-audio output recording capabilities
-
Editing tools
-
Free version available
-
No download necessary
![]() Apowersoft cons:
Apowersoft cons:
-
Not optimized for game recording
If you download one of these apps and decide not to use it, learn how to uninstall apps on Mac to save space and help keep you safer online.
Clear space on your Mac with Avast Cleanup
Mac screen recorders are useful tools for both work and play, but the videos they create take up a ton of space. But with a dedicated tool like Avast Cleanup, you’ll be able to stay on top of your Mac cleaning with very little effort. Schedule regular maintenance to find duplicate videos you forgot you were editing, and clear out the screenshots you no longer need. Keep your Mac free of clutter with Avast Cleanup.
What customers say
More Performance Articles
How to Clear the Instagram Cache on Your Device

The Applications Folder on Mac: How to Find and Access Your Apps
How to Clear System Data or “Other” Storage from Your iPhone

How to Fix Corrupted Files on Windows Using SFC And DISM

How to Lower CPU Usage on Windows

How to Fix the Blue Screen of Death (BSOD) on Windows 10 and 11

How to Clean Your Computer Screen Without Damaging It
How to Clear Cache in Chrome and Other Browsers

How to Screen Record on Your Mac or Macbook (With or Without Audio)

How to Delete Cache and Cookies on Your iPhone
How to Clear the Cache on Your Mac

Android Safe Mode: How to Turn On & Disable Safe Mode on Your Phone
Cleaning
Performance
Deepan Ghimiray
24-03-2023