- Security
- Privacy
- Performance
If your once buttery smooth Mac is acting up, it may be time for a cleaning. Macs can easily get cluttered with unnecessary junk files that take up valuable disk space and can cripple performance and speed. Check out our guide to learn 12 tips to clean up disk space and get your Mac revving again — or try Avast Cleanup for comprehensive Mac cleaning automatically.
.png)

Here are 12 tried-and-tested tips to free up space on a Mac:
Now let’s dig in to see how to apply these tips to start reclaiming some space on your Mac.
Just because you’ve stopped using a certain app, doesn’t mean it’s not taking up storage space. Many installed apps include background processes and login items that slow down your Mac — and they all consume disk space.
Here’s how to uninstall Mac apps you no longer need:
Click the Finder icon in your dock, then click Applications in the left sidebar.
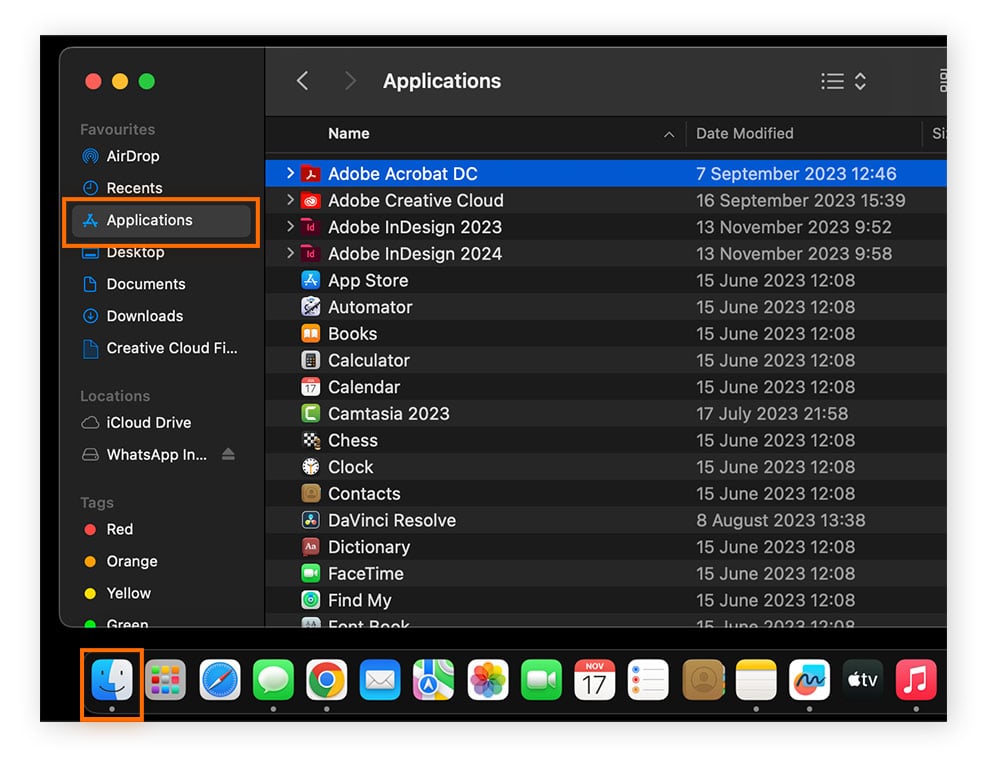
Click the filter button and select Date Last Opened to filter your apps according to the last time you opened them.

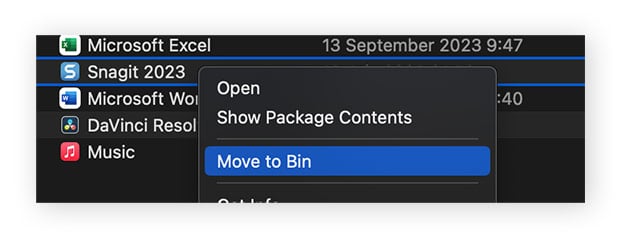
Go through the list to find apps you don’t need. Right-click an app and select Move to Bin from the menu.
You can automate this process by using a dedicated app uninstaller tool, like Avast Cleanup for Mac. Avast Cleanup will easily help you identify outdated apps and get rid of multiple obsolete apps at once.
Once you’ve installed Avast Cleanup for Mac, click on Uninstall apps. On the next screen, click Unused apps, which will show you apps you haven’t used in the last six months, or click Large apps to detect monstrosities that take up more than 1 GB. You can also sort by size or date right from the first screen.
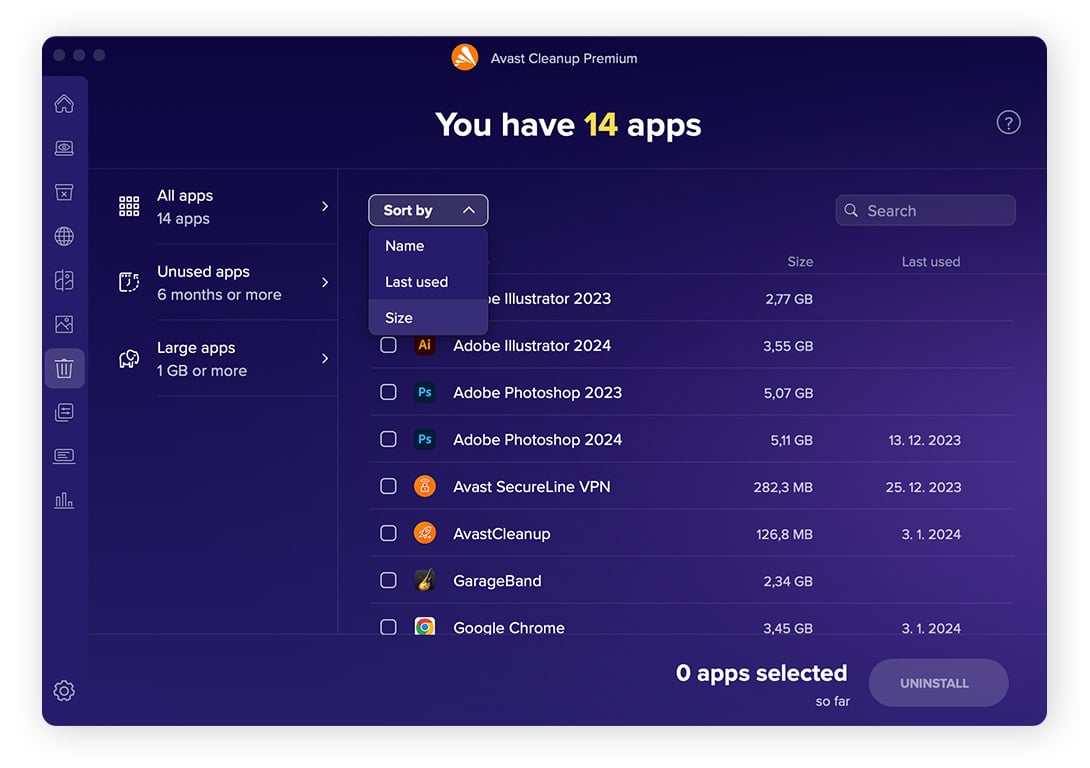
Select the apps you don’t need and hit the Uninstall button. Avast Cleanup will get rid of one app after the other.
Bonus tip: Over time, some apps gather a huge amount of temporary data. Below, we’ll show you how to delete these temporary files from macOS and specific apps, but if that doesn’t work, you might want to completely delete the app and reinstall it.
Consider Google Chrome. Some unfinished downloads or certain types of websites tend to store “supporting data,” which is hard to track down. The easiest way to delete all this unnecessary data is to get rid of the app and reinstall it.
 Here you can see how much unnecessary data Google Chrome has accumulated.
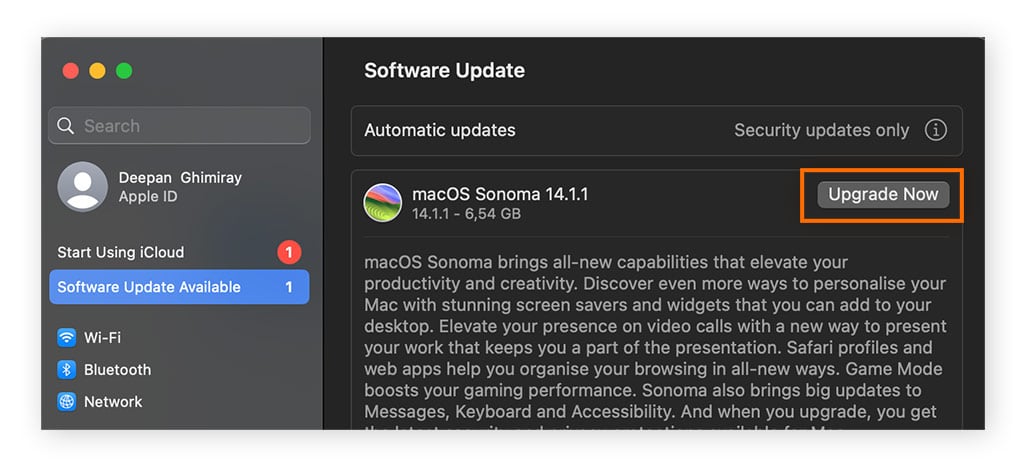
Updating macOS software and other system-related software can optimize system file storage and management. Updates may also reduce the overall file size of your software without compromising on functionality.
Here’s how to update your macOS software:
Click the Apple logo on the top-left of the screen and select System Settings.
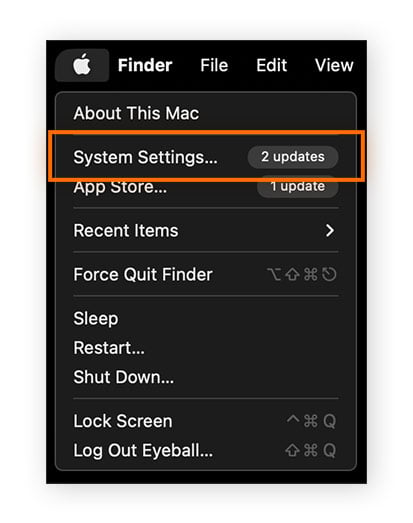
Click Software Update Available, if the option exists. Then click Upgrade Now in the Software Upgrade window.
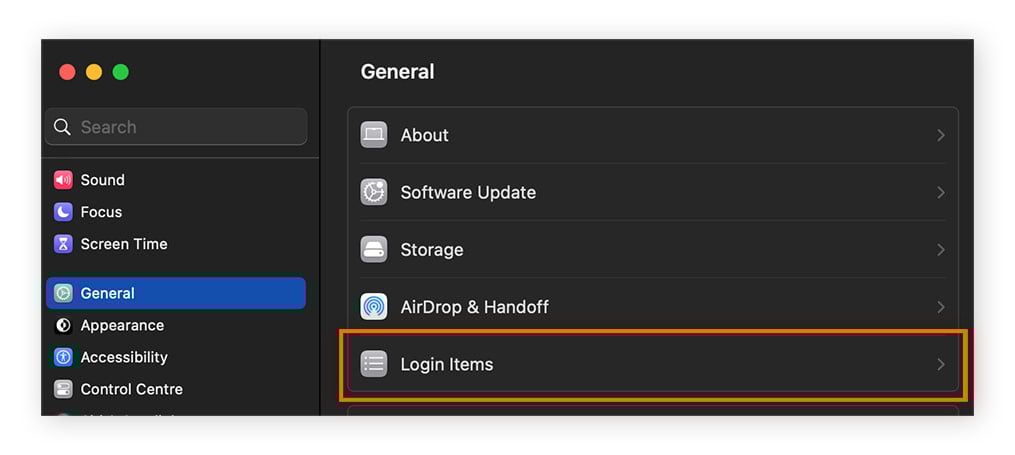
Login items are the apps and services that automatically launch when you log into your account. Though convenient, login items take up storage space and can cause performance issues. Reviewing and removing unneeded login items can help make space on your Mac. Here’s how:
Click the Apple logo on the top-left of the screen, select System Settings, and then click General in the left sidebar, followed by Login Items.
Review your Login Items displayed in the window.
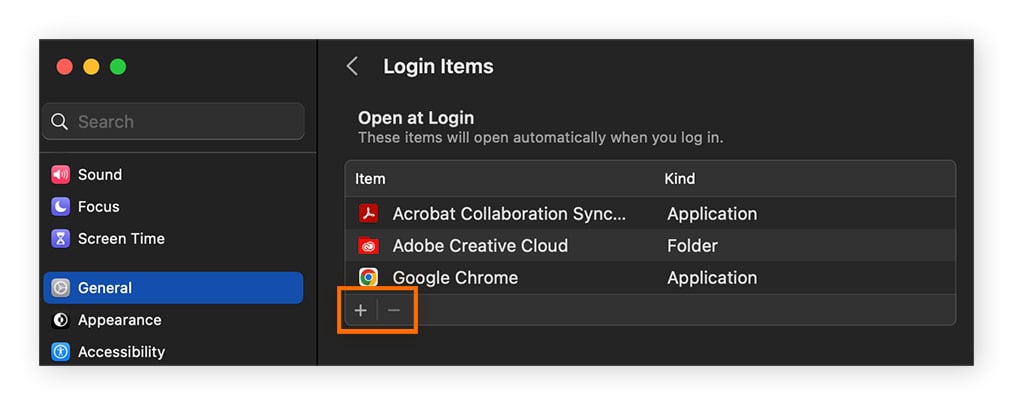
To remove a Login Item, click the remove button (—) button next to the selected item. Then restart your device to apply the changes.
Removing large files is one of the most direct ways to create storage space on your Mac, but you’ll need to identify them first. Here’s how to find and remove large files:
Click the Apple logo on the top-left of the screen, select System Settings, and then click General on the left sidebar, followed by Storage.
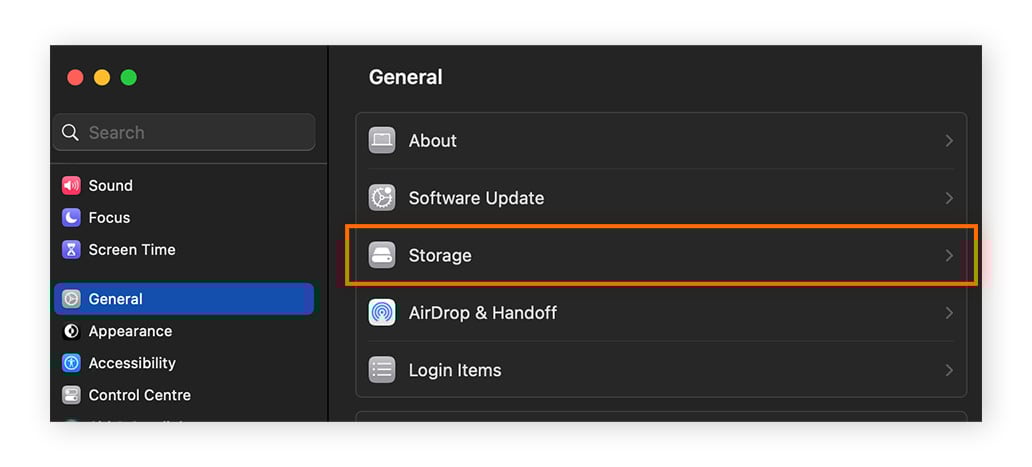
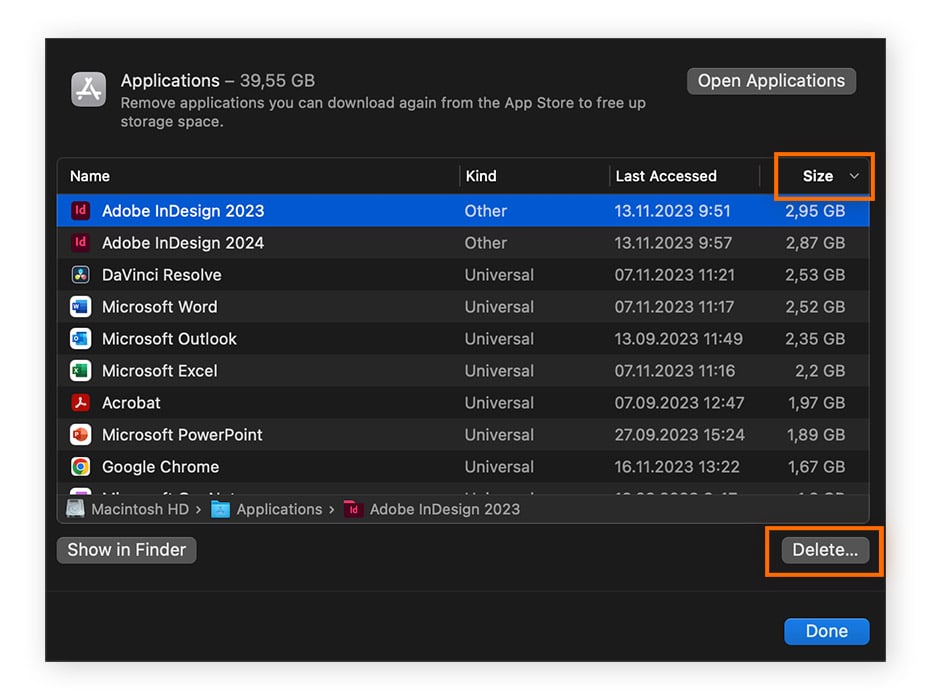
View the list of file categories at the bottom of the window. Click the info (i) button for each of the file categories.
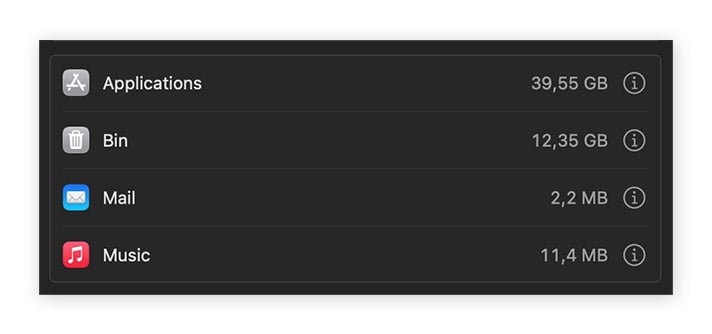
In each category, filter the list by size, then review and delete the large files you don’t need.
Having trouble figuring out the System Data Storage? You’re not the only one! Read our guide to Other storage on Mac to learn about this elusive file category.
The Downloads folder holds all the files you’ve downloaded from your web browser or other applications, like documents, installers, and disk images. This folder tends to fill up and take up a lot of space. Review the items in this folder and delete what you don’t need. Here’s how:
Click the Finder icon in your dock, then click Downloads in the left sidebar.
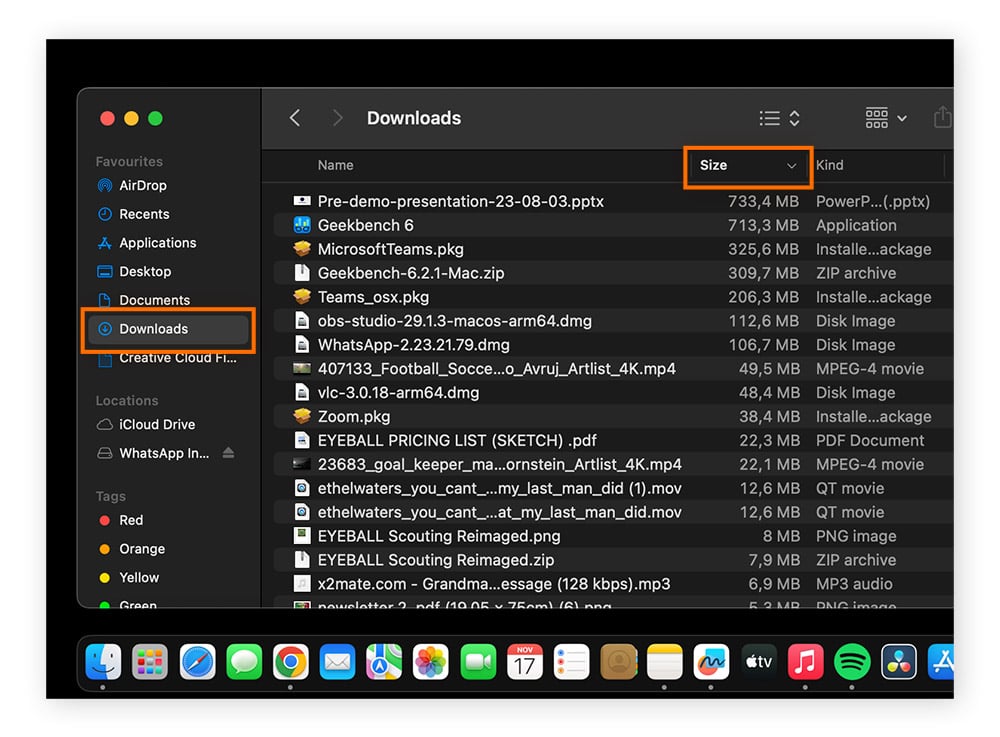
Filter the list by size, then review and delete the files you don’t need.
Since this folder accumulates files whenever you download anything, make a habit to clear the Downloads folder regularly.
iCloud enables you to store certain types of files in the cloud, including photos, videos, documents, and backups. By offloading data to iCloud, you can lessen the burden on your Mac’s storage drive and free up space.
Here’s how to check iCloud settings:
Click the Apple logo on the top-left of the screen and select System Settings.
Click your Apple ID (or “iCloud” on older Macs).
Click iCloud on the left sidebar.
Click on the iCloud Drive in the iCloud settings to manage which apps and folders are using iCloud drive. You can check or uncheck certain apps accordingly.
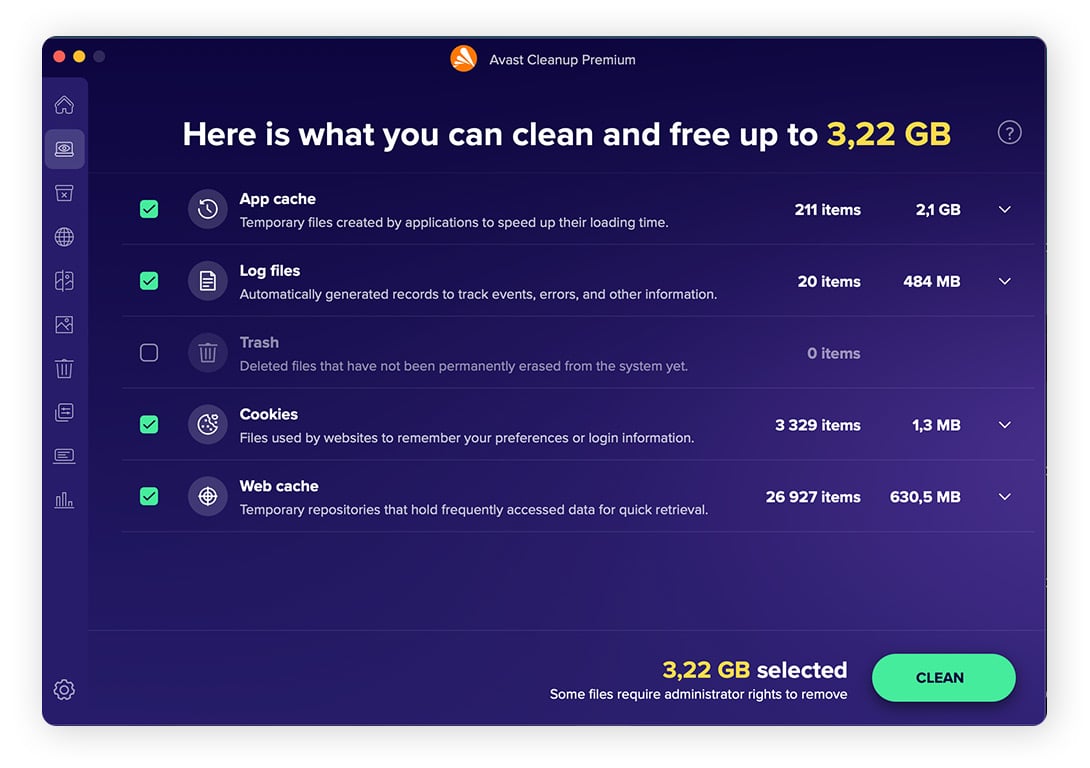
Now that you’ve cleaned up a load of data, it’s time to look at your hidden temporary files. To find them, we’ll use Avast Cleanup for Mac, which thoroughly scans your computer for temporary data. Get it here:
After installing Avast Cleanup, hit the SCAN button under Quick clean on the main dashboard to scan macOS and all your apps for redundant cache files, log files, and trash data. Then hit CLEAN to ditch the data weighing you down.
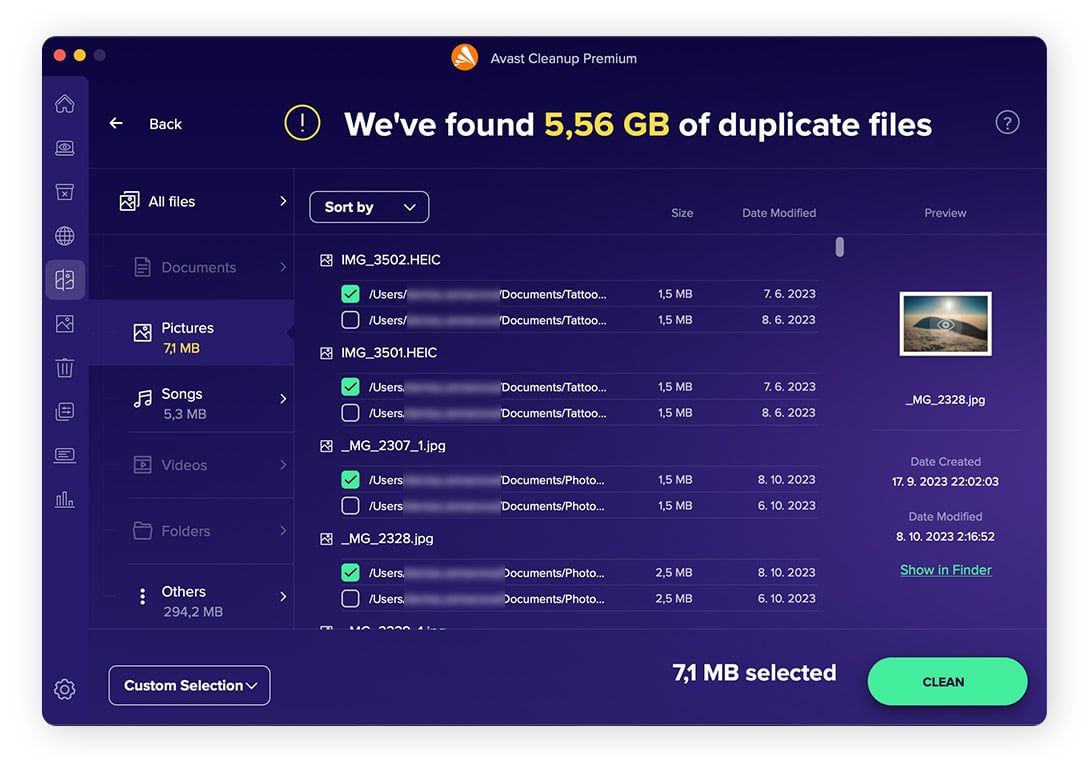
Next, it’s time to attack the clones, or duplicate files. Go back to the dashboard and click Find, next to Find duplicates. Select your user folder, your entire hard disk, or even external hard disks. Hit the SCAN button, review the list of duplicates found, and delete all the cloned files you no longer need.
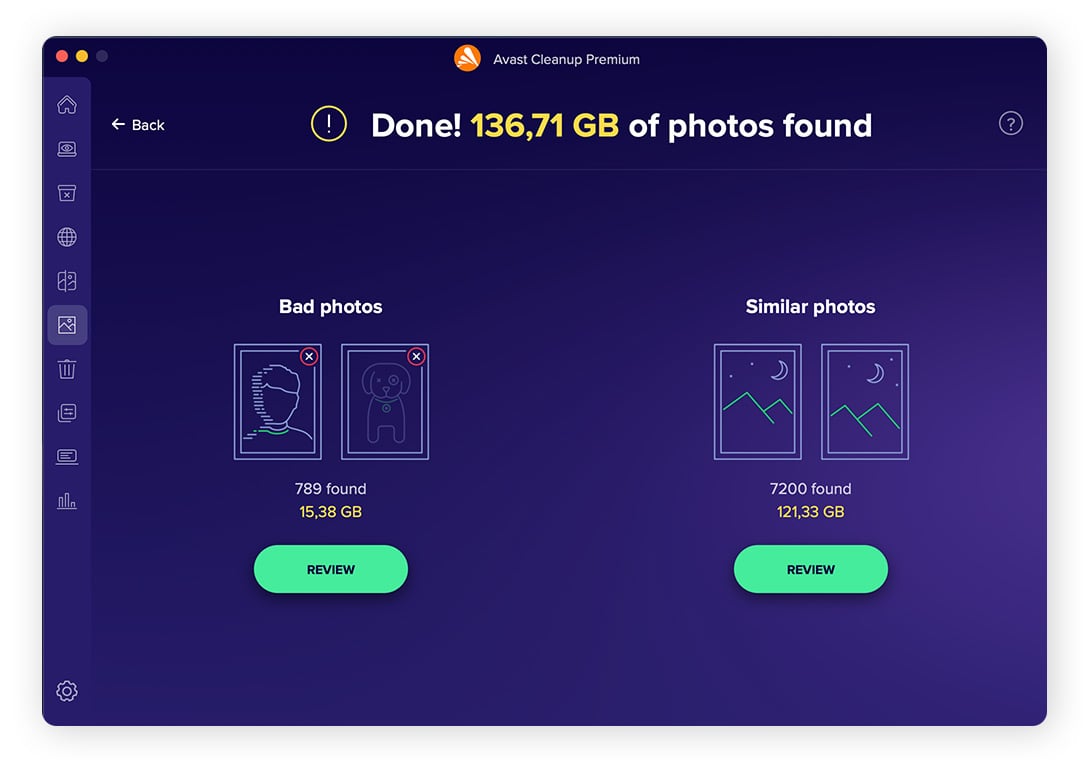
Next, look at your photo library. Our Photo Cleaner tool is here to help. Return to the Avast Cleanup dashboard and hit the Find button under Analyze photos. Choose all locations where you’ve stored your photos, and select Review to see either Bad photos or Similar Photos.
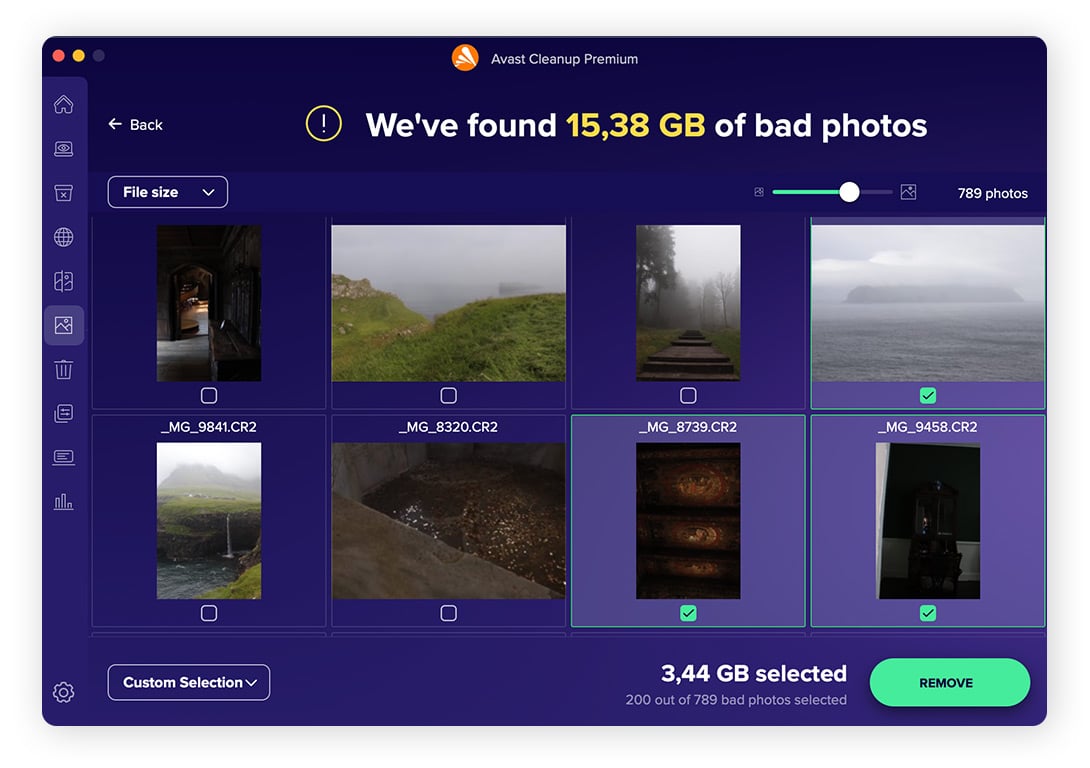
The next screen will show you poor or blurry photos. Simply mark the ones you don’t want or need and click REMOVE to delete them!
Backups of files and folders are crucial for restoring your system in the event of a storage or technical issue. Though important, old backups can pile up and eat up space. On macOS, backups are generally handled by the Time Machine feature.
Here’s how to remove old backups:
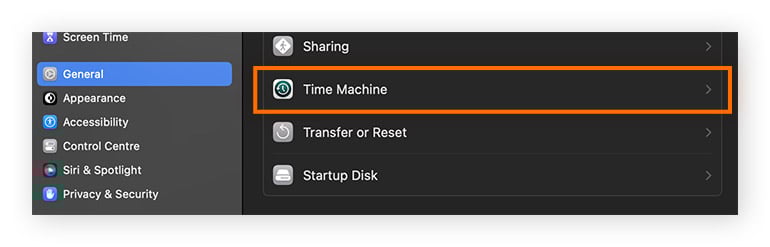
Click the Apple logo on the top-left of the screen, and select System Settings. Then click General in the left sidebar, followed by Time Machine.
Review your backups, if you have any. To remove one, click the remove button (—), then click Forget Destination.
Some messages can contain important or treasured information — but the rest are just taking up precious storage space. Unless you have them synced to iCloud, Apple Mail, and Apple’s Messages App store data on your Mac’s drive.
Click the Apple Mail icon in your Dock.
In the left sidebar, select the mailbox or linked account from where you want to delete old messages.
Click the column header labeled “Date” to sort your emails by date.
Review and delete old emails by right-clicking them and selecting Move to Trash.
Empty your trash to permanently delete the emails.
Click the Messages icon in your Dock.
In the left sidebar, select a conversation.
Review and delete old messages by right-clicking them and selecting Move to Trash.
Repeat the process for other conversations and then empty your Bin to permanently delete these messages.
Your Mac’s Desktop can quickly get cluttered with unnecessary files, folders, and apps. Plus, to be ready to go at a click’s notice, desktop items require some storage resources, so reorganizing them can have a noticeable impact on your storage situation.
Here’s how to reorganize your desktop:
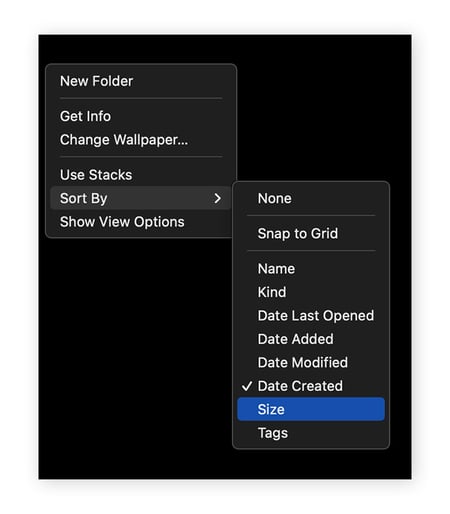
Right-click anywhere on your desktop, hover over Sort By in the menu, then sort your files according to your preference.
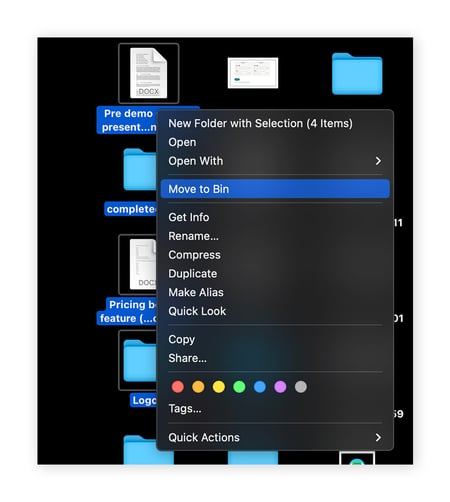
Once your Desktop items are re-organized, right-click on the items you wish to remove and select Move to Bin from the menu.
Empty your Bin to permanently delete unwanted desktop items.
Your Mac’s cache holds temporary files that help speed up application processes and optimize performance. Although helpful, these files can accumulate over time and take up excessive storage space. Learning how to clear your Mac’s cache can free up a significant amount of disk space.
Here’s how to clear your Mac browser cache:
Open Finder and navigate to Go to Folder using the shortcut Shift + Command + G.
Type ~/Library/Caches and hit Enter.
Open the browser cache folders, choose the files you want to purge, and hit Delete.
You’re not really clearing space until you empty your Mac’s trash. Most of the steps above require you to place files and folders into the Bin — from there you’ll need to empty the Bin to permanently delete the items and actually free up space.
Here’s how to empty your trash or delete items in your Bin:
Open your trash by clicking on the Bin icon in your dock.
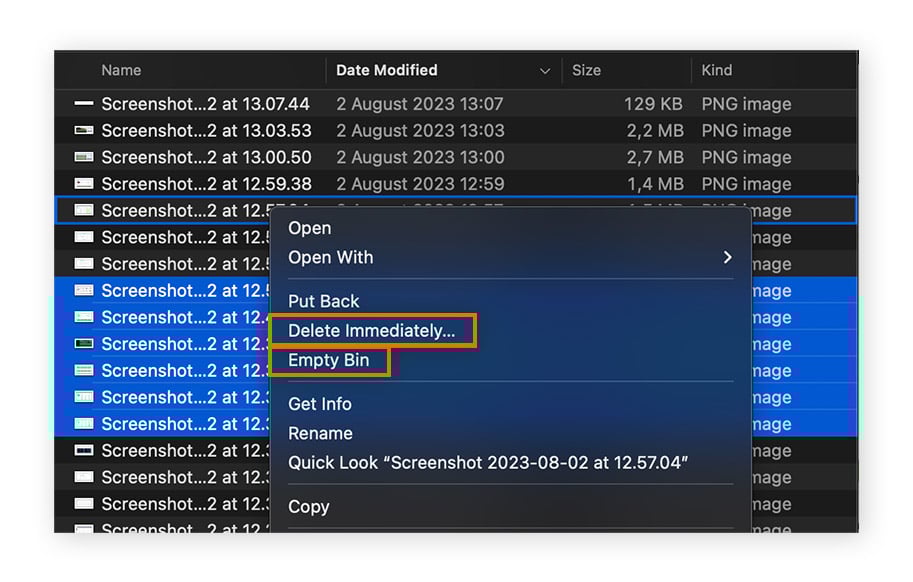
Right-click any individual items you want to delete and select Delete Immediately.
Delete everything in the Bin at once by clicking Empty Bin.
Physically cleaning your Mac won't create space, but it may improve its performance if dust or other obstructions are blocking your cooling vents, keyboard, and ports. Power off your Mac and use a can of compressed air to blow out dust and debris from these areas. You can also use a soft cloth (and a little water) to clean your computer screen and freshen other surfaces.
Cleaning your Mac will directly enhance its performance and speed. Plus, you’ll get rid of those annoying “your startup disk is almost full” alerts. Over time, old apps, duplicate files, and other junk data collected on your Mac will cause it to slow down, crash, and generally malfunction. To optimize device performance, learn how to clear disk space on your Mac using the 12 tips above.
Whether you have an iMac or Macbook (Pro or Air), storage issues are generally caused by the same types of files. With regular usage, your Apple device will accumulate these files and eat up your valuable space — without you even realizing it. The most common space-gobbling culprits on Macs are:
Temporary files: The programs you use (and MacOS) create thousands of cache files and temporary data to carry out specific functions. But if they don't get removed afterward, they’re just junk files littering your machine.
Duplicate files: Most people waste valuable storage space by accidentally saving large files — like movies and photos — twice.
Files you thought you trashed: Putting files into the Trash doesn’t actually delete them. They still hang around, taking up disk space, until you empty your Bin.
Blurry photos: In the age of smartphone cameras, it’s easy to take dozens of photos while chasing that perfect shot. But do you really need duplicate photos, or pictures that are blurry or otherwise low-quality?
The same file types that cause Mac storage issues are responsible for iPhone and iPad storage issues, too. Learning how to free up space on Mac can benefit all your Apple gadgets, especially if you’re synching devices.
You will know it’s time to clean up your Mac when you experience slow speeds and performance issues, but a notification about your startup disk being full is a more definitive sign. It will look something like this:
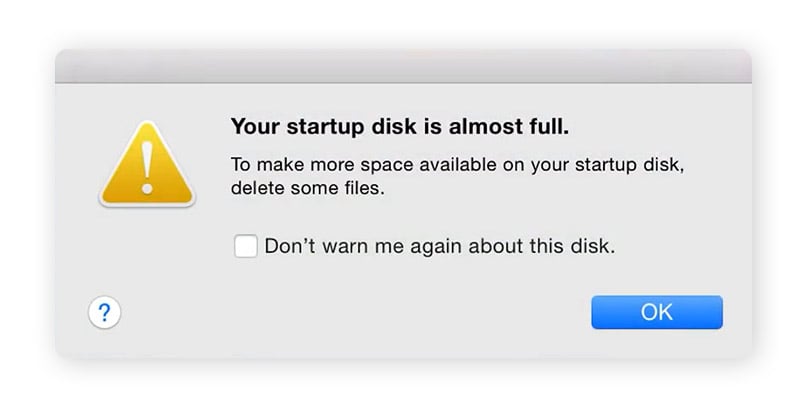
If you receive a Mac startup disk full alert, you’ll have very limited space to save files, applications that require more space could stop working, and your performance might decline quite drastically. This is due to macOS and its programs not being able to allocate enough virtual memory — a process that uses your hard disk’s memory as an extension to your RAM.
You may receive a Macbook disk full notification when you have less than 500MB of storage space. But if your Mac isn’t running out of disk space and still feels sluggish, check out our tips to boost its performance.
Your other devices — PCs, Androids, or iOS devices — are also likely to need a good cleaning. Here’s how you can keep them all in top shape:
A Mac cleanup isn’t a one-time thing — you should be cleaning out your computer on a regular basis. Avast Cleanup for Mac automates the cleanup process, purging your computer of junk files, duplicates, unwanted apps, and unneeded photos for you. A cleaner Mac runs faster, holds more data, and delivers the performance you expect.