- Security
- Privacy
- Performance
Are your games constantly stuttering and laggy? Overclocking your GPU can give you butter-smooth performance on your favorite games and multimedia apps. Don’t settle for low FPS or suboptimal settings. Learn how to safely overclock your GPU and get your rig running in beast mode. And use dedicated optimization software to help clear up storage space, increase speed, and get an even bigger performance boost.

This Article Contains
This Article Contains
What is GPU overclocking?
GPU overclocking means pushing the speed of your graphics card beyond its default settings to get higher frame rates and smoother performance in video games, multimedia rendering, and other graphics-intensive tasks. Every graphics card operates at a certain standard frequency, overclocking enables your card to perform beyond that standard.
For example, my NVIDIA Titan Xp runs at a maximum clock of 1,582 MHz on its GPU chip while the 12GB of memory runs at 5,505 MHz. NVIDIA has opted for a rather conservative approach on this as the silicon is capable of handling higher frequencies, which allows for more operations per second. Enter: overclocking.
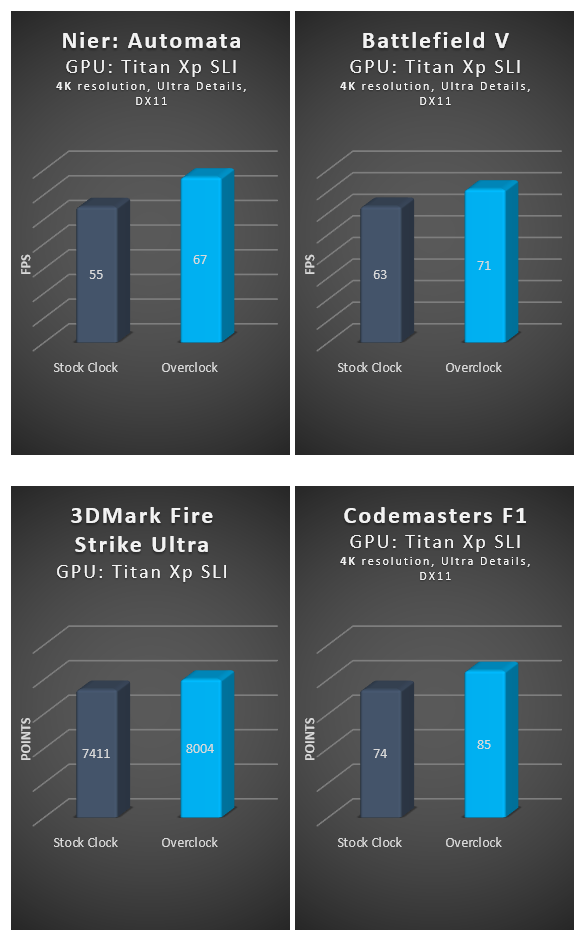
A GPU overclock can also give you an edge when cranking up visual details. For example, only by overclocking can I play Nier: Automata at 4K resolution, with maximum details at a rock solid 60 FPS. Without that overclock, I’d have to dial back some visual settings and make sacrifices.
Other GPU-dependent tasks might also benefit from an overclock, including multimedia rendering, which is done mostly by the GPU. Whatever the task, overclocking your GPU can give you a bump in performance by maximizing the potential of your graphics card.
It’s like a runner exceeding their typical physical limits to run faster than usual. But just like a runner sprinting for the finish line, your graphics card can't maintain that performance forever. Overclocking beyond what your GPU can handle can cause your computer’s temperature to rise and other stability issues, including hardware damage. That’s why it’s crucial to overclock safely.
Ready to get the most out of your games and multimedia apps? Let’s take a look at how to safely overclock your GPU.
How to overclock your GPU: Step-by-step instructions
Overclocking sounds dangerous, but it’s safe if you follow the steps below. Before you start, make sure you benchmark your default performance (see section below) to determine the baseline performance of your system. That way, you’ll get an idea of how much you can overclock.
Here’s how to overclock a GPU:
Step 1: Launch your overclocking tool
We’re using MSI Afterburner, as that’s my preferred tool, but the method is very similar for other tools (which are listed below).
First, launch MSI Afterburner.
 MSI Afterburner overclocking settings
Here’s what you’re looking at:
-
Your current GPU and memory clock: The numbers go up and down based on your current GPU needs, so if there’s no GPU load running, you shouldn’t see too many fluctuations here.
-
The current voltage: Most modern GPUs prevent you from changing the voltage, as it could harm the hardware. There are workarounds (such as flashing the BIOS and other ways), but we don’t recommend this as it offers negligible benefits.
-
GPU temperature: Usually anything around 80-85° is a good maximum temp. Beyond that, things might get too hot and the graphics card could throttle itself.
-
Power limit: Here’s where you can usually increase the draw by up to 20%, giving you extra headroom for overclocking. If your card has a limit of 250 watts, you can increase it to 300 watts by moving the slider to the right. Watch the temperatures and noise levels. The higher the limit, the hotter your system will get.
-
Temp limit: This increases the temperature limit before the GPU starts to throttle things down too much.
-
Core clock: Magic button number 1! This increases your GPU clock and is one of the key measures to improve performance.
-
Memory clock: Magic button number 2! The memory clock increases the frequency of its memory, which increases bandwidth — another key factor to get more FPS.
-
Startup: This button enables you to launch MSI Afterburner every time your PC boots.
-
OK: The “Let’s fire this up” button, which applies the overclocking button.
Step 2: Overclock the GPU clock
Now let’s start overclocking. Here’s how:
-
Increase the temperature limit to its maximum and increase the Power Limit by 10%. This gives you some headroom for the first big step of overclocking.
-
Now, move the GPU slider to the right by +50 MHz. Hit the OK button (9). Usually, any overclock between 5-50 Mhz shouldn’t cause any issues, so this is more to see whether the overclock works at all. If it doesn’t, then it’s time for a new graphics card, as your current GPU can’t handle overclocking.
 MSI Afterburner step-by-step overclocking
 -
Now, stress test the GPU to make sure everything’s running ok (options are detailed below). Run a benchmarking tool like 3DMark or Unigine Valley. If you see no artifacts and experience no crashes, that’s great, and we can proceed.
-
Increase the clock speed in increments of 10 MHz. Hit OK.
-
Test again. If it works, continue increasing the clock speed in increments of 10 MHz until you hit the limit where the game crashes or your PC or laptop reboots.
-
Then, reduce that clock rate by 10 MHz to give you some headroom. In my case, I was able to get my Titan Xp up to 170 MHz (stable).
Step 3: Overclock your memory
Usually you can overclock memory (Video RAM/VRAM) between 10-15% to get a drastic performance boost in games that rely heavily on it, especially ones with lots of textures. In the case of my Titan Xp, its memory runs at 5,505 MHz, so I was easily able to push it by 400-500 MHz.
My advice is to start lower, go with increments of 50 MHz, and work your way up until you hit a limit.
 MSI Afterburner properties
Note that games react differently to a high memory clock. Some will run significantly faster with no problem, others might show artifacts. I initially had a memory overclock of +700 MHz in place, which worked fine for all games except my two favorites, The Witcher 3 and Nier: Automata. I had to dial back. (Sad trombone.)
Step 4: Increase power & temp limit
Once you hit a limit, set the temp and power limits to the max. Then try again. You’ll likely be able to push the clocks of both the GPU and the memory slightly further, but it won’t be much, and it might be too noisy. I personally settled at +114% for the power limit.
But that’s just me — and every GPU is different. How do I overclock my GPU, you ask? Well, the answer isn't always straightforward.
You have to figure out the maximum overclock of your individual GPU on your own. There’s no guide that says “Got a GeForce RTX 2080 Ti? Then your maximum setting is +200 MHz GPU and 800 MHz VRAM!” Every chip is manufactured differently on a chemical level. Every silicone composition is a bit different, and there are variations, so one chip might not sustain heat and stress as well as another.
Is overclocking GPU safe?
Generally, overclocking your GPU is safe, with little chance of damaging your hardware. If there’s an issue, the laptop or PC will crash or produce visual artifacts, which is a good warning that your game is about to crash.
However, you can damage your GPU if you decide to become a regular GPU overclocker, using LN2 or “shunt mods” to remove voltage limitations so you can feed more power to the GPU. So I wouldn't mess around with that, unless you really know what you’re doing. It’s not sustainable and only gives you marginal benefits at high risk.
If you want to know how to safely overclock your GPU like the pros, check out the channels of some of my favorite German overclocking champions Der8auer, GamersNexus, and JayzTwoCents.
Before you overclock, optimize your software
Overclocking is a hardware-based approach to optimizing your PC. But if your PC isn’t optimized on a software level, you won’t experience the gains you’ve made by overclocking. To create a solid base for overclocking, optimize your PC software for gaming.
Avast Cleanup dedicated optimization software designed by performance experts to reduce the impact of 3rd-party processes on your machine. The combination of optimized hardware and software will give you the best possible performance.
Your overclocking checklist
Overclocking is a straightforward way to improve gaming or multimedia performance of your PC or laptop. Here’s what you’ll need:
-
An overclocking tool: My personal preference is MSI Afterburner, which works for most AMD and NVIDIA GeForce chips. Note that newer versions of MSI Afterburner also feature an “OC Scan,” initially developed for NVIDIA's latest GeForce RTX series (2070, 2080, 2080 Ti) that automatically overclocks your GPU — a nice feature to have.
You can download MSI Afterburner and its latest beta versions (which I’d actually recommend, especially for newer generation GPUs) to get started.
 MSI Afterburner overclocking utility
If MSI doesn’t work for you, EVGA’s Precision X1 is a good alternative that works well on non-EVGA cards. However, EVGA requires you to sign up for an account before you can download the (otherwise) free tool.
 EVGA Precision X1 overclocking utility
AMD users might want to look at AMD Ryzen Master, which is specifically aimed at AMD Ryzen processors. If either of the above tools doesn’t work, AMD Ryzen Master will help you push your hardware to its limits — and beyond.
-
A GPU stress test: Overclocking a GPU works fine at first glance, or even for a few minutes or hours when you’re gaming. However, in my experience, an overclock shows its true effects after a few hours of real gaming.
Not long ago, I thought I’d found the perfect overclock settings for my Titan Xp GPU(s), only to realize that those settings would cause a crash after only an hour or so of gameplay. That’s why you need a good GPU stress test utility — run it for a few hours to find your personal settings. I use two tools for that: 3DMark and Unigine Valley.
 3DMark’s Stress Test provides a lot of detailed analysis and is easy to automate, but you need to have the paid version.
 Unigine Valley renders a highly complex forest, pushing your CPU/GPU combo to its limits.
Run your benchmarking tests and get a baseline of the framerate, stability, clock speeds and temperatures of your GPU. Repeat it multiple times to get a sense of your GPU’s capability.
Can I overclock every graphics card? Can I overclock my laptop?
You should be able to overclock most GPUs. Though you might see some compatibility issues, especially with laptop GPUs and Intel’s HD graphics processor. Generally, though, overclocking should work fine.
The GPUs of most laptops can be overclocked, but you’ll hit thermal limits. Most laptops feature high-power components squeezed inside a tiny chassis with limited amounts of airflow. Overclocking the GPU can lead to an increase in heat (more operations leads to higher temperatures) so you would hit thermal limits.
 Overclocking laptops, such as this GeForce 965M GTX on a Surface Book is possible, but you need to be careful.
During gameplay sessions, your laptop might turn off and reboot. However, even with limited overclocking ability, you can achieve some boost on laptops. Take my Surface Book, for example: before the overclock, the framerate in Far Cry Primal dropped to 44 FPS.
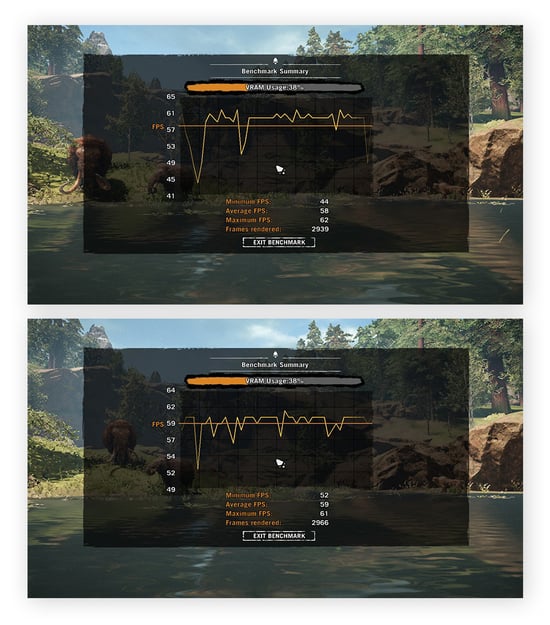
Overclocking raised the minimum FPS to 52! That’s a noticeable improvement for a laptop. It’s important to remember that some laptops aren’t built for overclocking and might crash at even the slightest OC setting.
That’s when you should use alternative methods for optimizing performance, either manually or via PC optimization software that helps reduce background activity. Plus, you might need to look at updating GPU drivers and CPU overclocking for additional boosts in performance.
Get an overclocked card and save time
To avoid some of the tinkering above, you could always buy a factory-overclocked card, such as the EVGA FTW3 or the MSI Lightning Z. These overclocked graphics cards go beyond the factory clocking capabilities of the original NVIDIA reference models.
To put things into perspective: While the default 2080 TI boosts up to 1635 MHz, the Lightning Z goes up to 1770 by default, and you can boost this even higher thanks to beefier power supplies and PCBs.
 Factory-overclocked GPUs can help you save time as you seek faster performance.
Time to play
So what did we get out of all this overclocking? Well, we performed benchmarks with some of the latest games and 3DMark. The results are impressive.
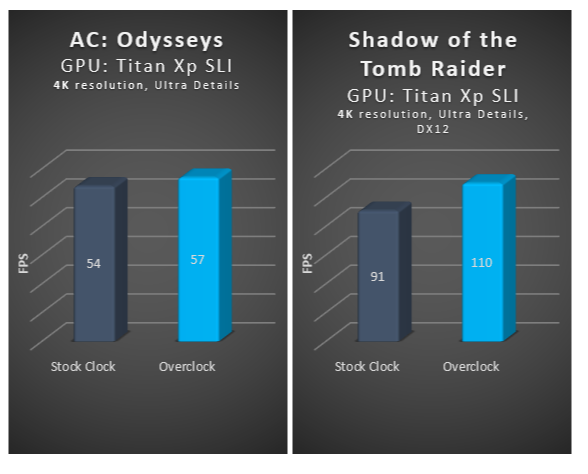
On the left, we have Assassin’s Creed Odyssey, which struggles to reach a solid 60 FPS on even high-end hardware at 4K resolution. Overclocking took it a bit closer to that sweet spot. On the right, Shadow of the Tomb Raider noticeably benefitted from overclocking, managing to boost the FPS from 91 to 110 in SLI mode.
In all cases, we were able to get a boost in performance that sometimes made the difference between stuttering and silky-smooth 60 FPS (or more). Now stop fiddling with clocks and just enjoy your games — that’s what it’s about after all! Don’t be me, wasting hours finding the perfect clock down to the last MHz. (You won’t see the difference between 175 and 170 MHz of frequency.)
Now speed up your PC
Once you’re done optimizing the hardware, take care of your software by minimizing the background activity that could slow down gaming PCs. Avast Cleanup can help you by putting performance-draining apps to sleep, cleaning your disk for more space, and uninstalling resource hogs. Try Avast Cleanup for free today.
Overclocking FAQs
What does overclocking a GPU do?
Overclocking will push your GPU to perform better for graphics-intensive tasks, like gaming or video editing. It entails boosting your GPU’s clock speed and memory beyond the manufacturer’s recommended limit, so the GPU can process more instructions per minute. Overclocking your GPU results in higher frame rates, smoother gameplay, and faster rendering times.
Should I overclock my GPU?
You should overclock your GPU only if you need better performance from your graphics card. If you’re experiencing choppy or lagging video rendering, overclocking can provide a noticeable increase in frame rates and help achieve smoother gameplay. On the other hand, if you’re not a gamer or don’t require high-performance graphics, overclocking your GPU would have little benefit for you.
Can overclocking damage the GPU?
Generally, overclocking will not damage your GPU when done right. However, you can cause damage if you remove voltage limitations to feed even more power to your GPU. Though most overclocking is relatively safe, remember the process entails increasing heat and power consumption, which could reduce the lifespan of your hardware over time.
What is a good GPU clock speed?
A good clock speed is dependent on your GPU model, cooling system, and the application or game that you’re running. GPUs can also vary individually on a chemical level, as every silicon composition is different. To find a good clock speed, you’ll have to experiment to discover the maximum speed that your particular GPU can handle without stability or heating issues.
How much should I overclock my GPU?
How much you should overclock your GPU depends on your individual hardware, cooling system, and the application or games that you’re running. To safely determine your ideal levels, overclock your GPU and memory in small increments, then use a stress test after each increase until you discover the maximum your GPU can handle.
What customers say
More Performance Articles
/Academy-How-to-improve-your-gaming-PC-performance-Thumb.jpg)

Gaming
Performance
Sandro Villinger
27-04-2023