- Security
- Privacy
- Performance
Ever wondered how much power your computer really has under the hood? A CPU stress test is the safest way to push your processor to its limits and see what it can handle. Keep reading to learn how to stress test your PC or Mac and put your processor through its paces. Then, get specialized cleanup software to unlock your computer’s true potential.

This Article Contains
This Article Contains
The complete CPU stress test process
To stress test your PC, close all non-essential apps, install any updates, and then run stress-testing software. While the stress test runs, monitor the temperature of your hardware, and be prepared to stop the test if your PC gets too hot.
Once the PC stress test is complete, the results will tell you the overall status and stability of your system and highlight any limitations or faults that you should be aware of.
Here’s a more detailed look at the CPU stress test process, from start to finish:
1. Get your PC stress test ready
Before checking your CPU stability with a stress test, it’s important to properly configure your computer, as the test can be demanding on your hardware. Preparation for a stress test involves setting up a controlled environment where background apps don’t interfere with the results, ensuring your cooling system and power source are stable, and running some device maintenance.
Connect your device to a power source
A CPU stress test pushes your processor to maximum load, significantly increasing power consumption. This can drain a laptop battery quickly, causing a shutdown or performance throttling if not connected to a charger.
When stress testing a laptop, keep it plugged into the charger. For desktops, make sure the PC is securely connected to a power source — preferably a wall outlet rather than a power strip — to prevent throttling or potential hardware issues. Stable power ensures accurate results and allows you to properly assess your processor’s performance limits.
Close unnecessary apps and processes
Close all programs that aren’t critical to your computer’s functioning. Right-click on Applications in the taskbar (or Dock if you’re using a Mac) that you’re not actively using, and select Close.
You can also use Windows Task Manager to close open applications and end processes that could interfere with your CPU stress tests:
-
Press Ctrl + Shift + Escape and choose the Processes tab.
-
Right-click any non-critical apps or processes and select End task.
Or, to close apps and end processes on a Mac using Activity Monitor:
-
Press Command + Space, type “activity monitor,” and press Enter.
-
Go to the CPU tab and select any non-critical apps or processes.
-
Press the (X) button and Quit.
Only quit apps or processes that you recognize to avoid crashes or performance issues.
Temporarily put programs to sleep
Use a dedicated performance tool like Avast Cleanup to put certain apps to sleep before stress testing. Rather than closing apps fully, hibernation halts background processes but allows for quick reactivation of the program when needed.
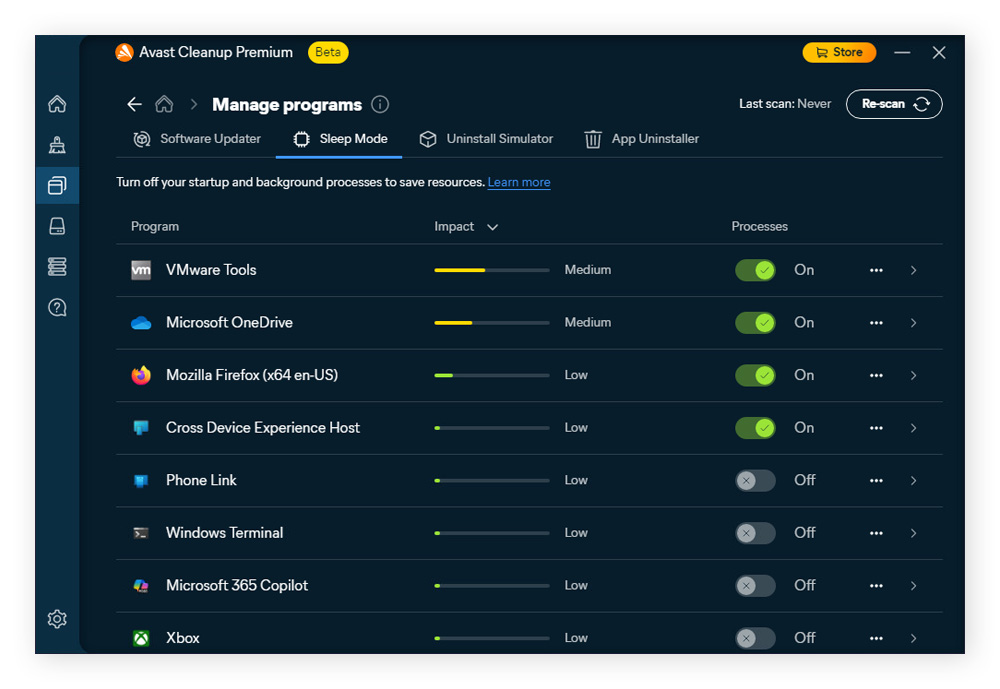
Choosing to put unused applications to sleep helps free up resources, which in turn helps you get more accurate stress test results. Download Avast Cleanup to manually select apps using lots of CPU and RAM, or simply click Speed Up to open a control panel that puts programs to sleep. Don’t be afraid to turn all these off, as only non-essential programs are listed.
Clean up your device
It’s a good idea to clean up your PC before a stress test, so you can free up system resources like CPU, RAM, and storage. Consider removing unnecessary junk files, moving large media files to cloud storage, and clearing app caches. This can help provide more accurate results and prevent system slowdowns or crashes during the test.
Here’s how to do a quick clean on your computer before stress testing:
-
Delete or move large files: Manually search for large files (videos, install files, etc.) that you no longer need. Removing or moving them to an external hard drive or cloud storage can free up valuable disk space, allowing your system to focus on necessary processes during the stress test.
-
Clear browser cache and cookies: Clearing your browser cache and deleting any cookies improves performance and reduces unnecessary data use. This is especially helpful if you're running a web-based test or using the internet during the stress test.
-
Remove junk files: Deleting junk and system files (such as temporary data, cache, and unused system files) before a stress test helps ensure accurate results by freeing up storage, reducing background processes, and preventing performance bottlenecks during heavy usage.
-
Use a disk cleanup tool: Tools like Avast Cleanup automate the removal of junk files, browser history, registry clutter, and more, allowing you to optimize your PC without having to manually dig through your system.
Run a data backup
A stress test pushes your computer to its limits, which can sometimes lead to system crashes or — in rare cases — even hardware failure. To stay protected, back up your important files first, so you don’t lose valuable data if something goes wrong.
Windows makes it easy to safeguard critical files using File History, a built-in backup tool that automatically saves copies of specific files and folders to an external drive or network location. But it’s important to note that Window’s File History does not create a full system backup.
Here’s how to run a data backup on Windows:
-
Connect your PC to an external drive via USB.
-
Go to Control Panel > System & Security > File History.
-
Select Turn on, then click Select drive and choose your external drive.
Microsoft OneDrive automatically syncs documents, photos, and other selected files, and includes built-in security features like encryption and ransomware protection. However, it doesn’t back up your operating system, applications, or system settings.
Mac users can rely on Time Machine, Apple’s built-in backup tool, or iCloud to keep files secure. Time Machine creates full backups of the entire Mac, including system files, applications, and user data, and it also allows file versioning, so you can restore specific files if needed.
Here’s how to set up Time Machine backups:
-
Connect an external drive via USB or Thunderbolt cable.
-
Go to System Preferences > Time Machine > Select Backup Disk. Then, choose your external drive.
-
Turn on Back Up Automatically.
To backup to iCloud instead, go to System Preferences > Apple ID > iCloud. Click Enable file syncing to store important data securely online.
Alternatively, you can use Google Drive, Dropbox, or another trusted cloud service for additional backup before running a stress test. You can also manually copy important files to an external drive or USB stick for a physical backup.
Install system software, drivers, and firmware updates
Keeping your software, drivers, and firmware up to date is essential for ensuring your system runs smoothly and remains stable during a CPU load test. Regular updates help prevent crashes, boost CPU performance, improve compatibility with stress testing tools, and provide more accurate results.
Here’s how to check and update your Windows PC:
-
System: Open Settings > Windows Update > Check for updates. Then, install any available updates.
-
Drivers: Go to Settings > Windows Update > Advanced Options > Optional Updates.
-
Firmware: Visit your device manufacturer's website to download and install the latest firmware updates.
Here’s how to check and update your Mac:
Go to System Settings > General > Software Update. If updates are available, follow the on-screen instructions to install them. MacOS updates firmware and drivers along with system updates, so there’s no need to check for those separately.
Be sure to restart your computer to apply all updates, then check for updates again to ensure there’s nothing pending.
Set up PC monitoring tools
Before running a stress test, it’s crucial to set up CPU monitoring to track your system’s temperatures, usage, and performance metrics. This step helps prevent overheating, identifies stability issues early, and ensures safe operation throughout the test.
Here are some trusted CPU monitoring tools to consider:
-
HWiNFO: This comprehensive tool tracks CPU and GPU temperatures, voltages, and fan speeds. HWiNFO is reliable, easy to use, and supports a wide range of hardware.
-
Core Temp: Focused specifically on CPU temperature, Core Temp provides real-time readings for each core, ideal for monitoring heat levels during testing.
-
Intel Extreme Tuning Utility (XTU): Official Intel software for monitoring overclocking, temperature, and tuning CPU performance with detailed metrics and customizable settings.
-
CPU-Z: A lightweight tool that provides real-time information on your CPU, RAM, and motherboard. CPU-Z is easy to use and offers detailed performance monitoring.
-
iStat Menus (Mac only): iStat Menus tracks CPU usage, temperatures, and overall system performance, with customizable monitoring directly in the menu bar.
Before you launch the test, check your CPU’s temperature as a benchmark.
2. Install and run reputable stress-testing software
To run a stress test, download a trusted CPU load testing tool like Prime95, AIDA64, HeavyLoad, or IntelBurnTest. These tools function similarly, pushing your CPU to its limits to assess stability and performance.
Don’t worry too much about which one offers the best CPU stress test, as they all allow you to monitor your PC’s thermals and deliver similar results.
Here’s how to use each of the most popular stress-testing tools:
Prime95
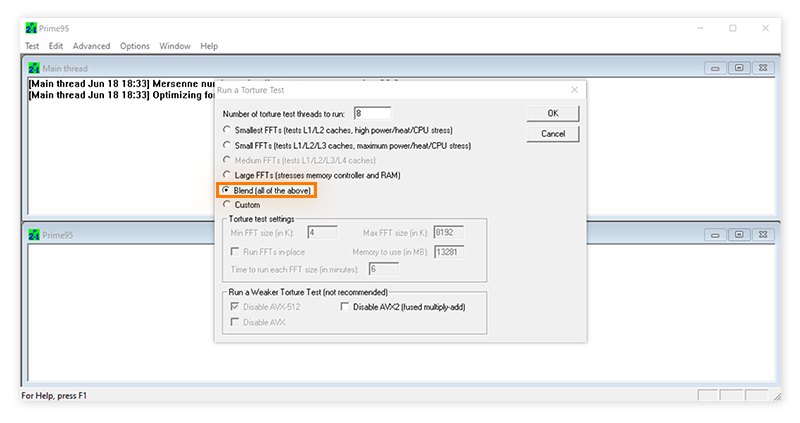
Available for both PC and Mac, Prime95 is a powerful option for assessing system stability under extreme loads. Prime95 is a widely used CPU stress testing tool known for pushing processors to their limits. It uses the Mersenne prime algorithm to fully engage your CPU’s floating-point unit (FPU) and integer processing, while also testing the L1, L2, and L3 caches for stability.
Here’s how to run a stress test with Prime95:
-
Download Prime95 and select the right variant for your operating system (usually Windows 64-bit).
-
Open the program, and choose Just stress testing > Options > Torture Test > Blend (all of the above) > OK.
-
Let the test run for at least 60 minutes. Expect a fair amount of noise and heat.
AIDA64
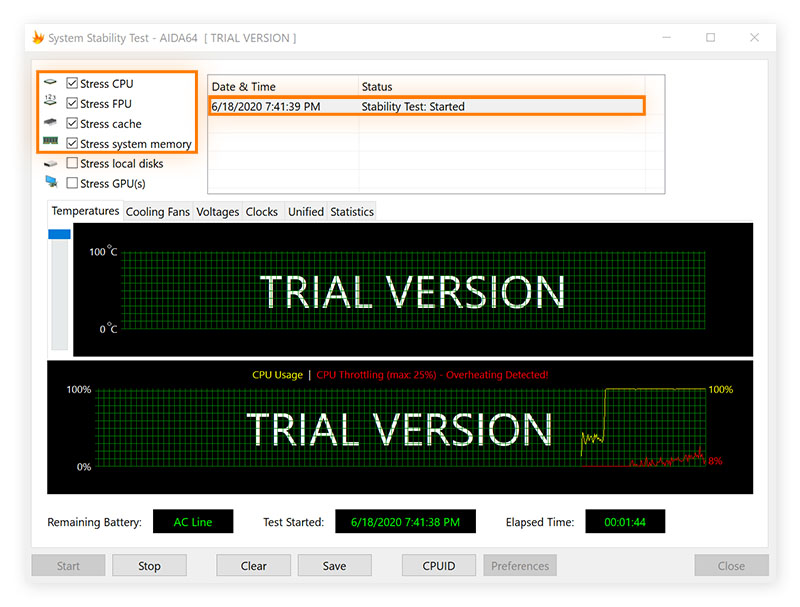
AIDA64 provides a powerful suite of tools to monitor performance, analyze hardware, and run load tests on your PC. This stress testing tool offers a system stability test that simulates realistic workloads, helping you assess your PC’s performance and reliability.
AIDA64 also includes benchmark comparison, allowing you to test your system and compare results with other PCs.
You can download AIDA64 as a ZIP file — ideal for one-time use, as it doesn’t leave installation traces — or as an EXE file, which is better for frequent use and provides a full installation.
Here’s how to run a stress test with AIDA64:
-
Download AIDA64, open the zip file, and run aida64.exe as an administrator.
-
Once installed, open AIDA64, click Tools > System Stability Test.
-
Click Start and allow the test to run for at least 60 minutes.
-
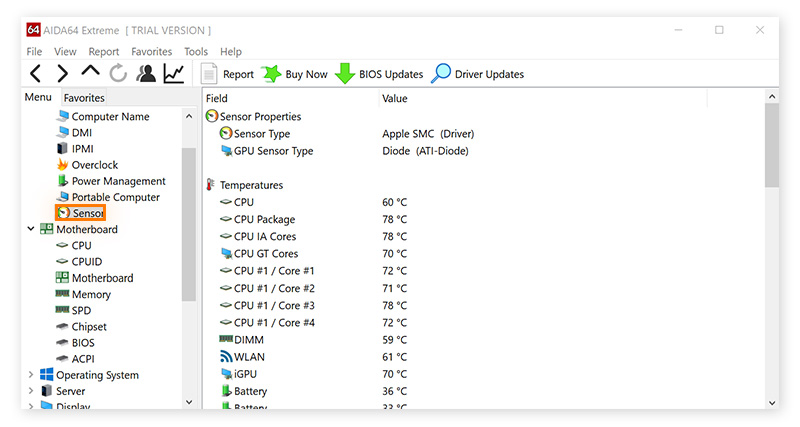
Go to the results screen, select Sensor, then monitor the internal hardware temperature as the stress test runs. Stop the test early if it exceeds 194°F (90°C).
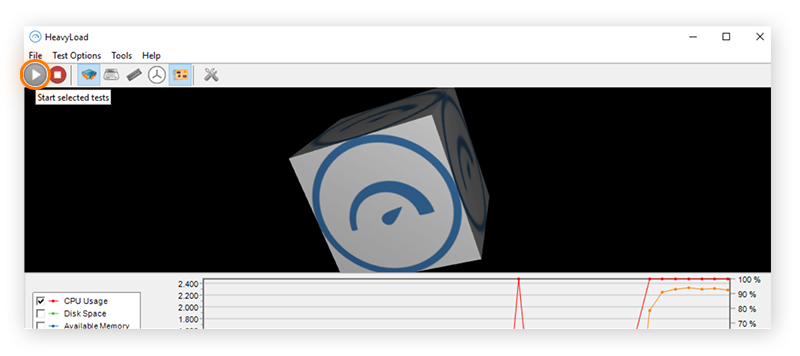
HeavyLoad
HeavyLoad is a free stress testing tool for Windows PCs that goes beyond just the CPU — it also lets you monitor GPU temperature as your system is pushed to its limits.
This stress-testing software provides real-time graphs of component usage, making it easy to track performance throughout the test. With a user-friendly interface and simple design, HeavyLoad is a great choice if you’re a beginner or you simply don’t need the advanced configurations found in other tools.
Here’s how to run a stress test with HeavyLoad:
-
Download HeavyLoad, install the .exe file, and launch the tool.
-
Check the box for CPU and for any other components you’d like to test.
-
Click the Play button to start the test.
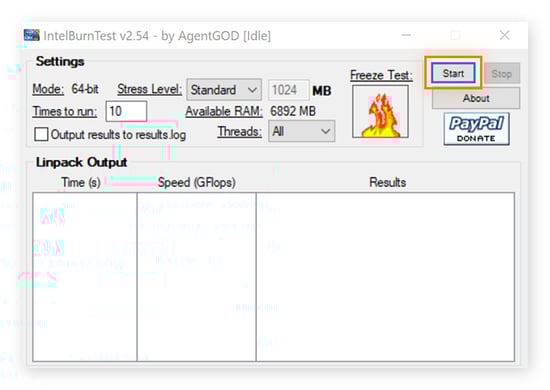
IntelBurnTest
IntelBurnTest may not be an official Intel tool, but it’s one of the simplest and most effective stress testing programs available. IntelBurnTest is designed to push even the most powerful computers to their limit. It delivers a fast and intense way to assess CPU stability, making it a great option for quick performance checks.
Despite its name, IntelBurnTest works with most modern PC processors, including both Intel and AMD. The tool is lightweight and easy to use, utilizing Linpack benchmarking to push your CPU to its limits — ideal for testing stability after overclocking or installing hardware upgrades.
Here’s how to run a stress test with IntelBurnTest:
-
Download, install, and open the IntelBurnTest app.
-
Select Stress Level, set it to Maximum, and click Start.
OCCT124
CCT (overclock checking tool) is a powerful stress-testing and monitoring utility designed to test CPU, GPU, power supply, and memory performance. The OCCT124 portable version requires no installation, making it easy to diagnose issues without adding extra software to your system.
The free edition of the tool provides access to all essential tests with minimal restrictions, making it a reliable tool for most Windows PC diagnostics.
Here’s how to run a CPU stress test using OCCT124:
-
Download OCCT 1244. Right-click the ZIP file and choose Extract All to a folder of your choice. Click OCCT.exe to launch the program.
-
In the OCCT interface, click CPU. Select the Infinite test type, then select All Logical Cores to stress the entire CPU.
-
Click Start to begin the stress test.
-
Go to the OCCT monitoring panel and stop the test if temperatures exceed 194°F (90°C) or after the desired duration.
Cinebench
Compatible with both Windows and macOS, Cinebench, developed by Maxon, is a widely used free benchmarking tool designed to evaluate CPU and GPU performance while also offering CPU stability testing.
Here’s how to run a CPU stress test using Cinebench:
-
Download and install Cinebench.
-
Open the tool and select CPU (Multi Core) > Advanced Preferences > Looped testing (continuous benchmark).
-
Click Run to start the test.
-
Stop the test if the temperature exceeds 194°F (90°C) in your chosen monitoring tool or after the desired run time.
Terminal on Mac
You can run a CPU load test on your Mac’s CPU with Terminal — a simple and free method that requires no additional software.
-
Press Command + Spacebar. Search for Terminal and open the app.
-
Type yes > /dev/null and press Enter.
-
To stop the test, press Command + C.
While Terminal provides a basic stability check without installing external software, tools like Prime95 or Cinebench offer more advanced stress testing options for deeper Mac performance analysis.
3. Monitor your PC
Monitoring your CPU during a stress test helps ensure it stays within safe temperature, voltage, and clock speed limits. Sudden clock speed drops (throttling) or unstable voltage levels can signal cooling problems, system instability, or potential hardware damage, requiring prompt action to prevent further risks.
Check your CPU temperature
Use your CPU monitoring tool to track both the peak temperature and the average temperature throughout the stress test. Most CPUs have a maximum safe limit of 185–194°F (85–90°C), though this varies by model.
Monitoring CPU temperature helps determine if your cooling system is effective. Watch for sudden spikes, as they could indicate cooling inefficiencies, VRM overheating, or faulty sensor readings.
If temperatures exceed 194°F (90°C), stop the test immediately to prevent damage to your system.
Check your clock speeds
CPU clock speed measures how quickly a processor executes tasks, expressed in gigahertz (GHz). During a stress test, monitoring clock speeds ensures your CPU is running at its expected frequency under load.
When running a stress test, you will likely have slightly lower clock speeds — 3.0 GHz and 4.5 GHz — due to thermal and power limits. Stop the stress test if your clock speeds reach 4.5 GHz to 5.0 GHz to avoid damage to your CPU.
Check your voltage
Use your CPU monitoring tool to track voltage levels during the stress test and ensure they stay within 1.0V to 1.4V for optimal stability and performance.
-
Below 1.0V: The CPU may become unstable, leading to crashes or erratic behavior.
-
Above 1.4V: Excess voltage can cause overheating and long-term damage.
By monitoring voltage, you can verify that your CPU runs efficiently under high loads, without risking thermal issues or hardware failure.
4. Inspect your CPU stress test results
Your stress test results provide insight into your CPU’s overall health and stability. Review the test logs for issues like calculation faults, hardware failures, or unexpected crashes, which may indicate instability, overheating, or power issues.
If the test shows high temperatures or stability errors, consider taking the following actions:
-
Improve heat management with better airflow or an upgraded cooling system.
-
Adjust voltage settings for better efficiency.
-
Underclock your CPU to enhance stability.
If your CPU fails the stress test, the issue might be fixable, or it could be a sign that it’s time to upgrade your computer hardware to achieve the performance levels you’re after.
What is a stress test anyway?
A CPU stress test analyzes your computer's performance capabilities by subjecting it to maximum usage loads over a sustained period. Load tests help you evaluate how much your hardware can handle, especially if you’re thinking of overclocking your CPU or running demanding processes. Knowing how to test your motherboard and other critical components with a computer load test lets you know what your PC can and can’t do.
Is stress testing safe?
Stress testing is generally safe, as long as you do it in moderation and carefully monitor the results. While there’s a small risk of burning out a CPU, most computers are designed to shut down automatically before that happens.
However, frequent or prolonged stress testing can generate excessive heat and potentially shorten your computer’s lifespan. For best results, run a stress test when the device is new, then repeat it annually or after major hardware changes.
How long should I run a CPU stress test?
A good rule of thumb is to stress-test a CPU for one hour, or until it exceeds 194°F (90°C). If your computer runs flat out for 60 minutes without getting too hot or forcing a shutdown, it’s a sign that your machine’s in great condition.
Why do I need to run a stress test?
You should run a stress test on a new computer to check your specs and ensure everything works as it should. Knowing your PC’s limits is essential, especially if you’re building your own gaming PC and want to eek out maximum gaming performance, or if you're planning to run high-demand programs regularly.
Why might my CPU fail a stress test?
A failed stress test may indicate that certain key components of your computer are compromised. Depending on what’s wrong, you might just have to replace the individual component(s). But a failed CPU load test could mean your computer is reaching the end of its life.
Here are some other reasons your CPU might fail a stress test:
-
The fan isn’t doing its job: Your computer’s fan gets loud because it regulates internal temperature at all times to keep the CPU and other components cool. If those parts are hitting high temperatures quickly, the fan (or other cooling elements) might need to be replaced. Try reapplying the thermal paste or upgrading the fan.
-
Poor airflow: No matter how powerful your PC’s fans are, they can’t function properly without cool air circulating. Taking care of the airflow by clearing ducts and vents with a few bursts of compressed air may help your computer run better.
-
Hardware that’s past its prime: All computers slow down eventually, but the time it takes them to run down depends on hardware usage levels. If you push your PC to the limit regularly, it’s not going to last as long. Upgrade individual components where possible.
-
Outdated drivers: Drivers help your computer run properly, but outdated ones can slow performance and cause unnecessary strain. Updating them with the help of a tool like Avast Driver Updater ensures compatibility with new software and keeps your system running smoothly and efficiently.
-
You’re weighed down by junk: When your system is weighed down by bloatware and junk files, it can’t run efficiently. If RAM maxes out, your hard drive steps in — but without enough space, the CPU works overtime, increasing the risk of overheating and performance slowdowns.
Prepare for your CPU stress test with Avast
Keeping your system streamlined is vital for maintaining optimal performance. Avast Cleanup will reclaim gigabytes of space on your hard drive by jettisoning junk and prevent speed-sapping programs from clogging up your computer.
From unwanted programs you haven’t touched in years to five-year-old “temporary” files clogging up your disk — download Avast Cleanup to get rid of them all with the click of a button. Try it free today and keep your PC squeaky clean and running at its best.
What customers say
More Performance Articles
/Academy-How-to-speed-up-your-browser-Thumb.jpg)
Why Is My Browser So Slow? How to Speed Up Chrome, Firefox, and IE

Mac Running Slow? 15 Proven Solutions to Speed Up Your Mac

Why Is My Data So Slow & How to Make It Faster

Why Is My Internet So Slow & How to Speed It Up

How to Speed Up Your PC

How to Clean Up Your Android Phone

Why Is My Android Phone Slow and How to Speed It Up

Why Your iPhone is Slow and How to Speed it Up
Speed
Performance
Anthony Freda
10-05-2022