- Security
- Privacy
- Performance
If your computer is acting strangely, it might be due to a nasty virus. Figuring out how to get rid of a virus from your PC doesn’t have to be complicated. Here, we’ll show you how to manually remove malware from your Windows computer or laptop, then explain how to remove and prevent viruses for free with Avast One.


This Article Contains
This Article Contains
What is a computer virus?
Computer viruses are nasty bits of software that can cause your PC to behave in all sorts of unpleasant ways. Viruses spread from one computer to another by hijacking the resources of their host machines in order to copy themselves and proliferate — just like biological viruses do, from one person to another. A virus on your computer will change the way certain programs or functions work so that they help the virus copy itself.
Some viruses are relatively harmless, but others can cause damaging long-lasting effects. The good news is that viral infections are largely curable. You can even attempt to fix virus-related issues and remove viruses on your own.
What's the difference between viruses and malware?
It’s common to hear the terms “virus” and “malware” thrown around interchangeably, but they’re not quite the same thing. That conflation can be especially troublesome if you’re trying to figure out how to remove malware other than viruses. So let’s set the record straight on viruses vs. malware.
“Malware” is an umbrella term that encompasses all types of malicious software — any program or code designed to do harm. Viruses are but one offering in the grander malware smorgasbord. All viruses are malware, but not all malware are viruses.
If you need to delete malware, the process may vary depending on the precise type of malicious code, so it’s important to acknowledge the distinction when removing viruses from your computer.
How to remove a virus from a PC
It’s action time. You’ve got an infected computer, and together, we’re going to remove all viruses from it and restore it to working order. The most reliable way to remove malware like viruses is to use a dedicated virus removal tool. It’ll automatically scan your computer to find any traces of infection while freeing you from having to worry about how to remove viruses yourself.
Below, we’ll show you how to remove malware from Windows 10, but you can apply the same basic principles to older versions if needed. But first, a quick note: Running older software is a security risk, as updates and patches frequently repair vulnerabilities found in previous versions. If you’re connecting a computer to the internet, it should be equipped with the most current software available. Install antivirus software for Windows 10 or Windows 11 to keep your device protected.
Onward and upward! Let’s find out how to get rid of viruses on your PC.
1. Enter Safe Mode on your PC
You’ll first need to restart in Safe Mode, which limits your computer to the basic operations that it needs to function. This is helpful when removing viruses from your computer or laptop, because it should deactivate infected files as well.
Depending on the degree of computer access you currently have, you can get to Safe Mode in a few ways:
Option 1: Enter Safe Mode from the Settings menu
Press the Windows key + I to open the Settings menu. You can also reach the Settings menu by opening the Start menu, then scrolling down to Settings.
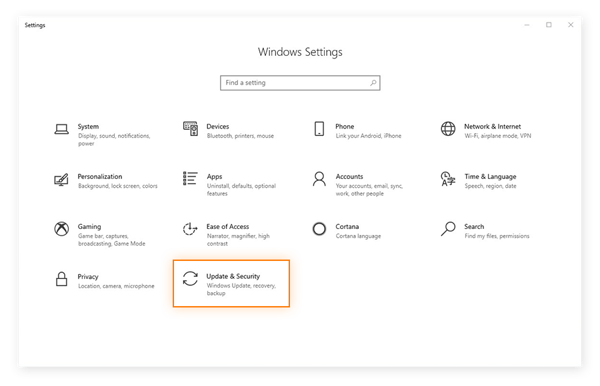
Select the Update & Security category. You may need to scroll down to find it.
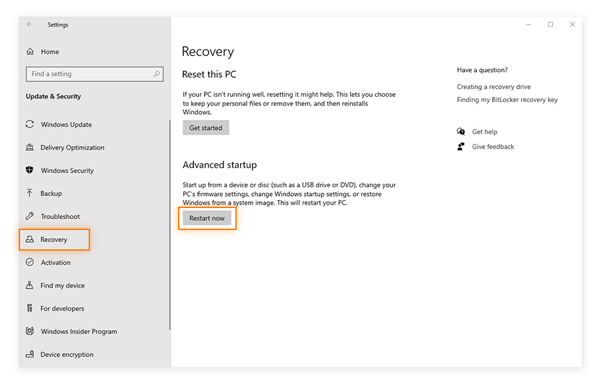
In the Update & Security settings, select Recovery, then click the Restart Now button under the Advanced startup heading.
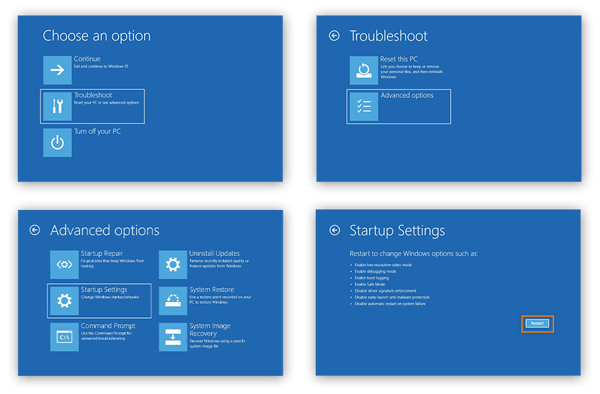
From here, your PC will restart and display the Choose an option screen. You can tell Windows 10 how you want it to boot. Navigate through Troubleshoot > Advanced options > Startup settings > Restart.
After another restart, you’ll see a new list of options for loading your OS. Select 4 or press F4 to start in Safe Mode.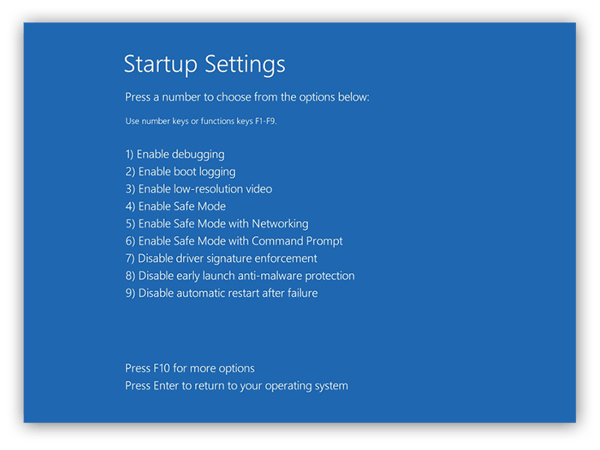
Option 2: Enter Safe Mode from the sign-in screen
If you’re unable to log into your computer, you can restart in Safe Mode from the sign-in screen. While there, press and hold Shift while clicking the Power icon and selecting Restart.
Your computer will then restart to the Choose an option screen. From there, you can follow the same process as is outlined in the previous step.
Option 3: Enter Safe Mode by shutting down your computer
If your computer is unusable, force it to shut down by holding down the power button for 10 seconds. After it shuts down, start it back up again by pressing the power button as you normally would. As soon as it shows the first signs of life — a startup chime, a logo on the screen — hold down the power button again for 10 seconds to shut your computer back down. Repeat this on-off process one more time.
When you turn your computer on for the third time, let it fully restart to enter WinRE (the Windows Recovery Environment). From there, follow the same steps from the Choose an option screen to select Safe Mode, as outlined above in Option 1.
2. Remove any temporary files
Once in Safe Mode, run Disk Cleanup to get rid of all your computer’s temporary files. Reducing the quantity of files on your device will help speed up the virus scan that you’re about to perform in the next step. You may even get lucky and clear up your malware infection before needing to go any further.
-
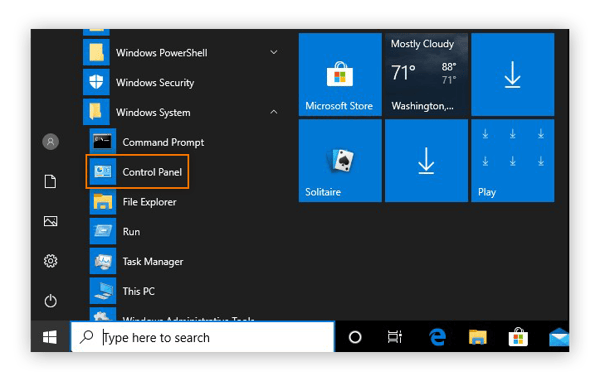
First, open the Start menu and select Control Panel from the Windows System drop-down menu.
-
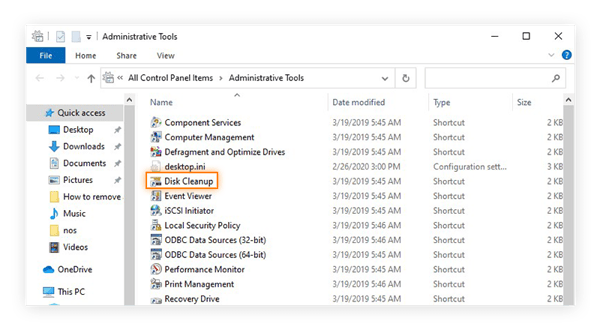
Select Administrative Tools.

-
Open Disk Cleanup from the list of tools.
-
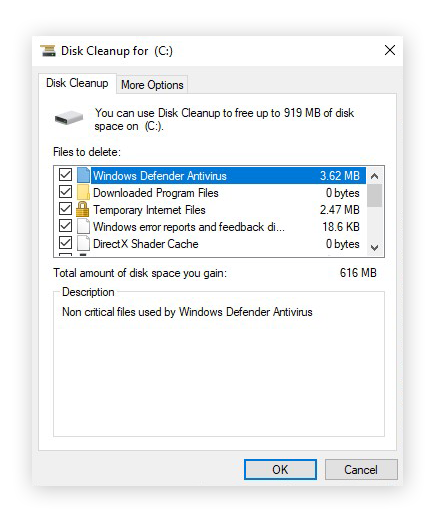
Tick the boxes next to the file types you’d like to remove. We suggest clearing all temporary files and emptying your Recycle Bin. If there’s anything else your system isn’t using, clear that as well.
-
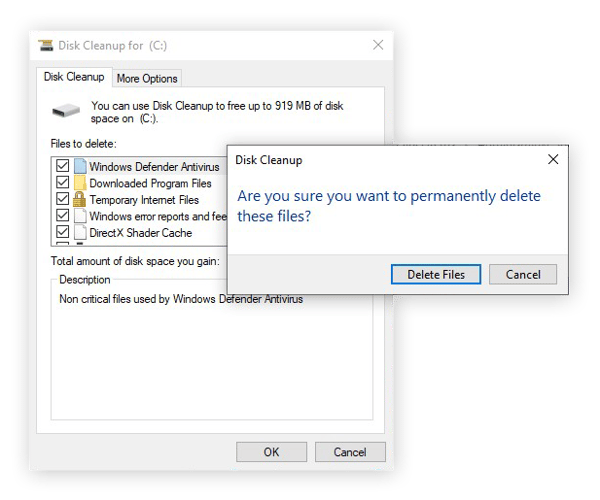
After making your selections, click OK. Then click Delete Files to confirm.
3. Scan the system for viruses
With all those temporary files out of the way, you’re ready to use a trustworthy cybersecurity tool to scan your device for any signs of a computer virus. Avast One thoroughly checks your device for viruses, other types of malware, and a wide range of other risks to your online security and privacy. Then, you’ll be able to safeguard your PC by resolving any issues with just a single click. And we’re always updating our antivirus software to protect you against the latest threats as they emerge.
Now, all you need to do is let Avast One — or your chosen antivirus removal app — do its job. Since you’re in Safe Mode, you won’t be able to open Avast One as normal — though it is still protecting your computer. Instead, we’ll show you how to set up a Boot-time Scan in Safe Mode, then restart your computer. This will allow Avast One to scan and detect malware when your computer restarts.
-
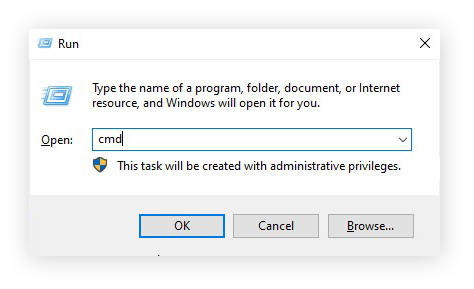
Press the Windows + R keys to open the Run box. Type cmd and press Enter to open the Command Prompt interface.
-
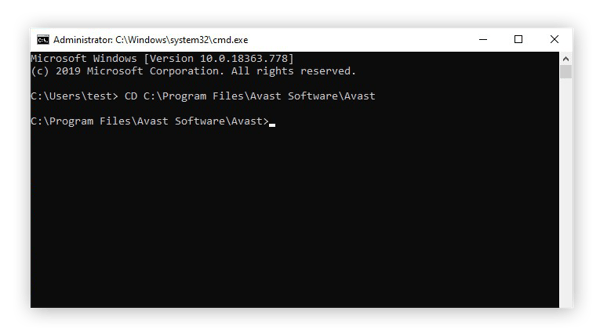
In the Command Prompt interface, type CD followed by the location of your Avast installation file. The default location is C:\Program Files\Avast Software\Avast. Then, press the Enter key.
-
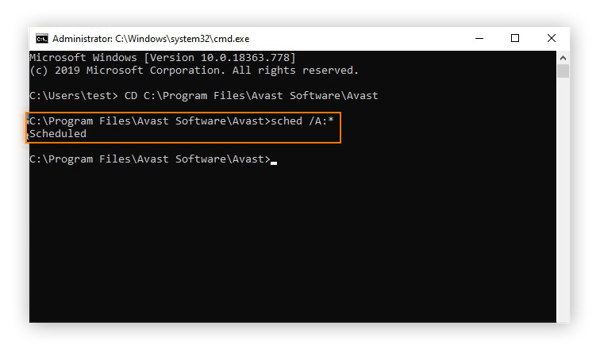
To schedule a Boot-time Scan for all drives in your PC, type sched /A:* and press the Enter key.
-
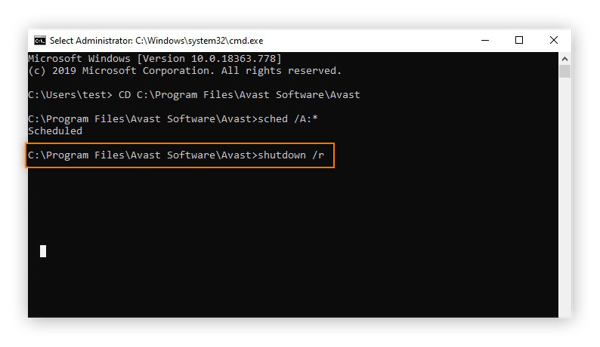
The Command Prompt interface should confirm the Boot-time Scan with the phrase “Scheduled.” After you see that, type shutdown /r and press the Enter key to restart your computer and perform the Boot-time Scan.
-
As your computer restarts, Avast One will perform a Boot-time Scan to thoroughly check for viruses and other malware. This may take several minutes to complete.
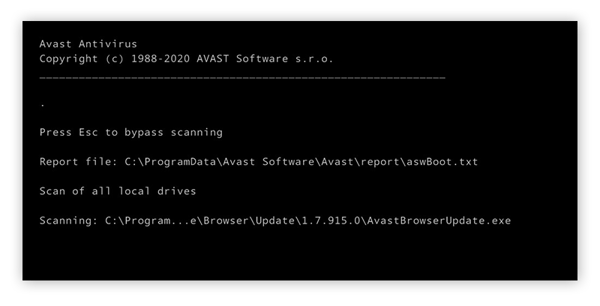
-
After the scan is complete, your computer will complete the booting process.
4. Recover any damaged software and data
Your cybersecurity tool will know how to tell if a file is a virus and how to remove a virus from a file without deleting it. However, many viruses can and will cause direct harm to your software and files. You can attempt to recover them with a backup.
Note that you’ll need to have previously enabled Windows’s backup tools in order to use them now.
Use backup files
If you aren’t regularly backing up your most important files, start now. Having an up-to-date backup on either an external drive or a cloud server is one of the best protections you can give yourself against viruses — aside from an antivirus tool, of course.
Here’s how you can restore your files from a backup in Windows 10:
-
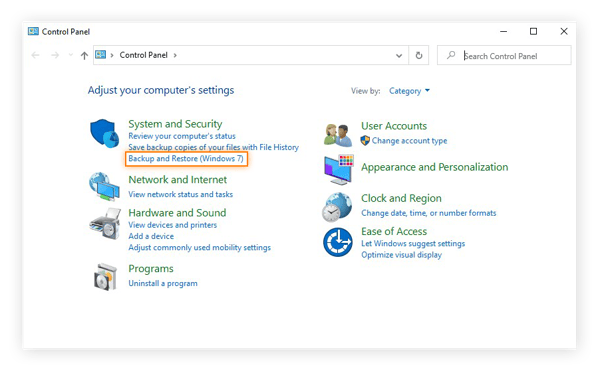
Head to the Control Panel via the Start menu in the lower-left corner of your screen.

-
Choose Backup and Restore (Windows 7) under the System and Security section.
-
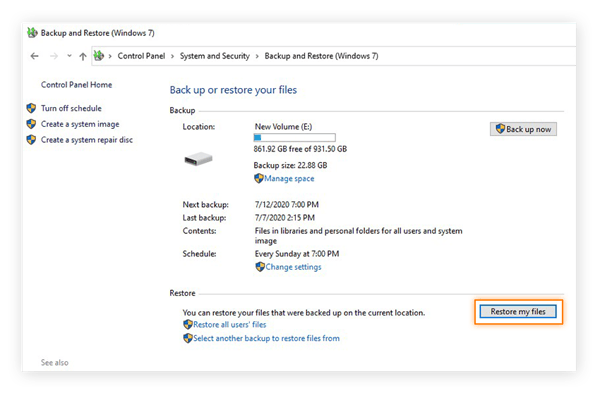
If you’ve created any previous backups, you’ll find them here. Click Restore my files to get your files back.
-
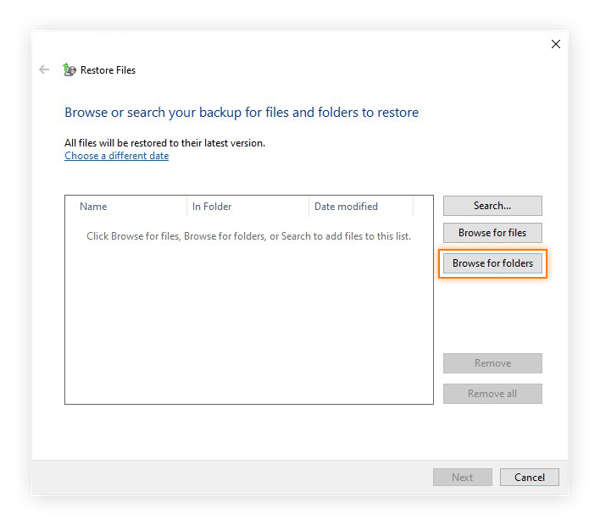
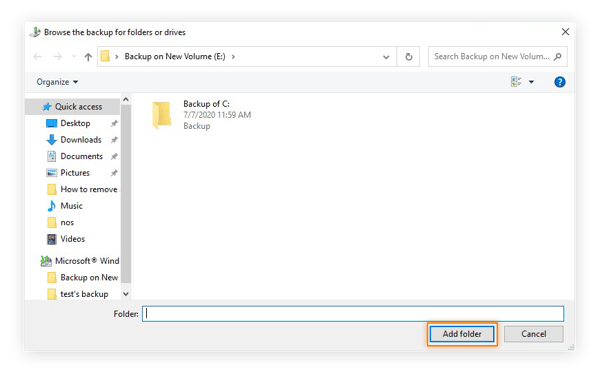
Now choose which files from your backup you’d like to restore. You can restore the entire backup by selecting Browse for folders.
-
Select your backup and click Add folder.
-
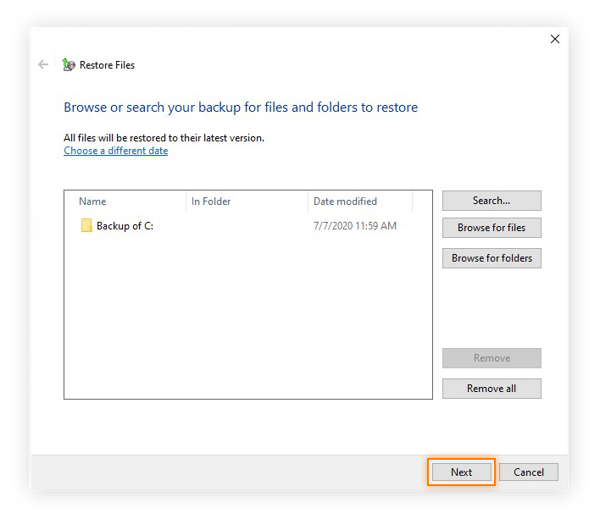
You’ll see your backup in the list of files and folders that you’ll be restoring. Click Next to continue.
-
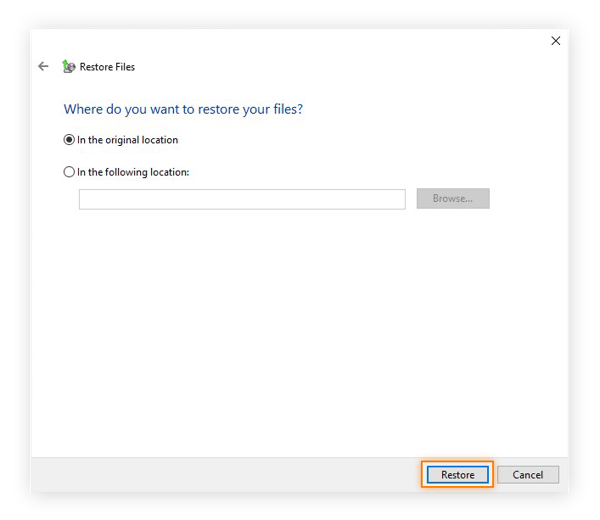
Tell Windows where to put the restored files. If you want everything exactly as it was, choose In the original location, then click Restore.
-
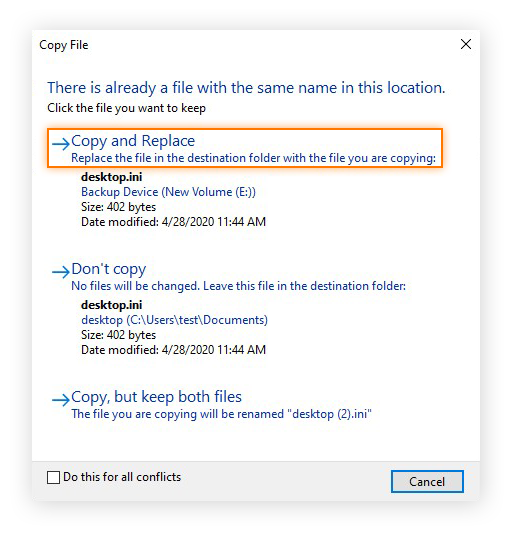
If Windows detects that the original files are still on your computer, you can choose to replace them or leave them uncopied. Choose Copy and Replace to ensure that you’re giving yourself pristine, uninfected files. At the bottom of the window, select the box next to “Do this for all conflicts” to replace all duplicate files.
-
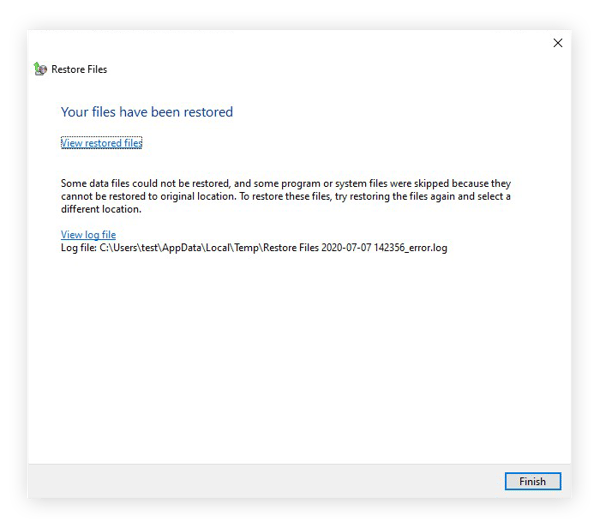
When the restoration is complete, click Finish to conclude the process. Now you can enjoy your virus-free files and folders.
How to tell if your computer has a virus
Now that your computer is virus-free, let’s look into how you can check for and detect any new viruses you may encounter in the future. Become an expert at malware detection and learn how to tell if your computer has a virus by remaining alert for the following symptoms:
-
Your system begins running slower than usual. This can be due to a virus borrowing your computer’s resources to replicate itself. With less computing power remaining for its own processes, your computer will slow down and suffer other performance declines.
-
Ads and pop-ups appear on your desktop. Many viruses fall into the adware category — malware created to flood you with ads to generate revenue for a cybercriminal. A sudden rush of pop-up ads may very well be the handiwork of a virus.
-
You find programs or other software on your computer that you didn’t install. A virus may download additional malware onto your computer for use in subsequent cybercrimes. The only programs on your computer should be those you installed yourself, or those included by its manufacturer.
-
Your system starts behaving erratically. As a virus seeps into your computer’s innards, you may experience side effects including crashes, shutdowns, or program failures.
-
Your internet suddenly slows down, or your bandwidth spikes. Malware that sends out large amounts of data, such as botnets or spyware, will clog up your internet connection.
-
Your antivirus software flags an infection. If you’re using legitimate antivirus software, trust it! Let it remove the virus or other malware for you.
It’s worth noting that those issues may also stem from non-viral causes, such as an overflowing downloads folder or a full cache. Computers can fill up with junk faster than you think, and this sort of digital hoarding can result in the consequences described above. Use a cleanup tool such as Avast Cleanup to trim the fat and restore things to working order.
If you’re sure that your computer is infected, but your anti-malware software has not detected and removed a virus, what should you try first? Well, just scroll up a bit and run through our detailed instructions for removing a virus!
Can any other devices be infected?
Windows PCs aren’t the only devices under threat from viruses. Unlike in the past, it’s now possible to get malware on nearly any device, including Macs and phones. That’s why it’s so important to scan devices for malware, no matter what type of tech you prefer.
Virus removal methods vary greatly depending on what you’re using — removing a virus from a Mac is a very different affair from getting rid of a virus on Android or removing malware from iOS. Regardless of what you use, your best defense against viruses is always a reliable antivirus solution from a reputable provider.
I thought Windows Defender protected me against viruses?
Windows Defender offers protection against viruses, but it doesn’t fare nearly as well against other types of threats.
Check out a recent comparative antivirus evaluation, and you’ll see that Windows Defender performs well enough, but not quite as well as some of the other options. While it’ll keep you safe from most malware, Windows Defender is not enough to fight against data thieves, Wi-Fi snoops, and other threats.
For this reason, we highly recommend that you protect your devices with specialized and comprehensive cybersecurity software.
Remove viruses and malware the easy way
One of the greatest benefits you’ll enjoy with cybersecurity software is its ability to detect and remove viruses and other malware from your device in real time. Avast One runs quietly behind the scenes, scanning for any traces of viruses or other malware and removing them before they have a chance to infect your machine. And our software is continuously updated to fight against new threats as they’re discovered, keeping you safe in an ever-changing online environment.
When you choose Avast One, you’re joining hundreds of millions of people around the world who trust Avast to protect their PC.
What customers say
More Security Articles

What Is UPnP?
Why is My iPhone in SOS Mode?
New Avast One vs Legacy Avast One: What’s Changed?

What Is the New Avast One?

Is Mercari legit? A guide to safe shopping and avoiding scams
Is WeTransfer Safe?

Is Poshmark Legit?

Is WhatsApp Safe?

Is Apple Pay Safe?
How to Bypass Apple Activation Lock (and Which Methods to Avoid)

Is Windows 10 Still Supported? It Is by Avast
Router Login Guide: How to Access Your Router Settings
Security Tips
Security
Ivan Belcic
9-07-2020