- Security
- Privacy
- Performance
Windows’s Task Manager monitors your PC’s processes and applications, so if Task Manager is reporting 100% disk usage, your hard drive is working at max speed, which can be a problem for your PC’s health. Learn solutions to fix 100 percent disk usage in Windows 10 or 11, from easy fixes to more involved methods. Then, get Avast Cleanup to help lower disk usage automatically.

This Article Contains
This Article Contains
What is disk usage?
Disk usage is the percentage of your hard disk your computer is currently using to run programs and carry out tasks. Disk usage relates more to the performance of your hard disk rather than its storage capacity.
If Task Manager is reporting 100% disk usage, but nothing is running, then your hard drive has hit a snag that’s making it run at full speed needlessly. Possible reasons why you’re running at 100 percent disk usage include malware and unnecessary background processes.
When troubleshooting 100% disk usage in Windows 10 and 11, try simple solutions first before moving on to more complex ones.
How to lower disk usage
If your disk is at 100% usage, you may be able to lower disk usage by checking for viruses, resetting your virtual memory, performing a clean boot, or wiping your hard drive. A simple restart might also clear up the issue.
Most screenshots below are for 100% disk usage in Windows 10, but guidance for Windows 11 is also included.
Fix 1: Restart your device
As a general rule, restarting your device can work wonders. A fresh start will flush your computer’s RAM, which will stop all the short-term tasks and data bogging down your computer. This can also plug memory leaks and improve performance. A system restart just might be what your device needs to lower disk usage.
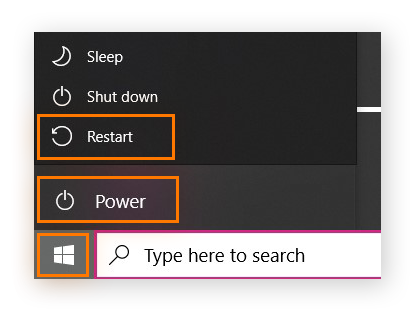
To restart your Windows device, open the Start Menu, click Power, and select Restart.
Fix 2: Update Windows 10
Microsoft updates Windows periodically to address problems and install new features. These updates can sometimes resolve 100% disk usage issues.
Here's how to update Windows 10:
-
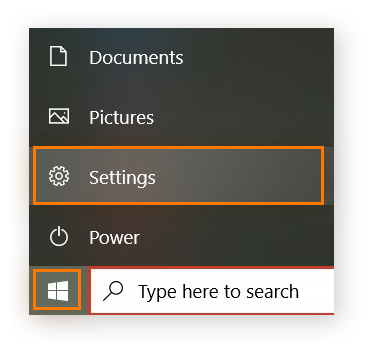
Open the Start menu and click Settings.
-
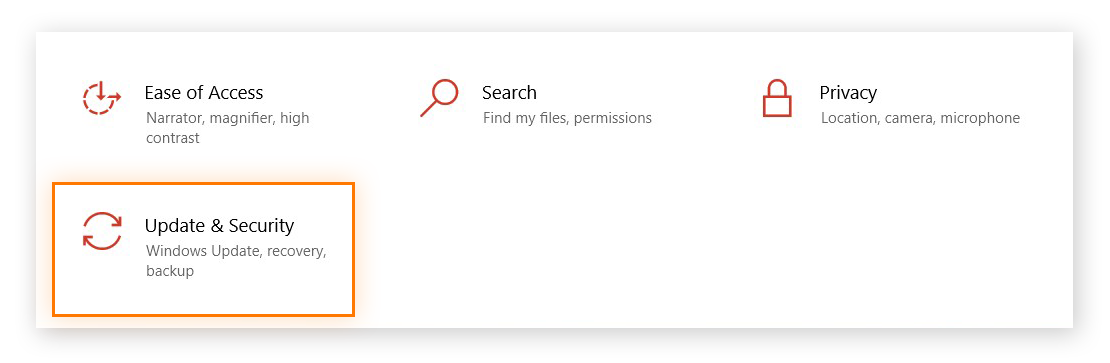
Select Update & Security.
-
On the left side of the page, select Windows update and check for available updates.
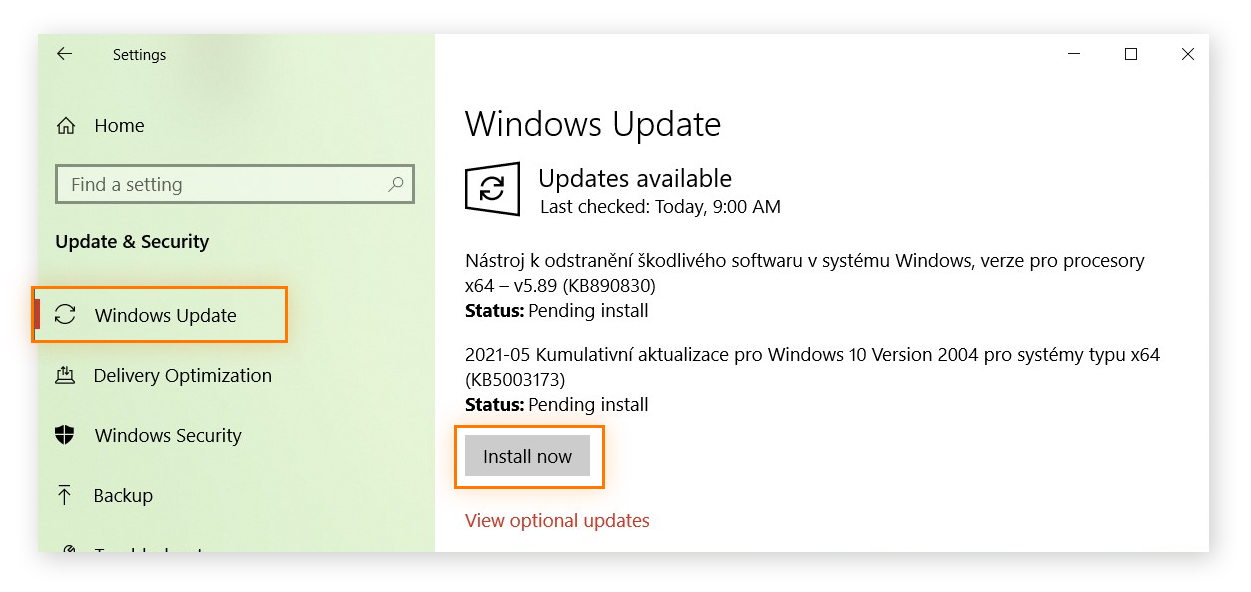
To update Windows 11, go to Start > Settings > Update & Security > Windows Update. Select Check for updates and download and install any available update.
Windows 10 can bombard you with constant updates, which are resource-intensive and may cause temporary 100% disk usage issues. Pausing automatic Windows 10 updates may help, but you’ll need to remember to check frequently for new updates — these are often essential for your computer’s security. We do not recommend disabling or stopping Windows 10 updates.
Don’t stop a Windows update once it starts. You may need to remove and reinstall the latest Windows Update if you do so.
Fix 3: Reduce startup apps
Some programs run on startup by default, so look under “disk” in Task Manager for sneaky apps contributing to Windows 100 disk usage on startup. Limiting the number of startup apps is a quick and easy way to lower disk usage.
To reduce startup apps in Windows 10 or 11:
-
Open Settings from the Start menu.
.png?width=350&height=551&name=MicrosoftTeams-image%20(51).png)
-
Click Apps and select Startup from the left-hand menu.
.png?width=900&height=443&name=MicrosoftTeams-image%20(52).png)
-
Toggle off startup programs you don’t need.
.png?width=978&height=726&name=MicrosoftTeams-image%20(53).png)
Fix 4: Update device drivers
Your device drivers are how your software talks to computer hardware like your disk. Updating your disk driver can help get you below 100 disk usage by allowing your disk to communicate better with the programs it interacts with.
To update a driver in Windows 10 or 11:
-
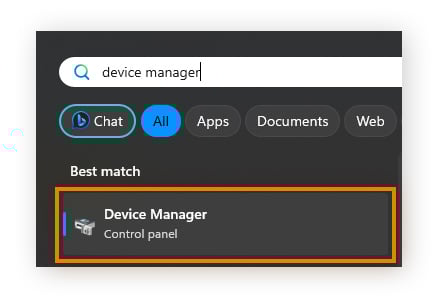
Type “device manager” into Windows Search and select Device Manager.
-
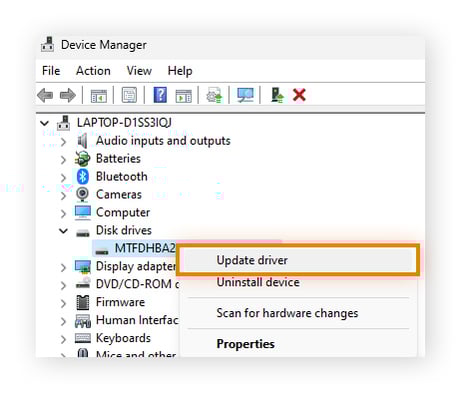
Double-click on Disk drive. Right-click on your drive and select Update driver.
-
Select Search automatically for drivers.
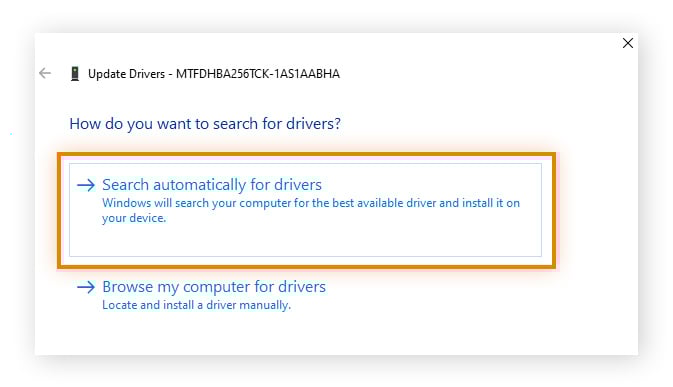
Windows will now search for a more current driver for your disk drive and update your disk driver if one is available. If Microsoft has trouble finding the latest drivers, try looking on your device manufacturer’s website for the most current driver and download it directly.
And just as updating your disk driver can upgrade your disk’s performance, learning how to update graphics drivers and how to update audio drivers can increase the performance of your games and applications.
The best driver updater software ensures you have the current drivers for your system’s hardware. The average PC has dozens of drivers, which can be a pain to locate and install — try using a driver updater tool to manage all your drivers for you.
Fix 5: Check for viruses
Hackers target different parts of your system, including your hard disk. While it performs well against malware, Windows Defender may not be enough to protect against additional threats like phishing attacks.
If you’re experiencing high disk usage, a computer virus or other malware may be the reason, in which case a junkware removal tool won’t help — it’s antivirus software you need. If malware is bleeding your PC’s resources dry, a virus removal tool can get rid of infections as well as help to fix computer overheating or a loud computer fan.
Avast One is a dedicated cybersecurity solution that will scan your system and eradicate threats to your hard disk — as well as the rest of your device. With multiple six layers of security, it’ll monitor your device 24/7 to help detect and block future viruses and other online threats.
Fix 6: Clean junk files
Junk files are temporary files that your computer creates when you perform a task, like browsing the internet or viewing an image. These files are used only once, and if left to accumulate, they quickly build up. Junk files can slow your system, cause performance issues, and contribute to high disk usage.
While they’re an inevitable part of how your computer operates, you can regularly delete junk files to free up disk space. If you’re using one of the fastest browsers available and you’re still experiencing slow browser speeds, examine your junk.
Like removing bloatware, clearing out junk files is one of the easiest ways to clean up your PC.
Here’s how to use the Disk Cleanup feature in Windows 10:
-
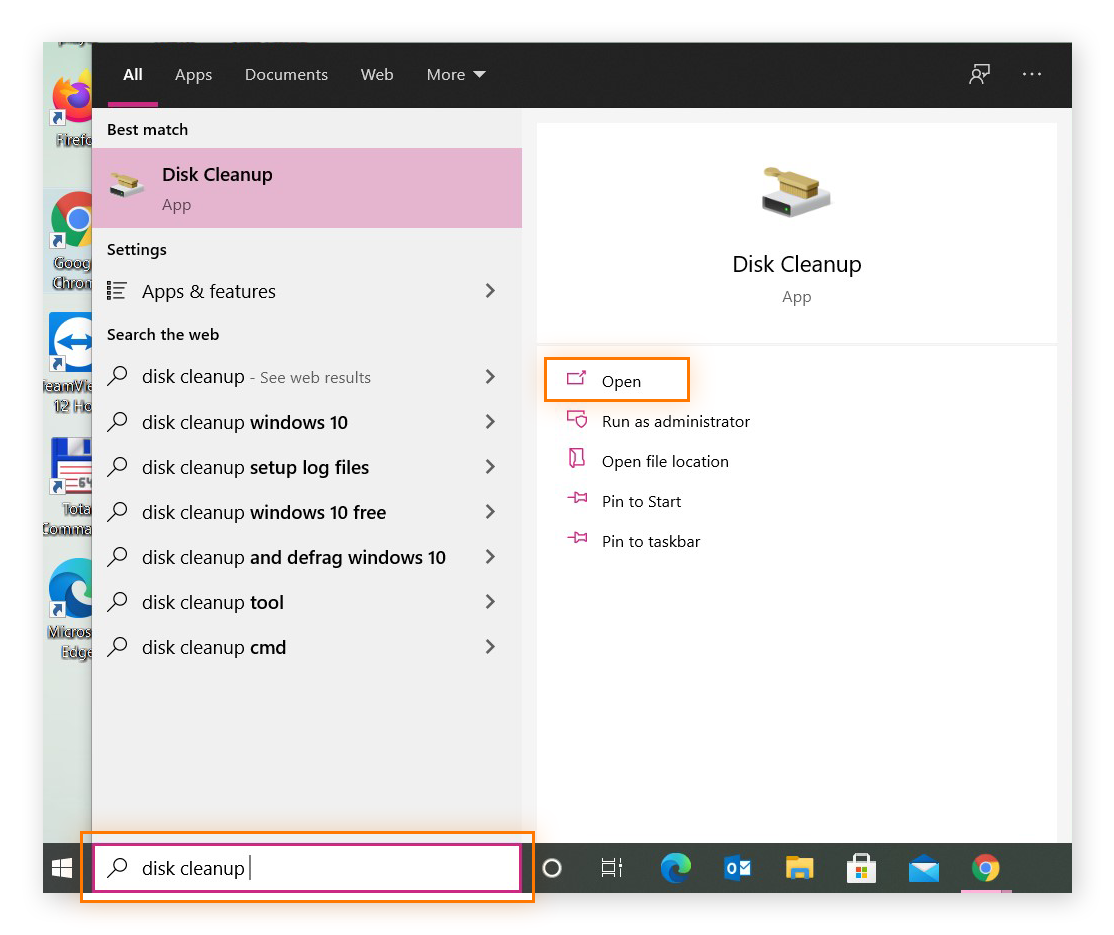
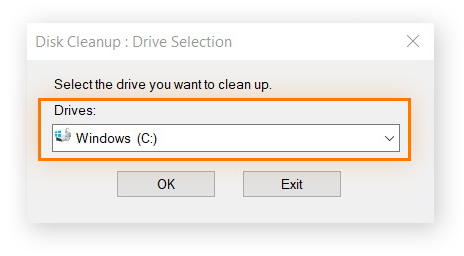
Type disk cleanup into the search bar and select Disk Cleanup from the list of results.
-
Choose the drive you want to clean and select OK.
-
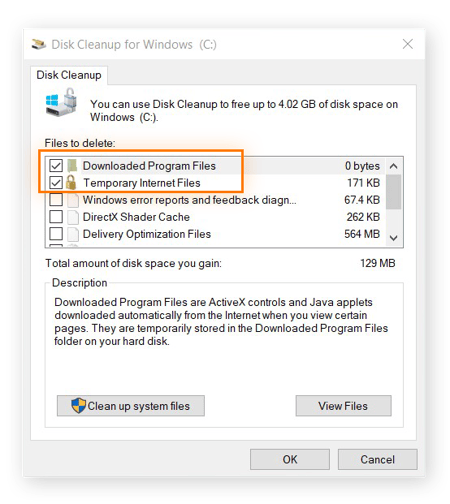
Under Files to delete, choose the file types to remove. Choose Downloaded Program Files and Temporary Internet Files, and then select OK.
The steps above are the same for Windows 11, except Windows 11 skips step 2 and goes directly to step 3.
You can also choose other file types like Recycle Bin to create more space. Just be sure you don’t delete anything you might miss.
Through normal usage, your computer accumulates numerous unneeded files, and they’re often hard to find. Our dedicated optimization experts know how time-consuming it is to sift through and manually clean up all these files. That’s why we built an intuitive and powerful tool that thoroughly cleans your entire system.
Avast Cleanup automatically seeks out and removes bloatware, junk files, and other unwanted files. Free up space to fix hard disk problems and get your PC running like new again.
Fix 7: Change energy options
Windows 10 offers a variety of energy options to help your computer save energy, maintain CPU temperature, and perform optimally. The default setting is Balanced, which is usually enough for most users.
But if you continue to experience 100 percent disk usage on Windows 10, changing your energy option to High performance could give your system a boost, though this is a general performance tip and may not directly impact 100% disk usage.
Here’s how to change your energy options on Windows 10:
-
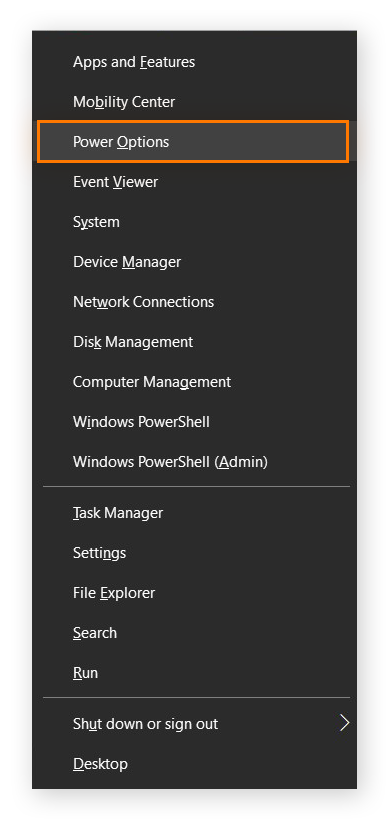
Press the Windows key + X on your keyboard. From the pop-up menu select Power Options.
-
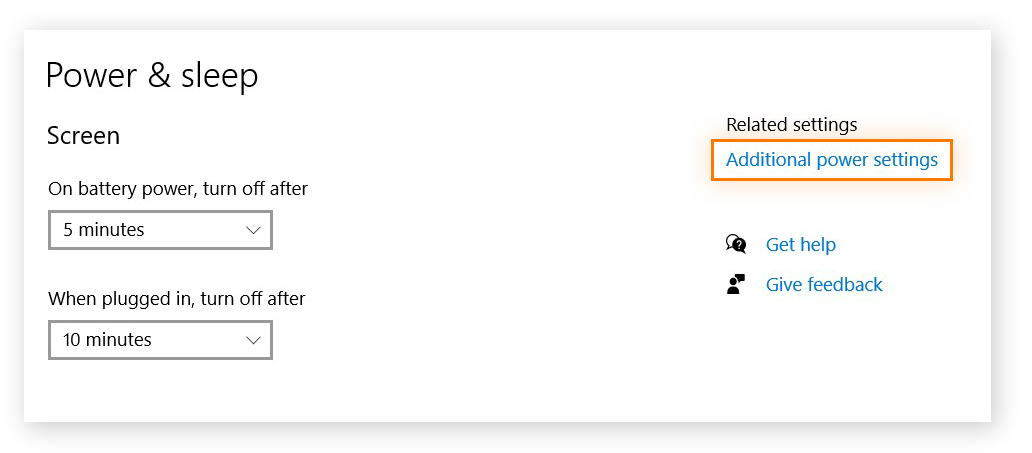
In the Power & sleep menu, click Additional power settings.
-
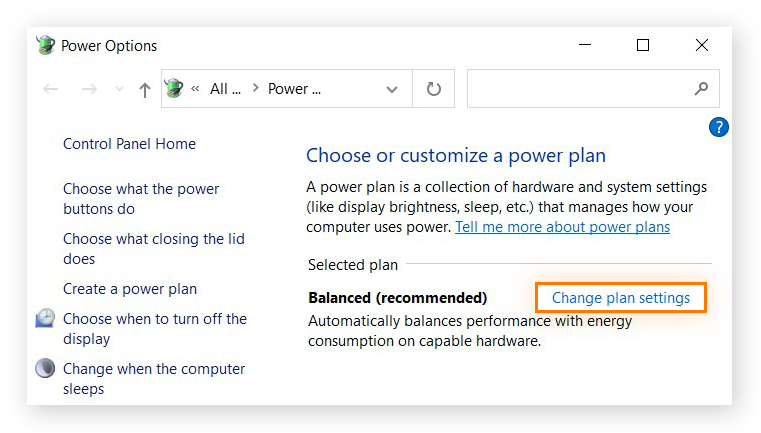
In the Power Options window, click Change plan settings.
-
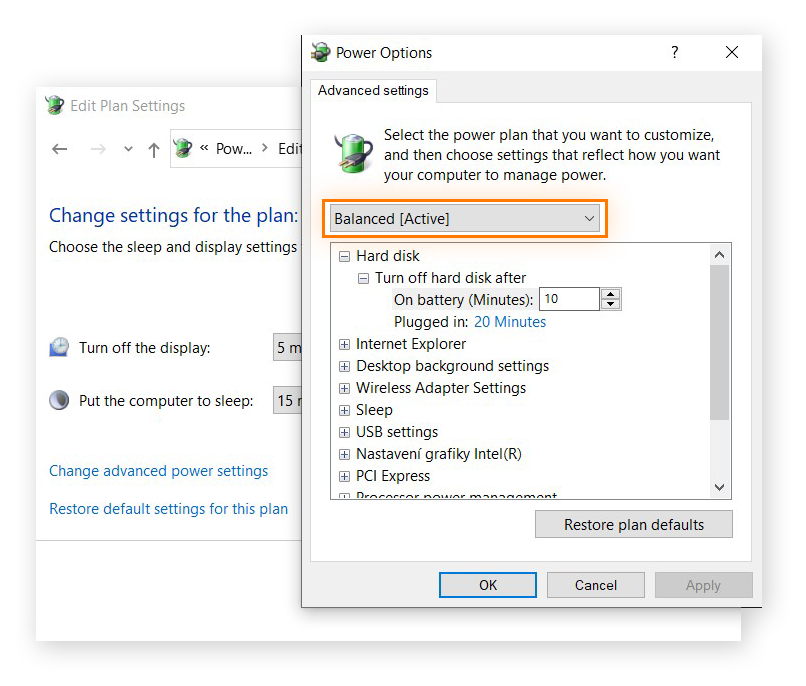
In the Edit Plan Settings window, click Change advanced power settings. In the Power Options window that pops up, click the downfacing arrow next to Balanced and select High performance.
In Windows 11, go to Start > Settings > System > Power & battery. Then, next to Power mode, choose Best performance.
Disk usage of 100 in Windows 10 or 11 won’t change if there are unresolved errors on the disk.
Fix 8: Check for disk errors
A disk at 100 in Windows 10 can be caused by errors on the disk, which can occur because of malware, corruption, power issues, physical damage, or other reasons. Since they can lead to data loss, disk errors should be addressed immediately, and Windows 10 will usually prompt you if it detects a hard disk problem.
But if you don’t get a notification and your disk is running at 100% usage, it’s better to be safe than sorry.
Here’s how to check for errors on Windows 10 using CHKDSK:
-
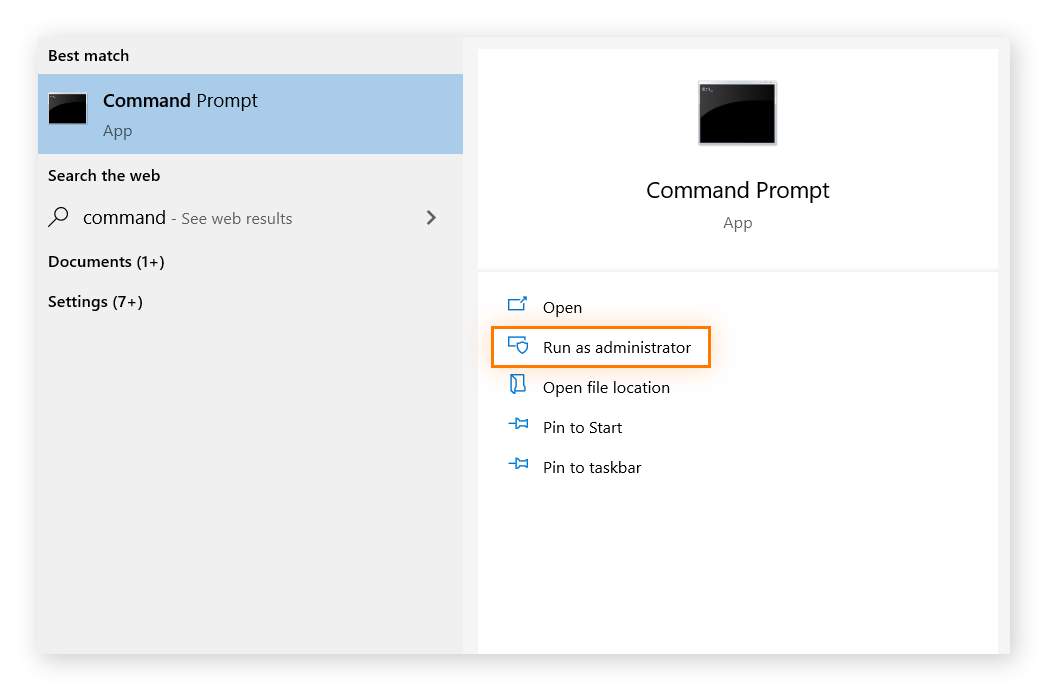
Type command prompt in the search box on the taskbar, click Command Prompt, and select Run as administrator.
-
When prompted to let the app make changes, click Yes.
-
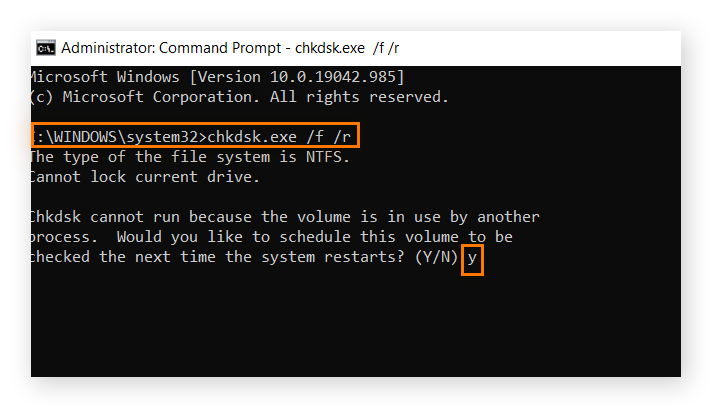
In the Command Prompt dialogue, type: chkdsk.exe /f /r and press Enter. Then type Y to finalize the disk check next time you reboot.
Running CHKDSK is the same process in Windows 11. You can also run a hard drive test to see if your drive is faulty.
A background process called Superfetch has been known to take the disk to 100 in Task Manager.
Fix 9: Disable Superfetch
Superfetch is a Windows feature designed to improve performance by optimizing your RAM. Superfetch anticipates what programs you’re going to use and pre-loads their data for you. This can decrease load times, but if you don't have the latest hardware, Superfetch can cause high disk usage.
You can try disabling Superfetch, but if that doesn’t help with your high disk usage, re-enable it to reap its performance-boosting benefits.
Here’s how to disable Superfetch in Windows 10 or 11:
-
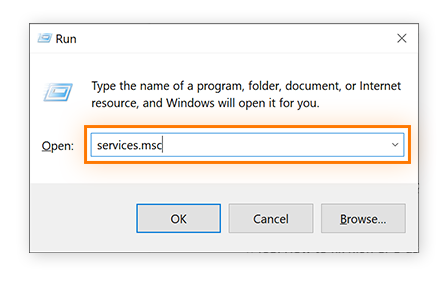
Right-click the Windows Start button and select Run. In the window, type: services.msc. Click OK.
-
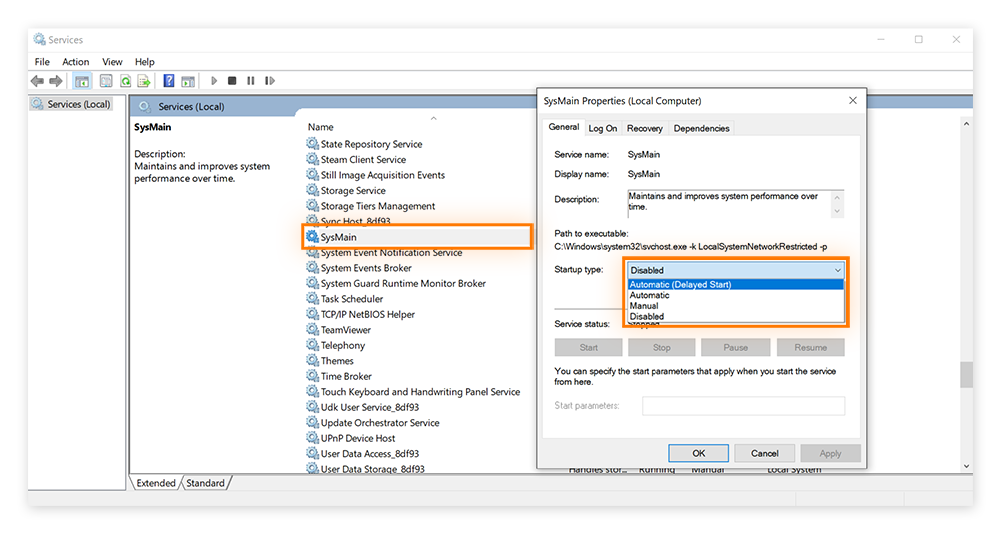
Under Name in the Services window, double-click SysMain, select Disabled, and then click OK and reboot your system.
Flash Player is another process that can create 100 disk usage on some systems.
Fix 10: Uninstall Flash Player
Adobe’s Flash Player was once popular for multimedia applications and streaming music and video. But since the end of 2020, Adobe no longer supports Flash Player and strongly recommends that you delete it.
If that’s not enough incentive, Flash Player updates consume unnecessary disk space and have been known to cause problems with Windows disk usage, like spiking it to 100%. Microsoft has already released system updates that automatically delete Adobe Flash Player.
If you haven’t removed it yet, here’s how to delete Flash Player with Adobe’s dedicated tool:
-
Click the Adobe uninstaller link to download the uninstaller for Flash.

-
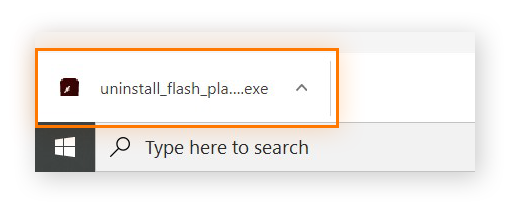
On the bottom-left of your window, click the downloaded file for the uninstaller. When asked if you want the app to make changes to your device, click Yes.
-
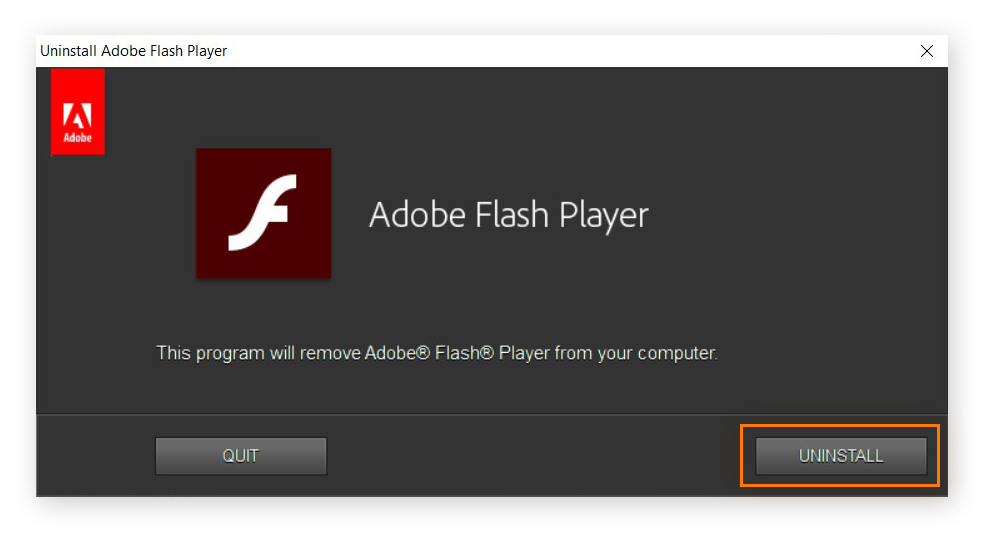
When the uninstaller opens, click Uninstall.
-
Follow the onscreen instructions and restart your computer when prompted.
Fix 11: Reset virtual memory
Virtual memory is a storage management technique that lets your computer’s RAM borrow space from your drive when it’s overloaded. Virtual memory will temporarily take data from your RAM and transfer it to your hard disk.
RAM (random access memory) is your computer’s short-term memory, responsible for immediate computing tasks like running an app or browsing the web. It’s faster than your hard disk, which is used for longer-term storage.
If you check your RAM, you’ll see it’s smaller than your main hard disk: generally 8 to 16 GB on an average desktop. If your RAM is maxed out, virtual memory will transfer some of the unused data to your hard disk into something called a swap file, freeing up more space on your RAM. It will swap the transferred data back to the RAM once you need it.
This is a great strategy on your system’s part, but it can also contribute to disk usage of 100% on Windows 10. The best solution is to add more RAM to your system, if you can — this isn’t possible on every computer.
If you don’t want to add more RAM, here’s how to reset your virtual memory on Windows 10:
-
On your keyboard, press the Windows key + Pause/Break key.
-
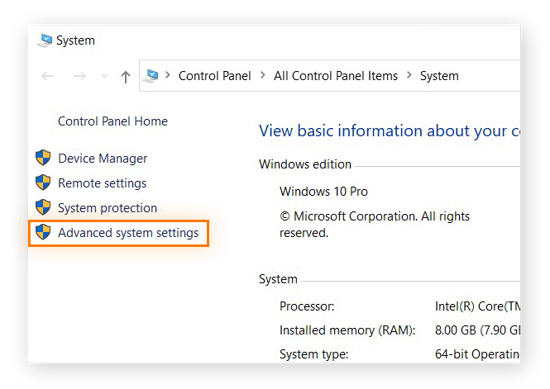
Click Advanced system settings on the left side of the window.
-
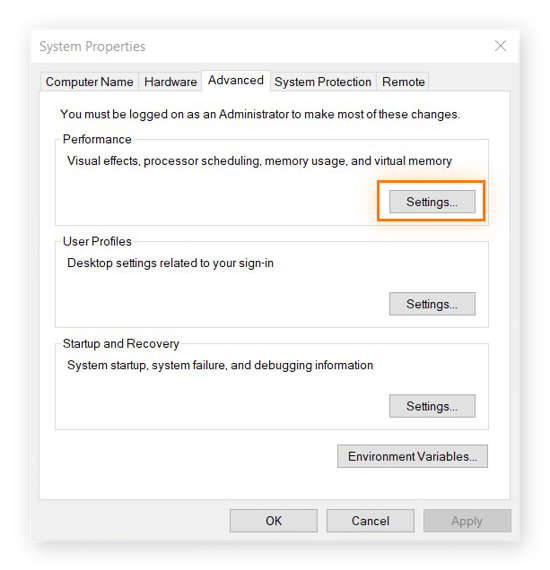
Under the Advanced tab in the Performance section, click Settings.
-
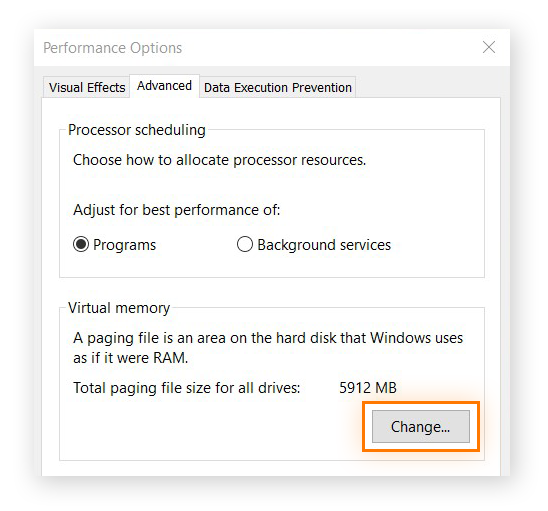
Under the Advanced tab, click Change in the Virtual memory section.
-
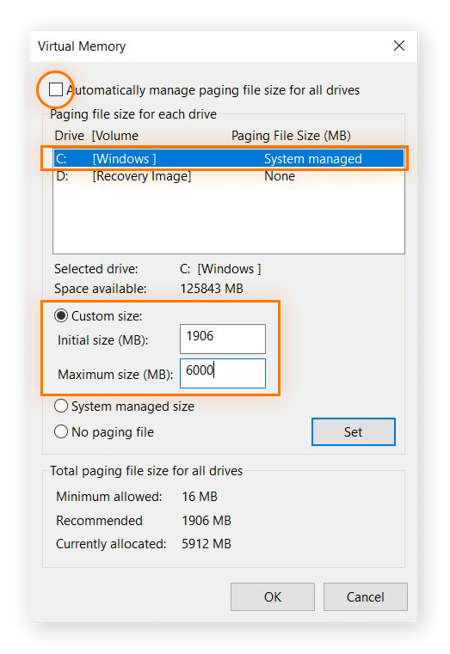
Untick Automatically manage paging file size for all drivers. Select the [Windows] drive and tick Custom size to set the values for Virtual memory. Click Set, then click OK. Here are a few things to keep in mind:
-
Initial size: This value depends on your computer’s specifications. If unsure, use the value next to Recommended.
-
Maximum size: This value should be about 1.5 times the size of your RAM. So if you have 4 GB (4096 MB) of RAM, you shouldn’t set your maximum value higher than 6000 MB.
-
-
Next, delete your computer’s temporary files. Press the Windows key + R. In the Run window that opens, type temp and press OK.
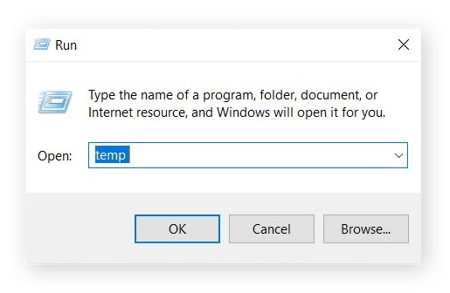
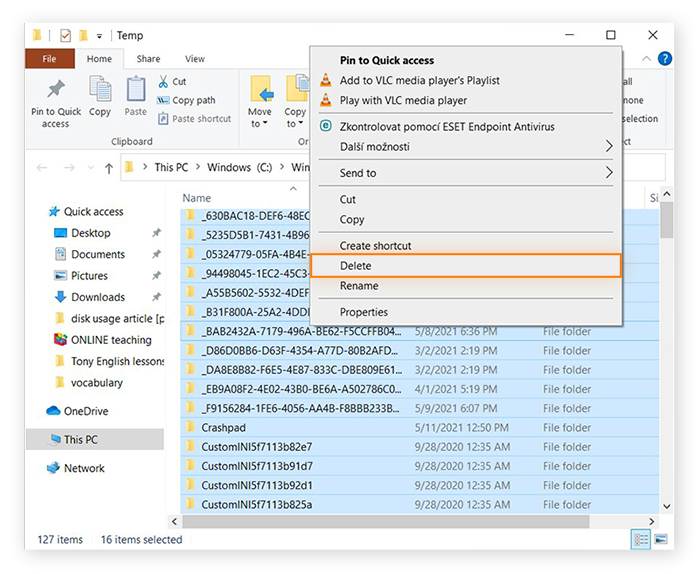
-
Select all the files in the Temp folder and delete them.
Your virtual memory on Windows 10 will now be reset.
Here’s how to reset virtual memory in Windows 11:
-
Open Search.
-
Search for “View advanced system settings” and click on View advanced system settings when it shows up underneath.
-
Under “Performance,” click Settings to open Performance Options.
-
Click the Advanced tab. Under “Virtual memory,” click Change to open Virtual Memory.
-
Untick Automatically manage paging file size for all drivers.
-
Select your drive (usually C:), then select No paging file and click Set.
-
On the confirmation prompt, click Yes.
-
Click OK.
-
Restart your computer to bring these changes into effect.
-
After your computer restarts, complete steps 1-4 again to re-open Virtual Memory. Re-tick Automatically manage paging file size for all drivers. Click OK.
-
Restart your computer again.
Disabling Windows Search can also stop 100 disk usage.
Fix 12: Disable Windows Search
Windows Search helps you search your computer, but it also pulls items from Microsoft’s Bing search engine, which slows down your system and can take you up to 100 disk usage. Disabling Bing, so it searches only for your local files, will put less stress on your disk.
Here’s How to Disable Windows Search in Windows 10 or 11:
-
Open Search. On Windows 10, you can search directly in the taskbar. On Windows 11, Search is a magnifying glass icon in the taskbar.
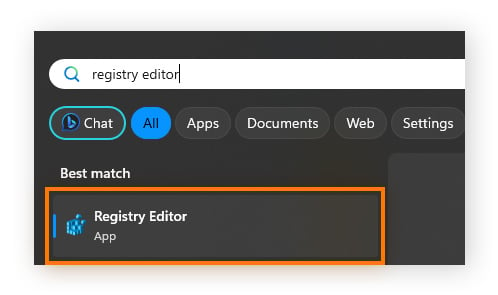
-
Start typing “registry editor” and then click Registry Editor.
-
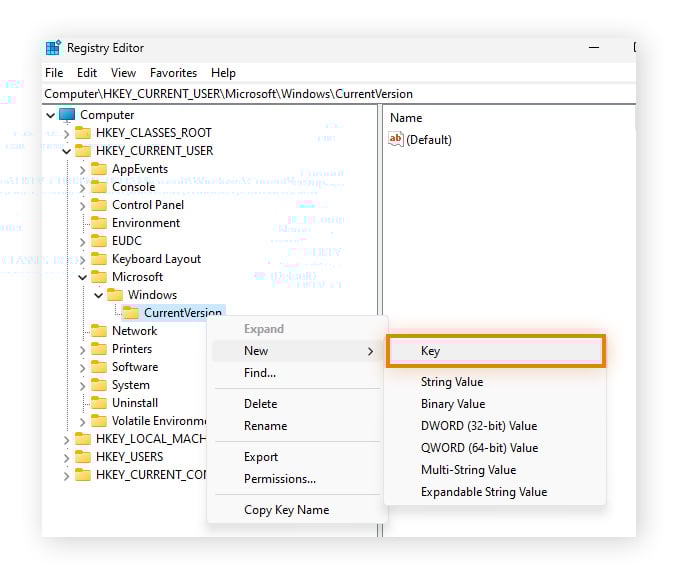
Double-click HKEY_CURRENT_USER. Double-click Microsoft. Double-click Windows.
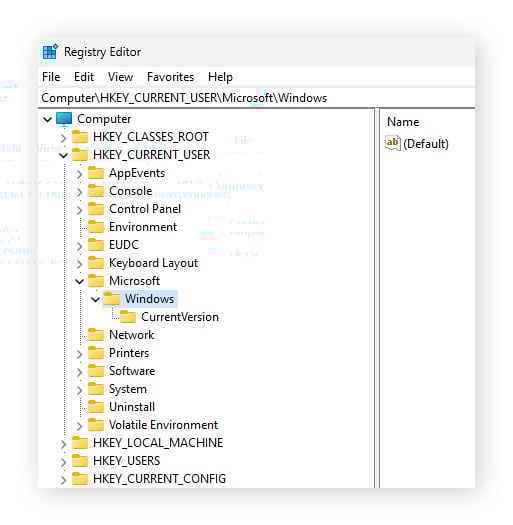
-
Right-click CurrentVersion. Select New>Key. This will create a subfolder under CurrentVersion.
-
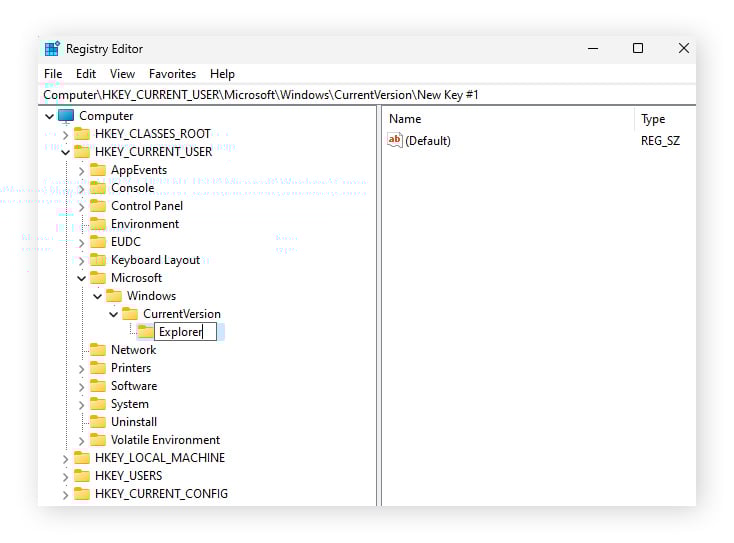
Name the new folder Explorer.
-
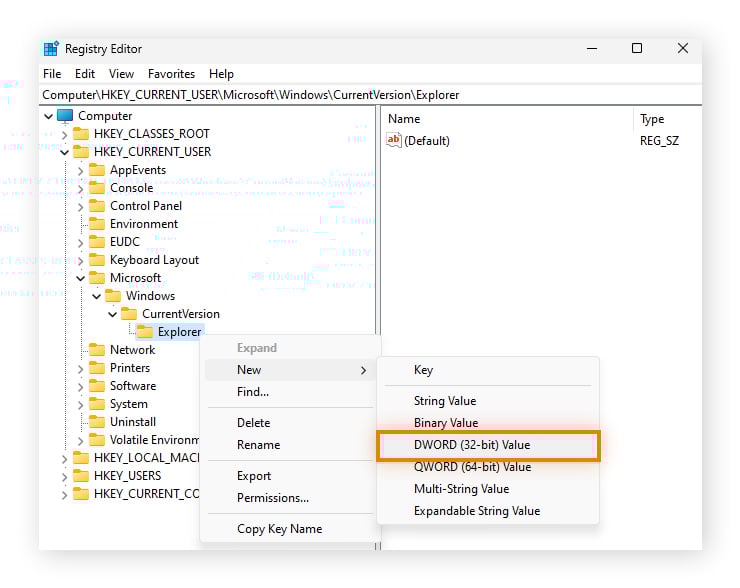
Right-click the newly created Explorer. Select New>DWORD (32-bit) Value. This will create a new registry entry under Name, below (Default).
-
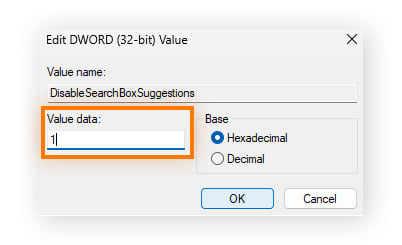
Name the new registry entry DisableSearchBoxSuggestions.
.png?width=788&height=534&name=MicrosoftTeams-image%20(54).png)
-
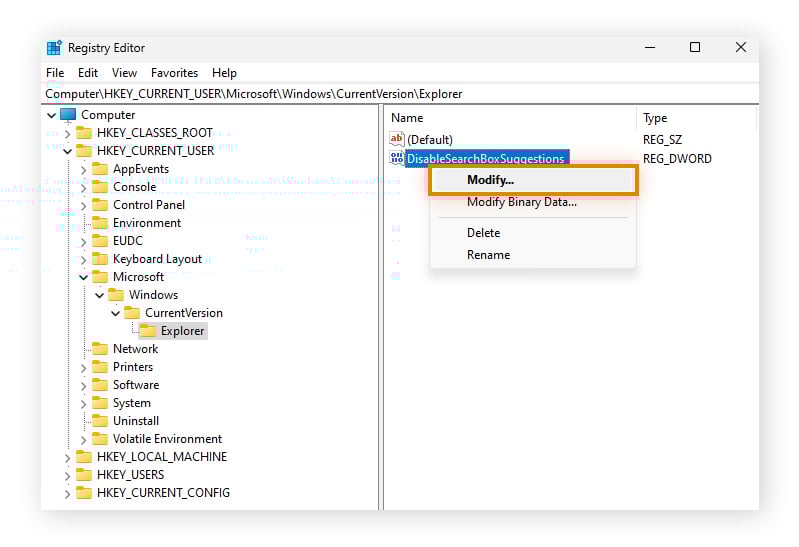
Right-click the newly created DisableSearchBoxSuggestions and select Modify.
-
Under Value data, type 1. Click OK.
-
Restart your computer.
Windows Search should now pull items only from your local computer, speeding up the search process and saving you disk usage.
If all else fails, perform a clean boot to see what’s causing 100 disk usage in Windows 10.
Fix 13: Perform a clean boot
A clean boot will restart Windows 10 with a limited number of drivers and startup programs. From there, you can reinstall third-party programs one-by-one to see if any of them are causing your system to use 100% of your disk.
Here’s how to perform a clean boot in Windows 10 or 11:
-
Open Search. In Windows 10, you can search directly in the taskbar. In Windows 11, Search is a magnifying glass icon in the taskbar.
-
In search, start typing “msconfig” and open System Configuration.

-
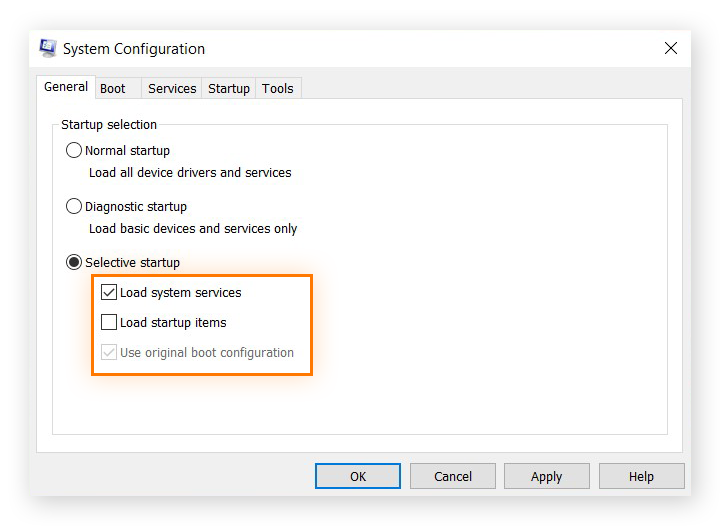
Under the General tab, tick Selective startup. Then, tick Load system services, untick Load startup items, and keep Use original boot configuration ticked.
-
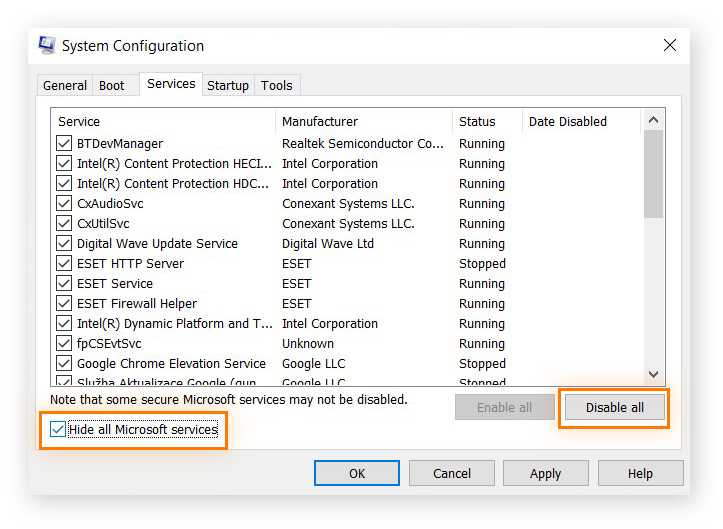
Under the Services tab, tick Hide all Microsoft services and click Disable all. Click Apply/OK and reboot your computer.
You may have already tried to delete programs or defrag your hard drive, but sometimes, you just need a fresh start.
If Windows 10 is using 100% of your disk, as a last resort, you can back up or clone the contents of your hard disk. Then, learn to format your hard drive to wipe it completely, before finally reinstalling Windows 10.
Do not try…
Although there are many ways to address the issue of 100% disk usage, avoid the following tactics:
-
Disabling BITS: BITS is a key component in Windows used to download system updates. Disabling this service will stop important updates, which could harm your system and security.
-
Disabling Windows Search Services: This commonly used feature indexes content and provides search results for emails, files, and other data. Once disabled, apps that rely on the service may not work properly.
-
Modifying page files: A page file is the hard disk space used by your system for virtual memory. It’s best to leave it so Windows manages this file. Don’t try custom values, which could further harm your hard disk.
-
Disabling antivirus software: It’s possible that malware is causing your high disk usage; disabling your anti-malware tool could put your system at risk.
-
Disabling Windows updates: Windows updates can include critical patches for security vulnerabilities. Without these updates, you could jeopardize your computer.
Windows 10 high disk usage: What’s causing it?
If you want to know what’s causing 100% disk usage, you need to figure out what’s making your hard disk work so hard.
Here’s how to analyze your hard drive and see what’s causing high disk usage in Windows 10 or 11:
-
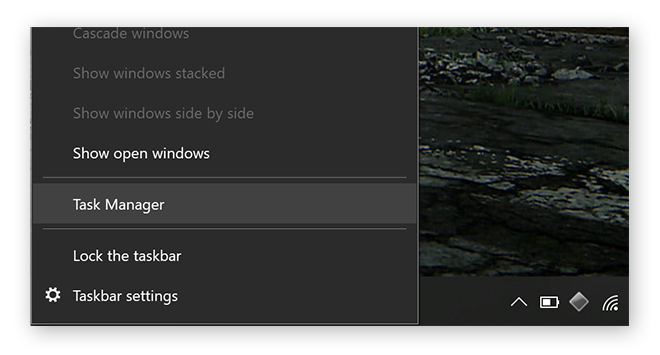
Open the Windows Task Manager by right-clicking on the task bar and selecting Task Manager. (Or use the keyboard shortcut: Ctrl + Shift + Esc.)
-
Click the Disk column in the processes tab of Task Manager to review all currently running processes. If the arrow at the top of the column is pointed down, the programs with the highest disk usage will appear first.
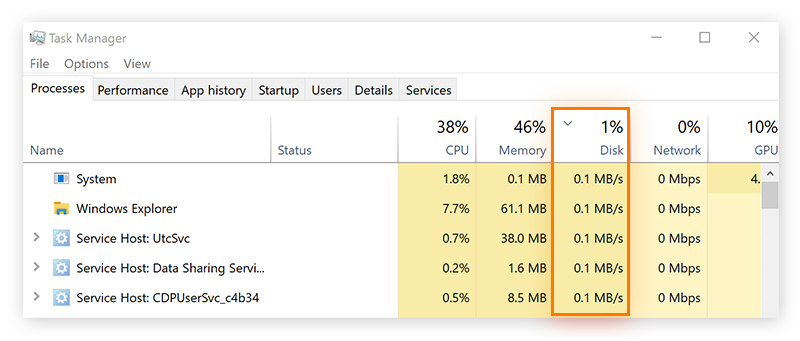
If there are bright orange boxes in the Task Manager Disk column, that means disk usage is high. Generally, any disk usage that exceeds 1 to 2 megabytes per second (MB/s) on individual processes is suspicious.
It’s common for your disk usage percentage to spike to 100% for a few seconds periodically, but it should quickly come back down to under 20%. If you’re constantly experiencing numbers close to 100% disk usage in Windows 10, there’s likely a problem you need to address.
High disk usage is more common on older PCs using hard disk drives to run modern software. HDDs are great for storage, but sometimes have trouble with the latest operating systems or games. One advantage of Solid State Drives vs HDDs is that SSDs can go idle more efficiently to reduce disk usage.
Your system using 100 disk is often only one aspect of a larger issue. A comprehensive cleanup tool like Avast Cleanup can automatically check, fix, and prevent hard disk errors, as well as clean up your browser, manage your apps, and much more.
Get a smoother computer with Avast
It’s possible that a single issue is causing high disk usage. But more often than not, it’s a combination of the issues detailed above. Managing every aspect of your Windows system can be a daunting task, which is why our performance experts built Avast Cleanup.
Avast Cleanup will thoroughly assess your device and automatically optimize it for peak performance. In addition to fixing disk issues, it will remove bloatware, clean up your browser, and tune up your Windows registry. Once your system is optimized, Avast Cleanup will maintain your device and automatically update your most important apps.
Get Avast Cleanup for a faster and cleaner Windows device today.
What customers say
More Performance Articles
How to Clear the Instagram Cache on Your Device

The Applications Folder on Mac: How to Find and Access Your Apps
How to Clear System Data or “Other” Storage from Your iPhone

How to Fix Corrupted Files on Windows Using SFC And DISM

How to Lower CPU Usage on Windows

How to Fix the Blue Screen of Death (BSOD) on Windows 10 and 11

How to Clean Your Computer Screen Without Damaging It
How to Clear Cache in Chrome and Other Browsers

How to Screen Record on Your Mac or Macbook (With or Without Audio)

How to Delete Cache and Cookies on Your iPhone
How to Clear the Cache on Your Mac

Android Safe Mode: How to Turn On & Disable Safe Mode on Your Phone
Cleaning
Performance
Deepan Ghimiray
1-07-2021